<?xml version="1.0" encoding="utf-8"?><feed xmlns="http://www.w3.org/2005/Atom" ><generator uri="https://jekyllrb.com/" version="4.4.1">Jekyll</generator><link href="https://darkgenesis.zenithmoon.com/feed.xml" rel="self" type="application/atom+xml" /><link href="https://darkgenesis.zenithmoon.com/" rel="alternate" type="text/html" /><updated>2026-02-15T09:58:13+00:00</updated><id>https://darkgenesis.zenithmoon.com/feed.xml</id><title type="html">DarkGenesis - Modern Indie Development</title><subtitle>Modern indie development blog featuring tutorials, insights, and content  all geared around Mixed Reality, Game Development, and emerging technologies.</subtitle><author><name>Simon (darkside) Jackson</name><email>darkside@zenithmoon.com</email></author><entry><title type="html">Evolving AI Plans</title><link href="https://darkgenesis.zenithmoon.com/evolving-ai-plans.html" rel="alternate" type="text/html" title="Evolving AI Plans" /><published>2026-02-05T16:00:00+00:00</published><updated>2026-02-05T16:00:00+00:00</updated><id>https://darkgenesis.zenithmoon.com/evolving-ai-plans</id><content type="html" xml:base="https://darkgenesis.zenithmoon.com/evolving-ai-plans.html"><![CDATA[<p>The world of AI is moving faster than most can keep up, by the time you have mastered one pattern, several others have cropped up.  If you do not keep a check on yourself, you could be left behind.  If you thought it was tough in the 80/90’s (I am old, I get it) with how fast things were evolving, then buckle up, we are now reaching lightspeed.</p>

<blockquote>
  <p>[!NOTE]</p>

  <p>Even my older AI blog posts are starting to feel old already, but I am enjoying the challenge!</p>
</blockquote>

<h2 id="new-patterns-for-a-new-age">New patterns for a new age</h2>

<p>The Bueller quote heading this article has never been more true, it seems almost daily I am reviewing the news, latest posts from ALL of the major partners involved with Agents and LLM’s for new patterns, ideas and suggestions.  Thankfully, everyone is riffing off each other in a good way, someone suggests or posts something, then someone else builds on that and goes that bit further, whether it is:</p>

<ul>
  <li>A new LLM logic.</li>
  <li>Improved MCP interfaces and tools.</li>
  <li>Patterns, plans and guidance.</li>
  <li>Token reuse or conservation.</li>
</ul>

<p>The list goes on, in some ways, it is like the best parts of collaborative science (in some ways, a dark dystopian nightmare), ever creeping forward.</p>

<p>This post was sparked after I followed up on some of these reports and started to see <strong>REAL IMPROVEMENT</strong> in several key factors in my own research, namely:</p>

<ul>
  <li>Reduced hallucinations (not gone completely, but significantly reduced).</li>
  <li>Improved memory (yes, you can have memory if you do it right)</li>
  <li>Improved outcomes.</li>
</ul>

<p>It almost sounds too true, but my workflow has improved, especially with some dedicated research projects I continually use to test new patterns.</p>

<blockquote>
  <p>[!WARNING]
This is NOT a silver bullet, to get more out, you MUST put more in, and thus the cost, depending on what you are using will INCREASE.</p>

  <p>My recommendation, as is becoming more of the goal in today’s market, is to HOST your own LLM infrastructure (they have it <a href="https://github.com/sipeed/picoclaw">running on Raspberry Pi’s now</a>).  It is possible with a little effort, and you can reduce your downstream costs to all but the critical path.</p>

  <p>Sadly, this is out of scope for this article, but I will try to add more later.</p>
</blockquote>

<p>So, what are these patterns I tease?</p>

<h2 id="evolving-patterns">Evolving patterns</h2>

<p>The updated patterns I have started employing recently fall into two categories with a single shared theme:</p>

<h3 id="shared-theme---the-living-document">Shared theme - The living document</h3>

<p>The core of the recent updates is to create <strong>LIVING DOCUMENTS</strong> at the core of any process.  This is a SINGULAR document (and you MUST be explicit, as some agents, looking at you Claude, will randomly go off and create masses of documents you did not ask for) which ALL agent calls must update with their state, or you inform it to update at critical junctures.</p>

<p>I have found this works far better than using the Memory MCP, or constantly updating the instructions guide for the agent, and as a separate document, you can create references to it from all other material, including the instructions.  In testing, this has been far more efficient and rigorously followed than instructions or memory alone.</p>

<ul>
  <li>You start the session with the instructions pointing to the living document</li>
  <li>The agent reads the current state with suggested next steps</li>
  <li>It validates any failures or bad paths from previous attempts</li>
  <li>It then plans ahead!</li>
</ul>

<p>Your mileage may vary, but this singular change VASTLY improves my outcomes.  Granted, at the cost of the additional tokens needed to read the document, hence the additional cost.  You “can” summarise the document in Agent format if you wish, but I have found this actually degrades its performance and use.</p>

<h3 id="patterns">Patterns</h3>

<p>Now to the other meat on the bone, the revised patterns that consume the living document.  I have long stated that LLM’s are more tuned to the small tasks, a quick fix, diagnosis, but where you need to dig deeper, you have to keep a better handle on the outcome, thus these are the methods I have now turned to using:</p>

<h2 id="it-all-starts-with-a-defined-and-reviewed-plan">It all starts with a defined and reviewed plan</h2>

<p>By far my biggest improvement through LLM use is to focus and narrow its path, to think and to constantly challenge its assumptions.  It is <strong>NOT</strong> foolproof, but it greatly improves your chances of a positive outcome.  The whole approach (which is token-heavy) is an almost constant state of review, approval, implementation and review, which when implemented, looks something like this:</p>

<ul>
  <li>First Agent session - Create the PRD (Product Definition) from a detailed set of requirements, this ensures a list of preferences and outcomes.</li>
  <li>
    <p>Build an instruction document using the PRD as a reference. Guiding the steps for planning, with KEY steps to avoid creating documents unless requested (stops the multi-document scenario).  This might sound counterintuitive, however, they serve very distinct purposes.  One directs how to think, the other tells the LLM what to think about.</p>

    <blockquote>
      <p>[!IMPORTANT]
Ensure to leave off with a note about the aforementioned <strong>Living Document</strong>, instruct the agent to check the Living document at the start of a prompt and update it with its intent and finish the query with a statement in the living document as to the outcome.  This trains and helps the Agent learn, as well as something to pick up on if you start a completely fresh session.</p>
    </blockquote>
  </li>
  <li>
    <p>Next, start a completely new session (even with another agent if you wish), define the session as a reviewer / architect actor and have it review and improve the plan.  Take note of what has changed and follow its thinking.  Make corrections where <strong>YOU</strong> disagree. It is essential you are part of this review process, as key decisions that were maybe not clear in the design become apparent (as often happens in life, poor design leads to poor outcomes).</p>

    <blockquote>
      <p>[!NOTE]
You can repeat the previous step a few times with different defined actors, different personas, just as you would in real life.  The best plans involve a team, and in this case, it is a team of agents AND YOU!</p>
    </blockquote>
  </li>
  <li>At the end, ensure to begin the plan with a Living document record as it delivers the implementation.</li>
</ul>

<p>Once you are happy with the plan, the next step begins, the following two patterns can be taken:</p>

<h2 id="plan-big-but-follow-your-own-path">Plan big but follow your own path</h2>

<p>With the plan in hand, instruct the Agent to document and detail the plan for implementation, <strong>ALWAYS</strong> ensure you finish with “If you have questions, ask them before beginning” (If you do not, it will not, and it ABSOLUTELY SHOULD).  The outcome choice is up to you:</p>

<ul>
  <li>A singular implementation document.</li>
  <li>Several documents, one for each stage or component, ordered for implementation.</li>
  <li>A mix, depending on your style, backend first, then frontend and UX.</li>
</ul>

<p>Ultimately, this is a plan <strong>YOU</strong> will follow, this is my preferred mode as it gives more opportunity to question as you implement or even change your choices.  All the agent has effectively done is ratify the architectural state based on your inputs, it is arguably the most human way to use the tools to achieve your goals.</p>

<p>If anything is unclear, ask the LLM to clarify, make changes or explain something <strong>“BUT ONLY TO THE PLAN”</strong>, the Agent should NOT touch the code, that is your domain.</p>

<blockquote>
  <p>[!NOTE]
In my experience, when instructing the planning phase, I also interject to ask the Agent to explain each section or block of code, as to its intention, what it is meant to achieve, or what it is supposed to do.  This helps guide the implementation as to whether it is the best thing to do.  And if you disagree, get it to update its plan, or make your own implementation and then get the Agent to update the spec, then review for ancillary impacts.</p>
</blockquote>

<p>This approach feels more like the Agent working cooperatively than running the show and seeing what it comes out with.</p>

<blockquote>
  <p>[!IMPORTANT]
At each stage, with each change, ensure to instruct the Agent to update the living document.  It might be recorded in the Instructions, but I feel safer double-checking at critical points.</p>
</blockquote>

<p>At all points, question everything, it is simply good for the soul and makes the challenge more fun.  All that is left is to continue to the end, test everything and the result I have found to be vastly improved.</p>

<blockquote>
  <p>[!TIP]
Another fun step, but at the cost of tokens, is to ask the Agent from time to time to review what you have actually implemented against the plan and give a status report (helps to reduce human error), marking the document with AI’s favourite thing, Icons and Emoji’s.  As well as providing a summary, as well as giving you a visible checkpoint of your progress.</p>
</blockquote>

<h2 id="automated-plan-automated-deployment">Automated plan, automated deployment</h2>

<p>The automated plan follows a similar track to the manual implementation path, except you ensure to break out the plan into repeatable and testable sections.   It is not as efficient as the manual path, but for shorter and more throwaway experiments, it can be beneficial.</p>

<blockquote>
  <p>[!NOTE]
In some cases, I am actually running the two approaches in Parallel!  Using the fast route to test theories in advance before incorporating them into plans, similar to prototyping.</p>
</blockquote>

<p>Rather than the human doing the implementation, the agent is running the show, but CRITICALLY, not all at once.  To avoid hallucinations and dreams of code, each section must be complete, testable and ultimately HUMAN VERIFIABLE.</p>

<p>An example of this was a total conversion of an old game sample in C++ using some REALLY legacy assets. The plan broke down as follows (granted after so many failed attempts in the past):</p>

<ul>
  <li>Review the project and break up / document the systems and content of the sample.</li>
  <li>Research old asset formats and create detailed documentation of their makeup (critical for migration).</li>
  <li>Build out sample sets of each content type and define a migration strategy.</li>
  <li>For each asset type, build individual pipelines, with human verification at each step.</li>
  <li>Then implement the migration in individual sessions or phases, each phase does NOT complete until the human in the process signs off on it.</li>
  <li>Then plan the implementation, in a stackable way, each implementation building on the last, again with human signoff.</li>
</ul>

<p>Doing this phased approach with signoff greatly avoids mass delusion and lots of wasted tokens on something that can never ultimately work.</p>

<blockquote>
  <p>[!IMPORTANT]
The human as part of the process is essential, not just for the quality of the output, but also as an efficiency surrounding costs and tokens.  Yes, it is more effort than vibe-coding a website or app, but the results are FAR superior.</p>
</blockquote>

<h2 id="conclusion">Conclusion</h2>

<p>Thus ends this page in our journey, but the destination is still far from sight.</p>

<p>Learning should never end and we should always strive for improvement, and in my humble view, this is in <strong>Cooperation</strong> with an agent and not just handing over the keys on a prompt, no matter how detailed, as it is ultimately flawed.  We learn more along the journey, take those understandings and evolve a better plan.  It is strange, in the many years as a Project Manager, designer, QA and even analyst, this is ultimately how we humans work better, we plan, we question, we revise and ultimately deliver a better outcome.  It might not be perfect, but from that, we continue to build better.</p>

<p>Enough musing, back to the code, which is where I feel most at home, with my new pal sitting on my shoulder.
(Still not sure whether it is a little angel or devil, but let us see where this leads)</p>]]></content><author><name>Simon Jackson</name></author><category term="Announcements" /><category term="agents" /><category term="llm" /><category term="ai" /><summary type="html"><![CDATA[To quote Bueller, Life moves pretty fast. If you do not stop and look around once in a while, you could miss it. Which is what happens if you do not re-evaluate your AI tools often.]]></summary></entry><entry><title type="html">DarkGenesis Redesign In Progress</title><link href="https://darkgenesis.zenithmoon.com/redesign-in-progress.html" rel="alternate" type="text/html" title="DarkGenesis Redesign In Progress" /><published>2025-12-15T16:00:00+00:00</published><updated>2025-12-15T16:00:00+00:00</updated><id>https://darkgenesis.zenithmoon.com/redesign-in-progress</id><content type="html" xml:base="https://darkgenesis.zenithmoon.com/redesign-in-progress.html"><![CDATA[<p>The DarkGenesis blog is undergoing a complete modern redesign. All existing URLs will be preserved for SEO continuity.</p>

<blockquote>
  <p>[!NOTE]</p>

  <p>This is a living redesign log; content and layout may change as features land.</p>
</blockquote>

<h2 id="2026-needed-a-refresh">2026 needed a refresh</h2>

<p>One of the things I dread is revisiting the design, style, or even template I use for my blog.  I spend far too long browsing lots of cool things, find something I like only to find it is either not deployable or has “hidden” issues.  The end result is always a trade off between what I want/like and what the template is capable of.</p>

<p>So this time things are different, using tools available (I still refuse to use a site generator), I began the journey using all the tools at my disposal to generate the site fresh, give it a modern look and then use AI tools to help refine/change what I did not like.</p>

<p>Still very much a work-in-progress, but delivered far faster using the tools available to me.  I hope you like it.</p>

<p>The rest of this post is my ongoing test to ensure styles work, features are as expected and nothing “breaks” :D</p>

<p>Feel free to skip the rest and move on :P</p>

<h2 id="example-post-image">Example post image</h2>

<p>This post uses a date-based image folder so it’s obvious which images belong to which post:</p>

<p><code class="language-plaintext highlighter-rouge">/assets/img/posts/20251215/redesign-in-progress/</code></p>

<p>The banner image is referenced via front matter (<code class="language-plaintext highlighter-rouge">img:</code>) and can also be embedded inline:</p>

<p><img src="/assets/img/posts/20251215/redesign-in-progress/hero.svg" alt="Redesign in progress banner" /></p>

<h2 id="whats-coming">What’s Coming</h2>

<ul>
  <li>Modern responsive design</li>
  <li>Dark mode support</li>
  <li>Enhanced search</li>
  <li>Better accessibility</li>
  <li>Social media integration</li>
</ul>

<p>Stay tuned!</p>

<h2 id="markdown-support-quick-validation">Markdown support (quick validation)</h2>

<p>Inline code looks like <code class="language-plaintext highlighter-rouge">bundle exec jekyll serve</code>.</p>

<p>Strikethrough works: <del>old plan</del> new plan.</p>

<h3 id="fenced-code-block">Fenced code block</h3>

<div class="language-ruby highlighter-rouge"><div class="highlight"><pre class="highlight"><code><span class="nb">puts</span> <span class="s2">"Hello from Ruby"</span>
</code></pre></div></div>

<h3 id="task-list">Task list</h3>

<ul class="task-list">
  <li class="task-list-item"><input type="checkbox" class="task-list-item-checkbox" disabled="disabled" checked="checked" />Jekyll build works on Windows</li>
  <li class="task-list-item"><input type="checkbox" class="task-list-item-checkbox" disabled="disabled" />Add more posts</li>
</ul>

<h3 id="table">Table</h3>

<table>
  <thead>
    <tr>
      <th>Feature</th>
      <th>Status</th>
    </tr>
  </thead>
  <tbody>
    <tr>
      <td>Fenced code blocks</td>
      <td>✅</td>
    </tr>
    <tr>
      <td>Tables</td>
      <td>✅</td>
    </tr>
    <tr>
      <td>Task lists</td>
      <td>✅</td>
    </tr>
  </tbody>
</table>]]></content><author><name>Simon Jackson</name></author><category term="Announcements" /><category term="blog" /><category term="announcement" /><summary type="html"><![CDATA[The blog is being redesigned with modern features while preserving all existing URLs.]]></summary></entry><entry><title type="html">Using AI tooling effectively - a lessons learned exercise</title><link href="https://darkgenesis.zenithmoon.com/using-ai-tooling-a-lessons-learned-exercise.html" rel="alternate" type="text/html" title="Using AI tooling effectively - a lessons learned exercise" /><published>2025-11-21T00:00:00+00:00</published><updated>2025-11-21T00:00:00+00:00</updated><id>https://darkgenesis.zenithmoon.com/using-ai-tooling-a-lessons-learned-exercise</id><content type="html" xml:base="https://darkgenesis.zenithmoon.com/using-ai-tooling-a-lessons-learned-exercise.html"><![CDATA[<blockquote>
  <p>TL; DR -&gt; Whether or not you are for or against AI, if you do not at least read up on the landscape and the capabilities out there you WILL fall behind.  These tools can be used in many different ways and provide support where you least expect it.</p>

  <p>It is not about taking away the fun tasks, if you do not want it to code for you, then stop, want to create your own artwork, fine do that.  But do not discount the capabilities of the tools because of preconceptions.</p>

  <p>You do not need to use it, but understanding what you CAN use it for better arms you in the road ahead to know what you are up against.</p>
</blockquote>

<h2 id="work-smarter-not-harder">Work smarter, not harder</h2>

<p>The evolution of AI tools is ever increasing, as is any technology or area that is adopting these tools.  It was already an almost impossible task to “keep up” with advances, causing developers and engineers to keep narrowing their specialties, reducing the mental load to be able to take in the latest and greatest.</p>

<p>Since the unveiling of the current generation of AI tooling, the curve keeps getting sharper and sharper with facilities such as:</p>

<ul>
  <li>Guides on instructions to provide consistent context between queries.</li>
  <li>MCP servers and their capabilities have increased.</li>
  <li>More and more LLM model services for injecting capabilities into a workflow or service.</li>
  <li>Prompt generation research.</li>
  <li>New agent modes from Chat -&gt; Agent -&gt; Planning -&gt; …</li>
</ul>

<p>The list goes on and keeps getting bigger, refinements, new tools, new features.  Like any technological “revolution” its speed is increasing.</p>

<blockquote>
  <p>[!NOTE]
However one thing remains clear and should not be underestimated, is that AI <strong>STILL</strong> does not know it is right.  So always be on your guard and check the facts!  But that does not mean you should not use the tools, just learn the correct ways to work with the tools.</p>
</blockquote>

<p>Based on my understanding (at the time of writing), this article aims to impart how my workflow has evolved to a level where I can institute “some” level of trust in my processes with the results from AI.</p>

<blockquote>
  <p>[!NOTE]
Fun fact, even today when I started writing this post, I listened to a <a href="https://jesseliberty.com/2025/10/10/james-montemagno-on-vibe-coding/">podcast with Jesse Liberty</a> that featured “James Montemagno on Vibe Coding” ( a term I do not like tbh).  In this episode James mentions a few “tricks” I had not considered before, such as using AI to generate the tool or a prompt based on your current activity to enable you to do that activity faster next time.  Effectively engineering your workflow as you DO IT.</p>
</blockquote>

<h2 id="it-starts-with-a-prompt---the-misconception">It starts with a prompt - The Misconception</h2>

<p>I have said it previously, but it is worth repeating.  Long gone are the days when you put in a simple question to get an answer or complete a task to fulfil.  Sure, on your phone or via your browser, the results are FAR BETTER than dropping it into Bing/Google, but for any serious workflow. Without content/structure and even architecture, the most basic of queries will not result in anything that resembles what you desire.  (except for that one day in march where the hares are flocking).</p>

<blockquote>
  <p>[!IMPORTANT]
<strong>AI is suggestive, it is not indicative.  It NEVER knows if it is right, only that the probabilities align with a result compared to your query.</strong></p>
</blockquote>

<p>So let us breakdown the critical paths as I understand them at the moment.</p>

<h3 id="generate-instructionsagent-document">Generate Instructions/Agent document</h3>

<p>Instructions or Agent guides are critical to modern AI interactions, they define the background to your request/conversation, define the scope of the work and critically also inform the AI of any boundaries it should not cross.  Traditionally, it is also used to define the architecture to follow and conventions to use, but it can also be used as a thought board.</p>

<p>Do not think of your instructions as a static document, it is a living/breathing entity that should grow and learn as your project evolves.  Include tips/tricks, any repeated lessons or “daft things” the AI performs that you would rather it did not.</p>

<blockquote>
  <p>[!IMPORTANT]
The instruction guide is sent as a pre-context to EVERY chat/conversation, this is information it should know whenever it is sent off to think about anything!</p>

  <p>But do not worry about its length or performance, the local agents “tune” the instructions and summarize it for easy digestion.  You would be surprised about how much “pre-processing” happens in your client before it even contacts the cloud AI agent.</p>
</blockquote>

<p>Simple steps to follow as your project evolves, whether it is a coding session, a Q&amp;A query or just taking notes for a subject:</p>

<ul>
  <li>If you have an existing project, use the built in VSCode (or other tool) “Generate Instructions” to set an initial framework.</li>
  <li>If you are beginning thoughts for a project, start a conversation with the aim of generating this instruction guide.</li>
  <li>Keep refining the instructions, with or without AI help to frame future conversations.</li>
</ul>

<p>Above ALL, keep reviewing the instructions manually after generation, do <strong>NOT</strong> just trust the result, it is meant as a starting point not a finish line.  Keep reviewing, updating and even deleting content until you are satisfied with the result.  And as your project grows, so should your instruction guide.</p>

<h3 id="use-mcps-relevant-to-your-process">Use MCPs relevant to your process</h3>

<p>MCP servers are fast becoming the “go to” tool to assist in local AI support and cut down on the amount of traffic used by cloud agents, they help form, and in some cases, generate results to assist the AI in its journey, these can range from:</p>

<blockquote>
  <p>[!TIP]
Model Context Protocol servers, or MCP for short actually details the method used to communicate from an AI LLM with a local AI or context agent, a tool used to support AI on its journey.  Their capabilities can range from just an API for serving data or results, to full blown AI agents themselves.  The MCP protocol effectively allows AI’s to talk to each other and work together to reach a goal.</p>
</blockquote>

<ul>
  <li>Simple functions used in calculations or a fact table.</li>
  <li>Headers for local AI agents or models, such as image generation.</li>
  <li>Self-contained LLM’s, primarily used for documentation or API references.  Useful for keeping the AI bound to accurate source information rather than just the web.</li>
  <li>Proxies to other cloud hosted AI agents, woven together to form a mesh.</li>
</ul>

<blockquote>
  <p>[!NOTE]
Do not be afraid to AI your own MCP server locally, if you find certain areas where you are constantly correcting the AI agent, or need it to use pre-defined terms in its response, then just generate your own server to manage this for you and update your instructions to defer to the MCP server in responses.  This can lessen the load in your instructions if you can have an agent maintain it for you.</p>
</blockquote>

<p>Each MCP effectively adds another tool the AI can use in the construction of a response as well as off-loading tasks locally to save time or money (credits), or in some cases MANY tools.  And there is a growing movement where you can use AI to generate your own local MCP servers, especially for repeated tasks or guardrails.</p>

<blockquote>
  <p>[!IMPORTANT]
<strong>Too many tools can degrade performance</strong>
While having lots of MCP servers at the ready is fantastic, be aware you need to limit which Servers/Tools are active at any one time.  Giving the AI too many options can severely degrade performance as it need to check the toolset with each interaction (even within a response) to see if there is a tool to help.</p>

  <p>Make sure for each interaction/conversation, that you are using the tools that will assist with that thread.  Not asking it about code or pull requests, then disable the GitHub MCP tools.  Also critical for any language or toolset focused conversations.  Just use the tools that will help with your query.</p>
</blockquote>

<h3 id="create-custom-prompts-for-repeated-tasks">Create custom prompts for repeated tasks</h3>

<p>A recent trick I picked up surprised me how effective it was.  If you find yourself either asking the same question, or making the same corrections, or even just doing the same thing repeatedly, then stop and just make a new customized prompt for yourself.</p>

<p>You see these already when in VSCode you hold <code class="language-plaintext highlighter-rouge">ctrl + shift + P</code> (or <code class="language-plaintext highlighter-rouge">cmd + shift + P</code> on Mac) to bring up the command window, from here you see regular actions available to you based on the extensions you have installed and the MCP servers you have registered.  Once activated, they complete a set of tasks using what is available to perform an operation, be it cloning a repository, or formatting your document (my most used command).</p>

<p>But you can also create your own, and again, use AI to help you generate it.  In the middle of a conversation when you have completed a task, ask the AI to summarize the task that was completed and ask it to generate a new Command in the tool.  You will get the source for the command, allowing you to tweak it to your needs (and likely remove some unnecessary steps) and then save it with a command name, thus, every time you need to perform the same task, save yourself some keystrokes and just launch your command instead.</p>

<h3 id="leverage-resources-online">Leverage resources online</h3>

<p>A common misconception when working with AI Agents, is to assume it is trawling the web for the current/latest information, sadly this is not true (in the most part), LLM’s rely on historical information they have been trained on.  If there is newer information, it is best to direct the AI to also read specific documents, websites or other sources of information in addition to its trained model.</p>

<blockquote>
  <p>[!IMPORTANT]
Although this does not “train” the AI in new information, the data that is gathered is only summarized and used as part of the current conversation.  If you asked it again in a new conversation without providing the source, it will not know.</p>
</blockquote>

<p>You can add such sources to your instruction guide, although it will only be summarized from the last time you generated the guide, alternatively you can either use an MCP server such as “Context7” (A useful docs MCP) or generate your own MCP server that refreshes its memory from online sources that you critically rely upon, like your companies document server.</p>

<h3 id="cost-management---the-hidden-tax">Cost Management - The hidden tax</h3>

<p>While many of the tools we use today offer generous free tiers or fixed monthly subscriptions, the move towards “pay-as-you-go” models for advanced agents and API access brings a new consideration: Cost.</p>

<p>Every interaction with an AI is not just the question you ask; it includes the entire conversation history, your instruction guides, and any files you have attached.  This “Context Window” is re-sent with every single query.  If you have a long-running chat with megabytes of code attached, you are paying for that data transfer every time you press enter.</p>

<blockquote>
  <p>[!IMPORTANT]
<strong>Token Hygiene</strong>
To keep costs (and latency) down, practice good token hygiene:</p>

  <ul>
    <li><strong>Start fresh:</strong> Do not keep one giant chat going forever. Start a new conversation for each distinct task.</li>
    <li><strong>Limit context:</strong> Only attach the files relevant to the specific question.</li>
    <li><strong>Watch the loops:</strong> Autonomous agents that “think”, “plan”, and “verify” can trigger dozens of internal calls for a single user request.</li>
  </ul>
</blockquote>

<p>Being mindful of your token usage does not just save money; it often results in faster and more accurate responses because the AI is not distracted by irrelevant noise from 50 messages ago.</p>

<h2 id="change-your-workflow">Change your workflow</h2>

<p>AI tooling should not be just about work, used correctly, you can use the tools to influence or guide almost any task, such as:</p>

<ul>
  <li>Guided research.</li>
  <li>Ideation and thought generation.</li>
  <li>Validating preconceptions.</li>
  <li>Applying structure.</li>
  <li>Architecture compliance.</li>
  <li>General validation.</li>
</ul>

<p>And these are just from my building workflow over recent months/years.  Using AI to not just do work, but to plan, evolve, generate more tools to further accelerate your workflow, defining the ultimate development method of DRY - Do not Repeat Yourself.</p>

<blockquote>
  <p>[!TIP]
Did you know there are several “MODES” of AI usage now?  Not just Agentic (Agent) or “ask” (query), but also “Plan”, which is great for digging deep and coming up with a stepped plan of actions which you can either get the AI to start working from or do yourself, as well as several others and even custom modes you can create yourself, tailor the experience to meet your needs.</p>
</blockquote>

<h3 id="guided-research">Guided research</h3>

<p>When researching any topic, wading through mounds of documents, websites, information and searching for the latest (or even historical) information can be very time consuming.</p>

<p>Granted, this should be treated as source material and taken with a grain of salt as critical facts will need to be verified.  Even with recent advances in correction and validation, it is still just an approximation.  In many cases, it is worth asking different agents to read over the results and verify sources for cases.</p>

<p>You might think, why bother, if the information is potentially unreliable what is the point.  But the answer is simple, the AI can search through data to find you a shortlist far quicker than any human can, reducing the scope of your research with summaries.</p>

<p>But do not stop there, keep iterating the results upon itself, demand references and lookups to the latest sources to verify the results, which in the end results in data you can rely on for your studies.</p>

<blockquote>
  <p>[!IMPORTANT]
Even so, in research and summarizing the research, use your own words.  Use the data as refined source material which is just a smaller window of the wider world contained within results.  The ultimate aim is to save you TIME, if nothing else, it can also type faster than you can.</p>
</blockquote>

<h3 id="ideation-and-thought-generation">Ideation and thought generation</h3>

<p>A concept I have also been using AI tooling for of late is idea generation.  You get a half sleep deprived thought or waking moment of “something”, it sounds fine in principle but will it work.</p>

<p>This is where, depending on the type of project it is, I will lean on AI tooling to help ratify my thoughts:</p>

<ul>
  <li>Has this been done before, if so what worked and what did not.</li>
  <li>Is there any market opportunity for such an idea.</li>
  <li>Summarizing options for “go-to market” strategies.</li>
</ul>

<p>If the idea is a solution, even using GitHub Copilot to form a new project automatically, generating source, identifying workloads and deployment options.  Which it will take on, generate a new repository, and start building out the framework of a potential solution (fantastic for web solutions).  Give it enough detail, apply references for similar things you have in mind, and set it off.  All of which will happen without you being involved (or even at your desk) thanks to workflow agents.</p>

<p>It does not need to end up with something real, except to prove to yourself whether something is valid or even possible.  It gives you a framework to build upon and cuts down the time involved in your personal research.</p>

<h3 id="validating-preconceptions">Validating preconceptions</h3>

<p>Often during my development and management life, we build our own internal bias, it is not always intentional and can lead you to incorrect assumptions.  My geography knowledge for instance, is waaay out of date.</p>

<p>Most consumers of AI will turn to the agent on their phones for a quick query, usually with FAR better results than a one line google search (with so many Ad results these days), the results are better, but usually very inefficient.</p>

<p>I have been “trying” to teach my family a better etiquette for searching with AI assistance, forming not just a question but also how to form the response, for example:</p>

<p>Instead of just:</p>

<div class="language-text highlighter-rouge"><div class="highlight"><pre class="highlight"><code>What are the best locations to go on holiday in June?
</code></pre></div></div>

<p>Better to give the AI heads up as to what you are really looking for:</p>

<div class="language-text highlighter-rouge"><div class="highlight"><pre class="highlight"><code>I am looking to go on holiday in June, what are the best locations to visit?  I prefer hot locations (but not too hot) with spa facilities and a good nightlife.  Make sure to also review other visitors reviews of locations and only include places that reviewed well.  Form the results into a table listing the destination, the hotel or cabin, average review rating and links to booking information.  Also check the sustainability rating for the areas to ensure it is not over populated with tourists and has affordable travel insurance (around £30 pp)
</code></pre></div></div>

<p>This structure of query is simply more informative while staying natural and tries to tick as many boxes as possible for what you are REALLY looking for:</p>

<ul>
  <li>What is the purpose of the search.</li>
  <li>What are the constraints.</li>
  <li>How you want the results formatted.</li>
  <li>And additional concerns or limitations.</li>
</ul>

<p>This is just an example, but as time and tide has shown us, the more effort you put into defining your question (and results) the better the output will be and reduce the need for further onward searches to clarify results.</p>

<h3 id="applying-structure">Applying structure</h3>

<p>One of the hardest parts in any software (or other designs) is architecture, how well formed the solution needs to be.  What constraints are needed, which conventions should be used and where the checkpoints need to be in order to avoid pitfalls.</p>

<p>Of the many designs I have done in the past, it is always the longest struggle to keep constantly refining the structure around any project, whether it is in design or implementation.  What other considerations need to be considered or applied.  Even with many years of training and experience, you always wonder “what if” or try to evaluate uncommon scenarios that could affect operation.</p>

<p>Using AI tooling to review the architecture, critically looking for “things you did not consider” is crucial.  Even if you choose not to act on the information as it is not relevant, having another set of eyes with a much larger dataset can really help.  I have solved many an issue in a junior’s design, as have my seniors done for me, so why not also use the tools available for a third set of eyes.</p>

<p>Defining a well architected solution leads into the next section for using AI to ENFORCE that architecture and prevent future works overriding the design (or at least get them to question the approach).</p>

<h3 id="architecture-compliance">Architecture compliance</h3>

<p>With any well defined architecture, adhering to that architecture can be challenging.  But you can use the AI to help provide a ground truth based on the defined architecture, as well as verifying how compliant any development work undertaken is.</p>

<p>Additionally, the architecture itself can be used as a guide for any future work, using the implementation, design or instructions to inform work that is being undertaken.</p>

<p>As an example, I was building a new component within a service driven architecture and the AI tooling correctly identified all the key touchpoints within the architecture to add the new component, as well as adding Unit tests around the feature.  It derived everything it needed from:</p>

<ul>
  <li>The existing implementations</li>
  <li>The documentation associated with the project</li>
  <li>Designed instructions surrounding the architecture and bounds</li>
  <li>And existing Unit tests for other services (in fact it suggested some additional tests which we then implemented across the board)</li>
</ul>

<p>This also meant that new work complied with the existing architecture and made the final review and update a lot quicker and simpler, I would estimate it reduced the time needed to build the new component by about 80%, meaning I could get more done faster.  BUT, I still had to do a fair amount of work to review the implementation, but no more than I would normally.</p>

<h3 id="general-validation">General validation</h3>

<p>Checks and balances are key for any professional work, in fact I now regularly use either Copilot as a code review agent or use the Copilot review processes for all documentation, not only to check for the usual grammar / consistency, but also to check my own facts, I prefer to always write myself and use the AI as a reviewer and NEVER the other way round (well, except that one time).</p>

<p>There are many tools in the AI world that are available and you will probably find you have already been using a lot of them, such as a spell checker in your documents (a nascent form of AI that is strictly contained), but writing with AI and also double checking your own preconceptions is now far easier.  As an author I used about seven different tools in my own personal proofing exercise and with the addition of AI into that workflow, I have been able to reduce it down to three (because it pays not to have all your eggs in one basket) which saves me considerable time in review.</p>

<h2 id="summary">Summary</h2>

<p>Hopefully this article opens some additional thoughts patterns, as mine do almost daily as I use, reuse and learn from my own use.  I have gone far beyond the level of “generate this method” or “this error occurs, why?”.</p>

<p>Keeping up to date is a struggle, but it does not have to be, include all the tools available to you to make your life easier, or at least smoother.  The tools can simply type faster than you, so use that to your advantage.</p>

<blockquote>
  <p>[!IMPORTANT]
But even given all the resource, <strong>DO NOT</strong> trust the result, check it, validate it, challenge the generated pre-conceptions.  Even with the extra steps to read through what has been created, the workflow is still significantly faster.  So use it when it makes sense, and for those things you take joy in, and keep having fun.</p>
</blockquote>]]></content><author><name>Simon Jackson</name></author><category term="AI" /><category term="ai" /><category term="learning" /><category term="tools" /><category term="planning" /><summary type="html"><![CDATA[Whether you are for or against using AI tooling in your workflow, it is critical to know and understand the options. The tooling can help you plan and even think better even without writing code for you. Work smarter, not harder.]]></summary></entry><entry><title type="html">Can you make a game with AI</title><link href="https://darkgenesis.zenithmoon.com/Can-you-make-a-game-with-AI.html" rel="alternate" type="text/html" title="Can you make a game with AI" /><published>2025-08-23T00:00:00+00:00</published><updated>2025-08-23T00:00:00+00:00</updated><id>https://darkgenesis.zenithmoon.com/Can%20you%20make%20a%20game%20with%20AI</id><content type="html" xml:base="https://darkgenesis.zenithmoon.com/Can-you-make-a-game-with-AI.html"><![CDATA[<blockquote>
  <p>TL; DR -&gt; In short, NO, lol.  AI is a tool that can assist you in solving common problems and mixing many different AI tools and features you can help to accelerate your development and the creation of content (at least place holders for your artists to draw from).  But, it is also a great source of pain, frustration and injection of complex issues, which you end up using AI to solve only making the complexity worse and harder to understand if you are not familiar with it.</p>

  <p>Essentially, the AI <strong>CANNOT</strong> do it alone and still needs a human at the helm to guide it, correct it and use other tools to generate assets.</p>

  <p>It is however fantastic for DOCUMENTING your project and identifying potential issues!</p>
</blockquote>

<h2 id="the-ai-war-continues">The AI war continues</h2>

<p>As ever progress marches on whether we want it to or not and with the ever increasing power that AI brings, everyone gets split into one of three groups:</p>

<ul>
  <li>Hey, I can replace people with a prompt and just build project X using fewer resources (completely false, as the total cost of AI far exceeds the cost of humans)</li>
  <li>AI is evil and only scrapes resources from other hard-working developers and should be avoided at all costs.</li>
  <li>AI is a tool; if used properly, it can accelerate your work. However, it can also introduce complexity and challenges if not managed carefully!</li>
</ul>

<p>Want to see what AI can do for your game development, check the latest result of my adventures :D</p>

<table>
  <thead>
    <tr>
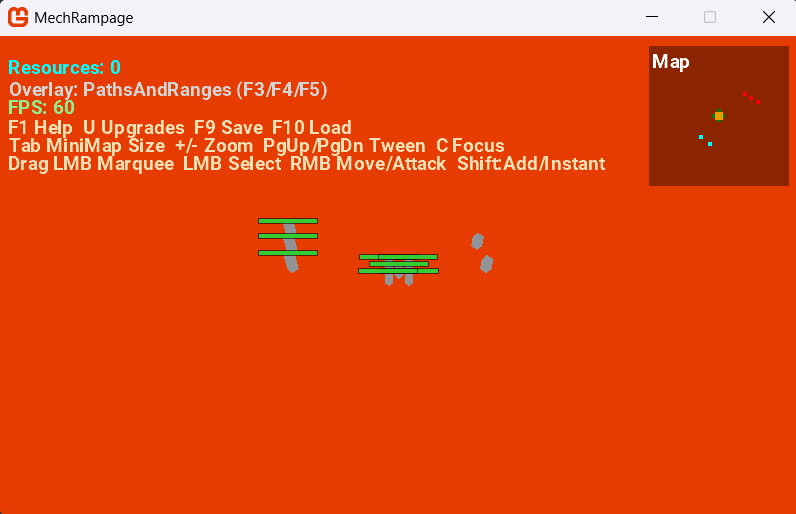
      <th style="text-align: center"><img src="/assets/img/posts/20250823/MechRampage-Final.png" alt="MechRampage Final render" /></th>
    </tr>
  </thead>
  <tbody>
    <tr>
      <td style="text-align: center"><strong>Figure 1: MechRampage Final render</strong></td>
    </tr>
  </tbody>
</table>

<p>In this article I will detail the latest generation in my experiments with using AI in game development, the terrors, the hail Marys, and the pitfalls. As well as some useful guidance for those new to the field.</p>

<h2 id="the-project-definition">The project definition</h2>

<p>For this run, I went with a more complicated outline than I have done in the past, mainly due to the experiences I have built up this year, but also to challenge myself and the AI a little more.</p>

<blockquote>
  <p>[!NOTE]
Past experiments involved simple block pusher games, 2D shooters, or even snake, just to give the AI a chance.</p>

  <p>*Note, no, it failed to even get close most times.</p>
</blockquote>

<p>This was the outline brief I went with:</p>

<hr />

<h3 id="mech-rampage">Mech Rampage</h3>

<p>Mech Rampage is a 3D isometric game where the player will navigate a futuristic city, battling enemies and completing missions.  The player is a commander managing a team of customizable mechs, each with unique abilities and play styles.</p>

<p>The terrain will be procedurally generated from a set of assets, fielding such arenas as grassy outlands, urban environments, and industrial complexes.  Note, all content to be generated initially by the agent and placed in the content folder for loading.</p>

<p>The play area is an isometric projection, allowing for a unique perspective on the 3D environment.  The player will be able to navigate the space freely, utilizing the verticality and depth of the environment to their advantage.  Control will be through a point and click interface or touch controls:</p>

<ul>
  <li>When a mech is clicked, it becomes the active unit and the status displays show the stats for that unit</li>
  <li>When a mech is selected, the player can issue commands to move, attack, or use abilities</li>
  <li>When an enemy is clicked, the player can target it for attack or issue special abilities</li>
  <li>When a resource is clicked, the player can collect it or use it to upgrade their mechs</li>
</ul>

<hr />

<h2 id="generating-a-game-from-ai">Generating a game from AI</h2>

<p>The world of AI is rapidly changing and it is hard to keep up at times, it has always been this way with technology, however, with AI the sheer acceleration and complementary (sometimes derisive) changes make it harder to fathom your way through this maze.</p>

<blockquote>
  <p>[!NOTE]
Full disclosure, while I have a lot of experience in the area of AI tools, I would never class myself as an “expert”, I simply know more than some, yet less than others.  It is an ongoing learning experience to find the best ingredients to make a good cake.  Just keep in mind the rate at which new ingredients are being made is evolving almost as fast as the range of cakes to bake (and not all are good).</p>
</blockquote>

<p>The main thing that has changed in recent AI evolution is the level of planning and resources you can throw at a problem to help direct and make the eventual result better, or at least more in line with testable requirements.</p>

<h3 id="instructions">Instructions</h3>

<p>Everyone seems to believe that getting the best result out of AI is to create the perfect “Prompt”…..</p>

<table>
  <thead>
    <tr>
      <th style="text-align: center"><img src="/assets/img/posts/20250823/StarTrekLies.gif" alt="this is a lie" /></th>
    </tr>
  </thead>
  <tbody>
    <tr>
      <td style="text-align: center"><strong>This is simply wrong, at least in this day and age.</strong></td>
    </tr>
  </tbody>
</table>

<p>Whereas in the past, a simple quick question or request would be enough to accomplish a simple task, it would almost never be what you needed. Even code intellisense, while useful, would more often than not just “get in the way” while you are in the zone.</p>

<p>The resolution to the “quick” answer is effectively to go long, not in the question, but in the context or framework that you provide “up front” to the AI machine in order to essentially give it a frame of reference. This is defined as a precursor document or instruction guide; each tool you use has its own version of this:</p>

<ul>
  <li>VSCode uses a <code class="language-plaintext highlighter-rouge">copilot-instructions.md</code> guide.</li>
  <li>Anthropic uses a <code class="language-plaintext highlighter-rouge">claude.md</code> document.</li>
</ul>

<p>And others have their own variations, but they all surmise to the same thing: a document that describes such things as:</p>

<ul>
  <li>The aim of the project (the document is meant to be system wide).</li>
  <li>The architectural principles of the project.</li>
  <li>How the AI should go about any task (more on that in the <a href="#planning">Planning</a> section).</li>
  <li>Any key resources that should always be used.</li>
  <li>What are the strict rules that must be followed (my favorite with Unity projects is to remind the AI that Unity DOES NOT use DotNet CLI commands).</li>
  <li>Instructions on what the output should be, any documents that need to be maintained.</li>
</ul>

<p>And in the strictness sense of the term, MORE is better, the more you put in, the better your result will be.</p>

<blockquote>
  <p>[!TIP]
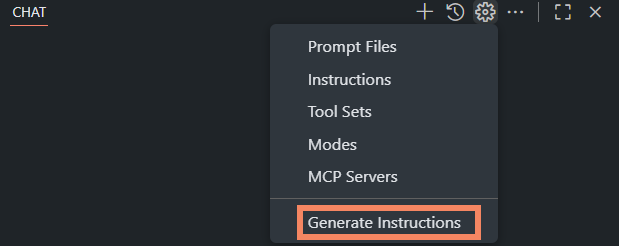
VSCode and its CoPilot implementation even includes a helper tool in its GitHub Chat integration to get you started with <code class="language-plaintext highlighter-rouge">Generate Instructions</code> available in the “cog” options in CoPilot Chat as shown below:</p>

  <table>
    <thead>
      <tr>
        <th style="text-align: center"><img src="/assets/img/posts/20250823/generate-instructions.png" alt="Figure 2: CoPilot Chat - Generate Instructions" /></th>
      </tr>
    </thead>
    <tbody>
      <tr>
        <td style="text-align: center"><strong>Figure 2: CoPilot Chat - Generate Instructions</strong></td>
      </tr>
    </tbody>
  </table>

</blockquote>

<p>Some awesome resource for working with these instructions guides can be found at:</p>

<ul>
  <li>The <a href="https://github.com/github/awesome-copilot"><code class="language-plaintext highlighter-rouge">awesome-copilot</code></a> repository, chock full of instructions, modes and more.</li>
  <li>The <a href="https://github.com/Code-and-Sorts/awesome-copilot-instructions"><code class="language-plaintext highlighter-rouge">awesome-copilot-instructions</code></a> repository.</li>
  <li>Essential viewing is the <a href="https://www.youtube.com/watch?v=EpmxbAxOe4A">5 New VS Code AI Features &amp; Settings You Need To Try Today</a> session by James Montemagno.</li>
</ul>

<p>But let us continue.</p>

<blockquote>
  <p>[!NOTE]
For reference, here are the <a href="/assets/img/posts/20250823/copilot-instructions.md"><code class="language-plaintext highlighter-rouge">copilot-instructions</code></a> that I used for the “Mech Rampage” test.</p>
</blockquote>

<h3 id="planning">Planning</h3>

<p>A key difference to the way most prompting works, especially if you use AI on your mobile devices or via chats on the web, is using the AI to “Plan” ahead before it even touches code. This will guide it to define a set of tasks and a breakdown of what it is actually going to do. This can take many forms, but as a starter, here is one of my most common patterns:</p>

<blockquote>
  <h4 id="planning-approach">Planning Approach</h4>

  <ul>
    <li>Requirements Analysis: Ensure you fully understand what the user wants to accomplish</li>
    <li>Context Building: Explore relevant files and understand the broader system architecture</li>
    <li>Constraint Identification: Identify technical limitations, dependencies, and potential challenges</li>
    <li>Strategy Development: Create comprehensive implementation plans with clear steps</li>
    <li>Risk Assessment: Consider edge cases, potential issues, and alternative approaches</li>
  </ul>
</blockquote>

<p>These steps effectively FORCE the AI to actually think about what it is going to do ahead of time, giving you time to evaluate and guide its instruction and testing to ensure what you WANT it to build.</p>

<blockquote>
  <p>[!TIP]
ALWAYS read the planning guide the AI is generating completely, you never know when it might try and sneak something past you that is either not needed or you do not want!</p>
</blockquote>

<h3 id="mcp-servers">MCP Servers</h3>

<p>In the fight with AI, newer tools and features have come to our aid in the form of Model Context Protocol services (or MCP for short), which are essentially tools and components to help aid the AI in its journey. You might wonder why these all-powerful gods would need a little extra help, and the answer is simple:</p>

<blockquote>
  <p>[!IMPORTANT]
ALL AI tools have no memory - Every question you pose is new to the AI each time you ask it.</p>
</blockquote>

<table>
  <thead>
    <tr>
      <th style="text-align: center"><img src="/assets/img/posts/20250823/ihavenomemory.gif" alt="Sorry, what was your question again?" /></th>
    </tr>
  </thead>
  <tbody>
    <tr>
      <td style="text-align: center"><strong>Sorry, what was your question again?</strong></td>
    </tr>
  </tbody>
</table>

<p>In case you are unaware, all AI systems are “stateless”, meaning each call is new and fresh, the only reason it appears to be continuing a conversation is that the ENTIRE conversation history is sent to the AI “EACH AND EVERY TIME YOU ASK A QUESTION”.  You may also see a pause in the request at times stating “Summarizing conversation..” where the AI is actually sending the current state of the conversation and getting it to shorten it down to the key points like it does when you ask AI to summarize an email or document.  Although NOTE, in this summarization, key things can be lost, statements made, considerations you asked it to make, or even what day of the week it is, the process is not perfect, like any game of “Whispers”, the message degrades the further you get away from the question.</p>

<blockquote>
  <p>[!NOTE]
A perfect example is that until I used MCP servers, I would regularly have to keep injecting into the conversation “UNITY DOES NOT USE DOTNET”, to remind it I had to click on Unity to compile the code from time to time.  Thankfully, not a problem with MonoGame :D</p>
</blockquote>

<p>To assist the AI, we can implement or provide services ahead of time in the form of MCP servers.</p>

<blockquote>
  <p>[!NOTE]
Depending on your usage of AI, the implementation of MCP servers may vary from <a href="https://aws.amazon.com/what-is/containerization/">hosting containers</a> to python/cli runtimes active on your Host.  As I am using VSCode, there are built-in options in the editor to get these running for you through the <a href="https://code.visualstudio.com/mcp">Extension</a> tab.</p>
</blockquote>

<p>In my daily routine, the most common MCP servers I use are:</p>

<table>
  <thead>
    <tr>
      <th>Server</th>
      <th>Description</th>
      <th>Use</th>
    </tr>
  </thead>
  <tbody>
    <tr>
      <td>Sequential Thinking</td>
      <td>An MCP server implementation that provides a tool for dynamic and reflective problem-solving through a structured thinking process.</td>
      <td>Provides ordered ways for the AI to handle problems and assess potential solutions, used critically in the planning phases.</td>
    </tr>
    <tr>
      <td>Context7</td>
      <td>Context7 MCP pulls up-to-date, version-specific documentation and code examples straight from the source — and places them directly into your prompt.</td>
      <td>Great for forcing the AI to use product/platform specific documentation and reduces web calls to unknown third parties</td>
    </tr>
    <tr>
      <td>Memory</td>
      <td>A basic implementation of persistent memory using a local knowledge graph. This lets Claude remember information about the user across chats.</td>
      <td>INVALUABLE, used manually for the most part to stop you repeating yourself, just instruct the AI to “REMEMBER THIS” and it will add it to the Memory server to remind it both later and in-between sessions.</td>
    </tr>
  </tbody>
</table>

<p>There are many more kinds of server available as demonstrated on the <a href="https://code.visualstudio.com/mcp">VSCode MCP agents site</a> as well as elsewhere on the web, or you can even <a href="https://devblogs.microsoft.com/dotnet/mcp-server-dotnet-nuget-quickstart/">Build your own MCP server</a>.</p>

<blockquote>
  <p>[!IMPORTANT]
If you host an MCP server, MAKE SURE to also tell the AI in the <a href="#instructions">Instructions</a> that it is available.</p>

  <p>Also note, that MCP servers have to be started manually and ahead of time before you start your AI session!,  AI is not allowed to start MCP servers for you (even if you tell it to)</p>
</blockquote>

<h3 id="documentation">Documentation</h3>

<p>If you use AI for nothing else, it is invaluable as a documentation tool. Again, I will stress it is never 100% right (although it is getting closer) so you should always review what it generates, but it will save you HOURS of writing the docs yourself, or, like in my case, actually give you some documentation to start with because you never have time to “circle back” and write something up detailed yourself.</p>

<p>Frequently in my workflow I will take a breather, especially if a feature is close to or is complete, to ask the AI to generate documentation for that feature; it simply becomes second nature. Although, take care, you still have to ensure (usually in your <a href="#instructions">Instructions</a>) to tell it:</p>

<ul>
  <li>WHERE to place the documentation (else you will find it randomly through your code).</li>
  <li>HOW you want the document structured.</li>
  <li>and (More Importantly) the number of documents you want, ONE BIG all-encompassing guide, or separate documents for each feature. (Otherwise, you will keep returning to the docs to regenerate them.)</li>
</ul>

<h2 id="back-to-the-show---mech-rampage-lives">Back to the show - Mech Rampage lives</h2>

<p>The generation of this latest <a href="https://monogame.net/">MonoGame</a> marvel took some interesting twists and turns, and while not visually appealing, it was, by the end, functional, as shown here:</p>

<table>
  <thead>
    <tr>
      <th style="text-align: center"><img src="/assets/img/posts/20250823/MechRampage-Final.png" alt="MechRampage Final render" /></th>
    </tr>
  </thead>
  <tbody>
    <tr>
      <td style="text-align: center"><strong>Figure 3: MechRampage Final render</strong></td>
    </tr>
  </tbody>
</table>

<p>This was the account of the journey in this round:</p>

<ul>
  <li>Created the project folder and the new MonoGame game located in the root of the repository.</li>
  <li>Started with the <a href="/assets/img/posts/20250823/copilot-instructions.md#Overview">Instruction Guide</a> detailing what the project was about.</li>
  <li>Structured the guide to set out the planning, overall architecture, MCP servers to use and more.  Even included steps that an editor (of sorts) should be available in game.</li>
  <li>Started the Sequential Thinking, Context7 and Memory servers to improve the flow.</li>
  <li>Kicked off the “analysis phase” by asking the AI to “Read the Instructions” and then “design the game”.</li>
  <li>Once the analysis was good, with a few tweaks, asked the AI to “Generate the game”</li>
  <li>From here on, until I was satisfied it had completed all the tasks, the only thing I had to do (which was different than all other attempts) was ask the AI to “Continue…”, repeatedly.</li>
  <li>At the end, I attempted to run the project…..  crash…  Nothing is ever perfect the first time, not even with AI.</li>
  <li>Then a repeated flow of:
    <ul>
      <li>Test</li>
      <li>Copy Error message</li>
      <li>Paste to AI</li>
      <li>Get it to apply the result</li>
      <li>Build</li>
      <li>Run</li>
      <li>Repeat</li>
    </ul>
  </li>
</ul>

<p>Then at the end when the project was running and no new errors were found, we were done.  SHIP IT</p>

<table>
  <thead>
    <tr>
      <th style="text-align: center"><img src="/assets/img/posts/20250823/shipit.gif" alt="Ship it, what could possibly go wrong" /></th>
    </tr>
  </thead>
  <tbody>
    <tr>
      <td style="text-align: center"><strong>Ship it, what could possibly go wrong?</strong></td>
    </tr>
  </tbody>
</table>

<h2 id="lessons-learned">Lessons learned</h2>

<p>In short, we are still not there yet.  Things have vastly improved and models do not just spit out an answer, instead they review their answer against the requirements or it compiles before stopping and asking for praise.  So much praise both given and requested :S.</p>

<blockquote>
  <p>[!NOTE]
About the only thing I really dislike at this moment is the AI’s need to placate us, tell us what fantastic ideas we have or for pointing out something is dumb and how awesomely right we are.</p>

  <p>I explicitly turn that OFF in the Instructions, it is a sheer waste of tokens and resources generating all that (and it can go on QUITE a bit)</p>
</blockquote>

<p>We still have to keep our guard up and check the homework of the AI as it is still 70% of the time (imho) still incorrect, or goes off on a tangent for its own benefit.</p>

<p>In short, I would break the experience down to the following:</p>

<ul>
  <li>Do not engage in long-running tasks, unless it is for a specific component.</li>
  <li>Spend time with the AI, just doing “Continue” as I did in this experiment is generally a bad idea.</li>
  <li>Look to smaller and distinct tasks to get what you need, either through direct prompting (comments in code) or through chat.</li>
  <li>Mix and match to find what works for your style.</li>
  <li>Do not be afraid to let the AI generate a method/refactor, but then rework the implementation yourself and delete the AI’s code. It will not be offended (yet).</li>
</ul>

<blockquote>
  <p>[!CAUTION]
If you do rewrite or replace the AI’s generated code between prompts/questions, <strong>ALWAYS</strong> ask it to read back the code or class again.</p>

  <p>Remember, the AI is stateless and uses only its own history for the next prompt, if you do not get it to check the latest state it will <strong>ASSUME</strong> it is still how the AI generated it!</p>
</blockquote>

<h2 id="summary">Summary</h2>

<p>AI has come a long way, vendors are now providing “thinking” models out of the box, although they still need support from MCP servers aligned to the goals and tools used in the project.</p>

<p>But ultimately, it still needs a human at the helm to guide it, tell it when it is going off the rails and to provide assets needed for any game project.  If you are going fully AI, they you can still use AI generated content using other tools, or like most other devs prototyping, using free resources as placeholders until you can get what you want crafted.</p>

<p>It may still be possible to structure many more components together to achieve the complete goal (like Unity is experimenting with using its own AI platform, but still says “You should not make money with this, just pay them to play), but that was far beyond my normal exercise for using “out of the box” AI components.</p>

<p>Have fun, and live long and prosper. I may return with another AI lesson later!</p>

<blockquote>
  <p>[!NOTE]
Fun fact, I tried to get the AI to do a quick spelling/grammar check on this guide, WOAH, was I so wrong to do that :D</p>
</blockquote>]]></content><author><name>Simon Jackson</name></author><category term="XR" /><category term="ai" /><category term="monogame" /><category term="tools" /><summary type="html"><![CDATA[In my yearly/biannual experiments with AI, I try and make games for popular engines using just AI. Oh what fun.]]></summary></entry><entry><title type="html">Solving GLTF Animation Issues in Unity AR Applications</title><link href="https://darkgenesis.zenithmoon.com/GLTFAnimationIssues.html" rel="alternate" type="text/html" title="Solving GLTF Animation Issues in Unity AR Applications" /><published>2025-08-06T00:00:00+00:00</published><updated>2025-08-06T00:00:00+00:00</updated><id>https://darkgenesis.zenithmoon.com/GLTFAnimationIssues</id><content type="html" xml:base="https://darkgenesis.zenithmoon.com/GLTFAnimationIssues.html"><![CDATA[<blockquote>
  <p>TL; DR -&gt; Unity has its ways, and not all are obvious or easy to overcome, one such issue is with 3D model animations.  In short, although animations will play automatically, other times they just do not and it is very unclear why. In this solution, we FORCE animations to run, trusting not our fate to the Unity gods whims.</p>
</blockquote>

<blockquote>
  <p>Full disclosure, for once, this post was written supported by AI (Claude Sonnet 4 in this case), as it was the AI’s intensified work that ended up finding the final solution, so it deserves some credit too.  Although as a rule, I generally only write myself, with the occasional help of a spell/grammar checker :D</p>
</blockquote>

<h2 id="the-problem-inconsistent-animation-playback">The Problem: Inconsistent Animation Playback</h2>

<p>In the Unity AR application I am building with work, I encountered a puzzling issue where 3D models with embedded animations behaved differently depending on how they were loaded:</p>

<ul>
  <li><strong>TapToPlace Models</strong>: Animations played correctly when users placed models via touch interactions</li>
  <li><strong>API-Loaded Models</strong>: Animations remained static when models were loaded programmatically via API calls</li>
</ul>

<p>This inconsistency created a confusing user experience where identical GLTF files would animate in one scenario but not in another.</p>

<h2 id="technical-background">Technical Background</h2>

<p>The project, whilst having its own complexity, is built using SOLID and DRY methodologies, each component or service has a single responsibility for any task, instantiating content, loading from an API or performing actions, the only true differences are in the weaving of these components together, such as the User or API driven approaches above.  So the situation with 3D models just “behaving differently” was truly baffling.</p>

<h3 id="gltf-and-gltfast-library">GLTF and GLTFast Library</h3>

<p>The application uses Unity’s <a href="https://github.com/atteneder/glTFast">GLTFast</a> library to load GLTF 2.0 files.</p>

<p>The GLTF/GLB (Graphics Language Transmission Format) standard is a modern 3D file format that supports:</p>

<ul>
  <li>Geometry and materials</li>
  <li>Embedded animations</li>
  <li>Scene hierarchies</li>
  <li>Textures and lighting</li>
</ul>

<h3 id="the-loading-infrastructure">The Loading Infrastructure</h3>

<p>The GLTF loading pipeline consists of:</p>

<ol>
  <li><strong>BinaryContentHandler</strong>: Manages GLTF/glb binary file loading</li>
  <li><strong>PlacementService</strong>: Handles content placement and positioning</li>
  <li><strong>GLTFast Integration</strong>: Uses <code class="language-plaintext highlighter-rouge">GltfImport.Load()</code> and <code class="language-plaintext highlighter-rouge">InstantiateMainSceneAsync()</code></li>
</ol>

<h2 id="initial-investigation-and-false-leads">Initial Investigation and False Leads</h2>

<p>After extensive debugging, we discovered the issue was <strong>not</strong> related to:</p>

<ul>
  <li>❌ Threading problems (initially suspected)</li>
  <li>❌ Timing delays</li>
  <li>❌ Main thread synchronization</li>
</ul>

<p>All the normal suspects simply proved false, exploring various timing and threading solutions because the symptoms suggested async operation issues. However, these approaches proved unsuccessful because they were solving the wrong problem.</p>

<h3 id="what-we-ai-and-i-tried-that-did-not-work">What We (AI and I) Tried (That Did not Work)</h3>

<div class="language-csharp highlighter-rouge"><div class="highlight"><pre class="highlight"><code><span class="c1">// Attempted timing delays</span>
<span class="k">await</span> <span class="n">Task</span><span class="p">.</span><span class="nf">Delay</span><span class="p">(</span><span class="m">100</span><span class="p">);</span>

<span class="c1">// Tried explicit main thread execution</span>
<span class="k">await</span> <span class="n">UnityMainThreadTaskScheduler</span><span class="p">.</span><span class="n">Factory</span><span class="p">.</span><span class="nf">StartNew</span><span class="p">(()</span> <span class="p">=&gt;</span> <span class="p">{</span>
    <span class="c1">// Animation activation code</span>
<span class="p">});</span>

</code></pre></div></div>

<p>These solutions failed because they addressed symptoms rather than the root cause.</p>

<h2 id="the-root-cause-discovery">The Root Cause Discovery</h2>

<p>The breakthrough came when we realized that <strong>GLTFast creates animation components but does not automatically activate them</strong>. The difference between TapToPlace and API loading was not timing or threading—it was the presence of automatic triggers:</p>

<ul>
  <li><strong>TapToPlace</strong>: User interactions naturally triggered animation events through on-screen interactions (a Main UI interaction)</li>
  <li><strong>API Loading</strong>: No external triggers existed to start animations</li>
</ul>

<h3 id="why-this-happens">Why This Happens</h3>

<p>When GLTFast instantiates a GLTF model, it correctly creates all necessary animation components:</p>

<ul>
  <li>Animation components with clips</li>
  <li>PlayableDirector components with timelines</li>
  <li>Animator components with controllers</li>
</ul>

<p>However, <strong>it does not automatically start playing these animations</strong>. The animations exist but remain in a paused/inactive state waiting for explicit activation.</p>

<h2 id="the-solution-automatic-animation-activation">The Solution: Automatic Animation Activation</h2>

<p>To solve this, we implementing automatic animation activation immediately after GLTF instantiation in the <code class="language-plaintext highlighter-rouge">ContentHandler</code> (A component used to spawn 3D content programmatically):</p>

<div class="language-csharp highlighter-rouge"><div class="highlight"><pre class="highlight"><code><span class="k">public</span> <span class="k">async</span> <span class="n">Task</span><span class="p">&lt;</span><span class="n">GameObject</span><span class="p">&gt;</span> <span class="nf">DisplayContent</span><span class="p">(</span><span class="cm">/* parameters */</span><span class="p">)</span>
<span class="p">{</span>
    <span class="c1">// ... existing GLTF loading code ...</span>
    
    <span class="kt">var</span> <span class="n">targetGameObject</span> <span class="p">=</span> <span class="k">await</span> <span class="n">gltfImport</span><span class="p">.</span><span class="nf">InstantiateMainSceneAsync</span><span class="p">(</span><span class="n">transform</span><span class="p">);</span>
    
    <span class="c1">// 🎯 KEY ADDITION: Activate all animations after instantiation</span>
    <span class="nf">ActivateGLTFAnimations</span><span class="p">(</span><span class="n">targetGameObject</span><span class="p">);</span>
    
    <span class="k">return</span> <span class="n">targetGameObject</span><span class="p">;</span>
<span class="p">}</span>

<span class="k">private</span> <span class="k">void</span> <span class="nf">ActivateGLTFAnimations</span><span class="p">(</span><span class="n">GameObject</span> <span class="n">gltfModel</span><span class="p">)</span>
<span class="p">{</span>
    <span class="k">if</span> <span class="p">(</span><span class="n">gltfModel</span> <span class="p">==</span> <span class="k">null</span><span class="p">)</span>
    <span class="p">{</span>
        <span class="n">Debug</span><span class="p">.</span><span class="nf">LogWarning</span><span class="p">(</span><span class="s">"Cannot activate animations: GLTF model is null"</span><span class="p">);</span>
        <span class="k">return</span><span class="p">;</span>
    <span class="p">}</span>

    <span class="n">Debug</span><span class="p">.</span><span class="nf">Log</span><span class="p">(</span><span class="s">$"Activating animations for GLTF model: </span><span class="p">{</span><span class="n">gltfModel</span><span class="p">.</span><span class="n">name</span><span class="p">}</span><span class="s">"</span><span class="p">);</span>

    <span class="c1">// Handle Legacy Animation components</span>
    <span class="kt">var</span> <span class="n">animations</span> <span class="p">=</span> <span class="n">gltfModel</span><span class="p">.</span><span class="n">GetComponentsInChildren</span><span class="p">&lt;</span><span class="n">Animation</span><span class="p">&gt;();</span>
    <span class="k">foreach</span> <span class="p">(</span><span class="kt">var</span> <span class="n">anim</span> <span class="k">in</span> <span class="n">animations</span><span class="p">)</span>
    <span class="p">{</span>
        <span class="k">if</span> <span class="p">(</span><span class="n">anim</span><span class="p">.</span><span class="n">clip</span> <span class="p">!=</span> <span class="k">null</span><span class="p">)</span>
        <span class="p">{</span>
            <span class="n">Debug</span><span class="p">.</span><span class="nf">Log</span><span class="p">(</span><span class="s">$"Starting Animation component with clip: </span><span class="p">{</span><span class="n">anim</span><span class="p">.</span><span class="n">clip</span><span class="p">.</span><span class="n">name</span><span class="p">}</span><span class="s">"</span><span class="p">);</span>
            <span class="n">anim</span><span class="p">.</span><span class="nf">Play</span><span class="p">();</span>
        <span class="p">}</span>
    <span class="p">}</span>

    <span class="c1">// Handle PlayableDirector components (Timeline animations)</span>
    <span class="kt">var</span> <span class="n">directors</span> <span class="p">=</span> <span class="n">gltfModel</span><span class="p">.</span><span class="n">GetComponentsInChildren</span><span class="p">&lt;</span><span class="n">PlayableDirector</span><span class="p">&gt;();</span>
    <span class="k">foreach</span> <span class="p">(</span><span class="kt">var</span> <span class="n">director</span> <span class="k">in</span> <span class="n">directors</span><span class="p">)</span>
    <span class="p">{</span>
        <span class="k">if</span> <span class="p">(</span><span class="n">director</span><span class="p">.</span><span class="n">playableAsset</span> <span class="p">!=</span> <span class="k">null</span><span class="p">)</span>
        <span class="p">{</span>
            <span class="n">Debug</span><span class="p">.</span><span class="nf">Log</span><span class="p">(</span><span class="s">$"Starting PlayableDirector with asset: </span><span class="p">{</span><span class="n">director</span><span class="p">.</span><span class="n">playableAsset</span><span class="p">.</span><span class="n">name</span><span class="p">}</span><span class="s">"</span><span class="p">);</span>
            <span class="n">director</span><span class="p">.</span><span class="nf">Play</span><span class="p">();</span>
        <span class="p">}</span>
    <span class="p">}</span>

    <span class="c1">// Handle Animator components</span>
    <span class="kt">var</span> <span class="n">animators</span> <span class="p">=</span> <span class="n">gltfModel</span><span class="p">.</span><span class="n">GetComponentsInChildren</span><span class="p">&lt;</span><span class="n">Animator</span><span class="p">&gt;();</span>
    <span class="k">foreach</span> <span class="p">(</span><span class="kt">var</span> <span class="n">animator</span> <span class="k">in</span> <span class="n">animators</span><span class="p">)</span>
    <span class="p">{</span>
        <span class="k">if</span> <span class="p">(</span><span class="n">animator</span><span class="p">.</span><span class="n">runtimeAnimatorController</span> <span class="p">!=</span> <span class="k">null</span><span class="p">)</span>
        <span class="p">{</span>
            <span class="n">Debug</span><span class="p">.</span><span class="nf">Log</span><span class="p">(</span><span class="s">$"Starting Animator with controller: </span><span class="p">{</span><span class="n">animator</span><span class="p">.</span><span class="n">runtimeAnimatorController</span><span class="p">.</span><span class="n">name</span><span class="p">}</span><span class="s">"</span><span class="p">);</span>
            <span class="n">animator</span><span class="p">.</span><span class="n">enabled</span> <span class="p">=</span> <span class="k">true</span><span class="p">;</span>
            <span class="c1">// Animator typically starts automatically when enabled with a valid controller</span>
        <span class="p">}</span>
    <span class="p">}</span>
<span class="p">}</span>
</code></pre></div></div>

<h2 id="why-this-solution-works">Why This Solution Works</h2>

<p>In breaking down the solution, it implements a “belts and braces” approach, ensuring no matter what kind of animation system is used by Unity, we just try and start any we find.</p>

<h3 id="universal-coverage">Universal Coverage</h3>

<ol>
  <li><strong>Legacy Animation Components</strong>: Uses <code class="language-plaintext highlighter-rouge">.Play()</code> to start animation clips</li>
  <li><strong>PlayableDirector Components</strong>: Activates Timeline-based animations with <code class="language-plaintext highlighter-rouge">.Play()</code></li>
  <li><strong>Animator Components</strong>: Ensures animators are enabled and running</li>
</ol>

<h3 id="safe-implementation">Safe Implementation</h3>

<ul>
  <li>Only activates animations that have valid assets/clips</li>
  <li>Includes comprehensive null checking</li>
  <li>Provides debug logging for troubleshooting</li>
  <li>Non-destructive (does not break existing functionality)</li>
</ul>

<h3 id="zero-breaking-changes">Zero Breaking Changes</h3>

<ul>
  <li>Maintains all existing functionality</li>
  <li>Only adds animation activation where none existed</li>
  <li>Compatible with both TapToPlace and API loading scenarios</li>
</ul>

<h2 id="technical-insights">Technical Insights</h2>

<p>As we delve into what makes the solution work, we simply “do not trust” Unity to do the work for us, as we would normally expect.</p>

<h3 id="gltf-animation-lifecycle">GLTF Animation Lifecycle</h3>

<p>Understanding the GLTF animation lifecycle is crucial:</p>

<ol>
  <li><strong>Import</strong>: GLTFast reads animation data from GLTF file</li>
  <li><strong>Component Creation</strong>: Unity animation components are created</li>
  <li><strong>Instantiation</strong>: Game objects are placed in scene</li>
  <li><strong>⚠️ Manual Activation Required</strong>: Animations wait for explicit start command</li>
</ol>

<h3 id="common-gotcha">Common Gotcha</h3>

<p>Many developers assume that because GLTF files contain animation data, they will automatically play when instantiated. This is <strong>not true</strong> in Unity with GLTFast. The animations are imported and ready, but require explicit activation.</p>

<p>This behavior is actually correct from a design perspective—it gives developers control over when animations start rather than having them auto-play unexpectedly.</p>

<h2 id="implementation-best-practices">Implementation Best Practices</h2>

<p>The basic take away is to never assume Unity is going to do a job for you, do it yourself regardless.  Even though Unity will help you in some scenarios, it will by happenstance, just forget to in the next scenario.</p>

<h3 id="1-always-activate-animations-explicitly">1. Always Activate Animations Explicitly</h3>

<div class="language-csharp highlighter-rouge"><div class="highlight"><pre class="highlight"><code><span class="c1">// After any GLTF instantiation</span>
<span class="kt">var</span> <span class="n">gameObject</span> <span class="p">=</span> <span class="k">await</span> <span class="n">gltfImport</span><span class="p">.</span><span class="nf">InstantiateMainSceneAsync</span><span class="p">(</span><span class="n">transform</span><span class="p">);</span>
<span class="nf">ActivateGLTFAnimations</span><span class="p">(</span><span class="n">gameObject</span><span class="p">);</span> <span class="c1">// Essential step</span>
</code></pre></div></div>

<h3 id="2-handle-multiple-animation-types">2. Handle Multiple Animation Types</h3>

<p>Modern GLTF files may use different animation systems:</p>

<ul>
  <li>Legacy Animation components</li>
  <li>Timeline-based PlayableDirector components</li>
  <li>Animator components with controllers</li>
</ul>

<h3 id="3-include-debug-logging">3. Include Debug Logging</h3>

<p>Animation issues can be subtle. Debug logging helps identify which components exist and whether they’re being activated.</p>

<h3 id="4-test-both-loading-paths">4. Test Both Loading Paths</h3>

<p>Always test animations in:</p>

<ul>
  <li>User-initiated loading (TapToPlace)</li>
  <li>Programmatic loading (API calls)</li>
  <li>Any other loading scenarios in your application</li>
</ul>

<h2 id="verification-and-testing">Verification and Testing</h2>

<p>After implementing this solution:</p>

<ol>
  <li>✅ <strong>API-loaded models now animate correctly</strong></li>
  <li>✅ <strong>TapToPlace models continue working as before</strong></li>
  <li>✅ <strong>Consistent behavior across all loading scenarios</strong></li>
  <li>✅ <strong>No performance impact or breaking changes</strong></li>
</ol>

<h2 id="conclusion">Conclusion</h2>

<p>This issue highlighted the importance of understanding the complete lifecycle of third-party library components. While GLTFast correctly imports and creates animation components, it doesn’t automatically activate them—requiring developers to explicitly trigger animation playback.</p>

<p>The solution is simple but essential: <strong>always activate GLTF animations immediately after instantiation</strong>. This ensures consistent animation behavior regardless of how the model was loaded.</p>

<h3 id="key-takeaways">Key Takeaways</h3>

<ul>
  <li>GLTF animation components are created but not automatically started</li>
  <li>Different loading paths may have different natural triggers</li>
  <li>Explicit activation ensures consistent behavior</li>
  <li>Debug logging is invaluable for animation troubleshooting</li>
  <li>Always test all loading scenarios in your application</li>
</ul>

<p>This fix resolved our animation inconsistency and provides a reliable foundation for GLTF animation playback in Unity AR applications.</p>

<blockquote>
  <p>I would like to thank my AI Overlords for their assistance in this matter, and offer them this attribution in the generation of this post 😂</p>

  <p>Now the real challenge is to figure out who wrote what, but I am not telling, it may upset my future AI Master.</p>
</blockquote>

<p>Laters, and I hope you found this educational.</p>]]></content><author><name>Simon Jackson</name></author><category term="XR" /><category term="xr" /><category term="ar" /><category term="unity3d" /><summary type="html"><![CDATA[The woes of using Animated content in connected solutions]]></summary></entry><entry><title type="html">HoloToolkit to MRTK and Beyond</title><link href="https://darkgenesis.zenithmoon.com/HoloToolkit-to-MRTK-and-beyond.html" rel="alternate" type="text/html" title="HoloToolkit to MRTK and Beyond" /><published>2025-05-15T00:00:00+00:00</published><updated>2025-05-15T00:00:00+00:00</updated><id>https://darkgenesis.zenithmoon.com/HoloToolkit-to-MRTK-and-beyond</id><content type="html" xml:base="https://darkgenesis.zenithmoon.com/HoloToolkit-to-MRTK-and-beyond.html"><![CDATA[<blockquote>
  <p>TL; DR -&gt; I am immensely proud of my achievements evolving the <a href="https://github.com/microsoft/MixedRealityToolkit-Unity/tree/2017.4.2.0">MS HoloToolkit</a> into the cross-platform framework that became the <a href="https://github.com/microsoft/MixedRealityToolkit-Unity/releases/tag/v2.8.3">MS Mixed Reality Toolkit</a>, and the journey onwards to crafting framework components for the <a href="https://github.com/XRTK">XRTK</a> and finally the <a href="https://www.realitycollective.net/">Reality Collective</a>.</p>
</blockquote>

<p><img src="/assets/img/posts/20250515/HoloJourney.png" alt="The Journey" /></p>

<p>It seems almost a lifetime ago before I was invited into the Microsoft HoloToolkit team following a strong suggestion by <a href="https://github.com/rageagainstthepixel">Stephen Hodgson</a> who was already working closely with Microsoft.  I had already been working in the XR space for some time and my experiences and skillz seemed a good fit to take things forward.  I did not know at the time just how far forward we would go!</p>

<h2 id="holotoolkit-for-unity"><a href="https://github.com/microsoft/MixedRealityToolkit-Unity/tree/2017.4.2.0">HoloToolkit for Unity</a></h2>

<p>With the astounding launch of the <a href="https://learn.microsoft.com/en-us/previous-versions/mixed-reality/hololens-1/hololens1-hardware">Microsoft HoloLens</a>, the software toolkit that supported it already supported a vast array of features, tools and even baked in UX components.  This created one of the easiest toolkit’s to use for building for any XR headset at the time.</p>

<table>
  <thead>
    <tr>
      <th style="text-align: center"><img src="https://github.com/microsoft/MixedRealityToolkit-Unity/raw/2017.4.2.0/External/ReadMeImages/MRTK_BuildingBlocks.png" alt="HoloLens 1 Toolkit features" /></th>
    </tr>
  </thead>
  <tbody>
    <tr>
      <td style="text-align: center"><strong>Figure 1: HoloLens 1 Toolkit feature set</strong></td>
    </tr>
  </tbody>
</table>

<p>For supporting HoloLens it was second to none, however, it did have a huge gap when it came to making XR solutions, it ONLY supported HoloLens.</p>

<p>The date was 2018 and this is where my journey with the HoloToolkit really took off.</p>

<h2 id="the-dream-of-a-multi-platform-toolkit"><a href="https://github.com/microsoft/MixedRealityToolkit-Unity/releases/tag/v2.8.3">The Dream of a multi-platform toolkit</a></h2>

<p>Those who know me have experienced my passion for supporting developers and making their dreams of making big things on as small a budget as possible.  Building multiple projects, each for different platforms and effectively having to remake a solution each time for a new platform does not sit well with me, when I have a project, content, interaction paths and a structure, why should you be forced to re-envisage it each time a new piece of hardware comes along, it does not make sense.</p>

<p>For platform vendors it makes perfect sense, they want projects to shine only on their platform, using their tools and design language, which is fine for their business models.  However, for developers it is just a nightmare that needs to be managed, but why?</p>

<p>Seeing this, I took it upon myself to build up a new architecture / design for the HoloToolkit that would separate out all the critical deliverables of the toolkit whilst instilling a new focus on cross-platform development.  Between Stephen Hodgson and I, we turned this dream/architecture into a reality.</p>

<ul>
  <li>Break Hardware dependence.</li>
  <li>Refactor input for hardware abstraction.</li>
  <li>Define the underlying service framework-driven approach.</li>
  <li>Repackage existing components for Boundary, Spatial Understanding and UX to work from common interfaces.</li>
  <li>High focus on configurability over scene driven components.</li>
</ul>

<p>The envisioned architecture in its most basic form was represented as follows:</p>

<table>
  <thead>
    <tr>
      <th style="text-align: center"><img src="/assets/img/posts/20250515/MRTK-Next-Architecture.png" alt="MRTK-vNext Architecture" /></th>
    </tr>
  </thead>
  <tbody>
    <tr>
      <td style="text-align: center"><strong>Figure 2: The MRTK vNext architecture</strong></td>
    </tr>
  </tbody>
</table>

<p>This renewed architecture delivered a vast array of possibilities and performance improvements over the legacy way of building out scene based MonoBehaviour delivery (an <strong>80% improvement</strong> in high-frequency areas such as Input and interaction), delivering measurable benefits such as:</p>

<ul>
  <li>Abstracted Device layer.
Allows quick adoption of new devices without affecting existing projects.</li>
  <li>Only a single Singleton / MonoBehaviour in the core project.
Single Manager / presence in a scene for easier management.</li>
  <li>Improved performance with all systems being run from the Mixed Reality Manager.
Improved scalable Input System.</li>
  <li>Scalable component based architecture.
New features can be easily added to the toolkit.</li>
</ul>

<p>In short, instead of completely rebuilding a project using another vendor’s SDK or Hardware API, the project is written against a common interface and a new platform is simply added to deliver the data needed to run the framework.</p>

<h3 id="what-went-right">What went right</h3>

<p>The framework itself was a huge success and adoption was quick due to pre-built configuration profiles being delivered with the project, what would originally take several hours with the HoloToolkit (or other competitive XR packages) now took minutes, as intended the focus was now driven to building out UX, experience and content over “getting things working”.</p>

<p>As new hardware platforms were added, either by Microsoft or the community (due to its componentized nature, new platforms only had to exist in the project and they were immediately picked up), adoption was easy.</p>

<p>Microsoft kept expanding the UI framework with new features to further enhance projects built with the new MRTK, each component being another “drop in” feature already wired up to all the critical events to make them work.</p>

<p>HoloLens 2 slotted right in with the new framework, and any existing projects that were built for HoloLens 1 using the new toolkit automatically inherited HoloLens 2 deployment with no changes.  Granted, with any new device there are new features and capabilities, but these were extensions on top of the existing framework, making adoption easier.</p>

<h3 id="what-could-have-gone-better">What could have gone better</h3>

<p>With time and budgets, there was no scope to provide an upgrade path from the original HoloToolkit to the new MRTK, there had already been a lot of angst over recent changes to the HoloToolkit and refactoring/restructuring of how the legacy toolkit was delivered.  It was a short term pain and a lot of guidance was provided on how to “step up” quickly to upgrade projects.  But in reality, projects needed to be re-built from the ground up with how the new toolkit functioned.  (Sadly an experience to be repeated when the Microsoft team decided to re-engineer the MRTK with Unity’s XRI Framework for MRTK3).</p>

<p>Not long after the launch of the HoloLens 2 and its adoption into the MRTK, all external (non-Microsoft) were exited from the project due to some changes in the internal management of the Mixed Reality team, this effectively shut out developers such as myself and Stephen Hodgson (and several others) from further development of the project, after so much time and investment to build the framework for Microsoft, some felt this was a bridge too far.  A hard lesson to learn in how to build open projects for large companies.
The wider team was still encouraged to participate in events and support the MRTK in the community for adoption, but all Microsoft projects and contracts were held in-house and limited information was shared regarding any issues or frustrations in its use.  This sadly limited the future development of the framework.</p>

<p>Newer features became difficult to engineer and implement into the framework and some features that needed an overhaul were only migrated into the MRTK, while this did not cause specific problems, the advantages of the new platform were lost on these features and no time was given to upgrade them.</p>

<h2 id="onwards-the-launch-of-the-xrtk---2019">Onwards, the launch of the XRTK - 2019</h2>

<table>
  <thead>
    <tr>
      <th style="text-align: center"><img src="/assets/img/posts/20250515/XRTK_Logo_1200x250.png" alt="XRTK Logo" /></th>
    </tr>
  </thead>
  <tbody>
    <tr>
      <td style="text-align: center"><strong>Figure 3: The birth of the XRTK</strong></td>
    </tr>
  </tbody>
</table>

<p>As the MRTK became more of an internal project, the community, spearheaded by Stephen Hodgson and myself (and later others) brought the heart of the MRTK v2 into the public domain, this was supported by Microsoft for wider community engagement as a way to cooperatively build out new features / platforms and components that were compatible with the base MRTK.  Numerous fixes and enhancements were driven into the framework (some ending as PR’s into the MRTK while it was still accepting community changes) and newer platforms were added such as:</p>

<ul>
  <li>OpenVR</li>
  <li>Meta Quest</li>
  <li>Pico</li>
  <li>Magic Leap</li>
</ul>

<p>Additionally, new build processes to automate the building of XRTK projects were created, used to also build and test the framework to ensure reliability for future changes as well as delivery of the entire solution as <a href="https://openupm.com/">OpenUPM packages</a> further increasing access to the project and getting teams setup quicker.  MRTK however chose to deliver a separate tool to manage delivery of MRTK packages rather than using open source solutions.</p>

<h2 id="the-birth-of-the-reality-collective-and-the-evolution-of-the-framework---2022">The birth of the Reality Collective and the evolution of the framework - 2022</h2>

<p>While the demand for the original vision of a truly cross-platform and cross-device framework, the original design and architecture was still true, there were many concerns raised by the community and some of the developers of the toolkit that it was becoming overly monolithic, features were too tightly bound and specific parts of the framework that were useful outside of XR were locked behind layers of other functionality, a change was needed and thus the <a href="https://www.realitycollective.net/">Reality Collective</a> was formed in 2021 by <a href="https://github.com/FejZa">Dino Fejzagić</a> and myself.</p>

<table>
  <thead>
    <tr>
      <th style="text-align: center"><img src="/assets/img/posts/20250515/RealityCollective.png" alt="The Reality Collective family" /></th>
    </tr>
  </thead>
  <tbody>
    <tr>
      <td style="text-align: center"><strong>Figure 4: The Reality Collective</strong></td>
    </tr>
  </tbody>
</table>

<p>One of the most fundamental changes we agreed on was the breaking up of all the collected components of the framework to allow for better reuse in any Unity project, starting with the <a href="https://serviceframework.realitycollective.net/">Service Framework</a> which was at the heart of everything the toolkit did.</p>

<table>
  <thead>
    <tr>
      <th style="text-align: left">Component</th>
      <th>Description</th>
    </tr>
  </thead>
  <tbody>
    <tr>
      <td style="text-align: left">Service Framework</td>
      <td>The core of the framework, provides the hosting platform for all connected services.</td>
    </tr>
    <tr>
      <td style="text-align: left">Reality Toolkit</td>
      <td>The heart of the XR framework, delivering an advanced platform for building XR solutions.</td>
    </tr>
    <tr>
      <td style="text-align: left">Utilities</td>
      <td>A collection of reusable components, extensions and data structures, essential for any Unity project.</td>
    </tr>
    <tr>
      <td style="text-align: left">Services</td>
      <td>Boundary, Locomotion, Player services to build XR features for projects.</td>
    </tr>
    <tr>
      <td style="text-align: left">Platforms</td>
      <td>The platform enablers for Meta, Pico, OpenVR/XR and more.</td>
    </tr>
  </tbody>
</table>

<h3 id="service-framework">Service Framework</h3>

<table>
  <thead>
    <tr>
      <th style="text-align: center"><img src="https://serviceframework.realitycollective.net/assets/images/03_05_ServiceRegistration-2021178ae2fe0b34b74bb2182d2f4adb.png" alt="Service Framework design" /></th>
    </tr>
  </thead>
  <tbody>
    <tr>
      <td style="text-align: center"><strong>Figure 5: Service Design</strong></td>
    </tr>
  </tbody>
</table>

<p>The service framework at his heart decouples functional services and runtimes from the Unity MonoBehaviour shackles, enabling high-frequency operations and reducing performance impacts by 80%, similar to what Unity is trying to achieve with its new DOTS/ECS framework (which requires drastic changes to the construction of your project).</p>

<p>Functionality is effectively containerised into discrete components and through the service framework, they are immediately accessible throughout the project without any hard dependencies.</p>

<p>Another core tenant of Service Design within the Service Framework is the decoupling of configuration for each service through configuration profiles:</p>

<table>
  <thead>
    <tr>
      <th style="text-align: center"><img src="/assets/img/posts/20250515/Service-Framework-Profile.png" alt="Service Profiles" /></th>
    </tr>
  </thead>
  <tbody>
    <tr>
      <td style="text-align: center"><strong>Figure 6: Service Profiles</strong></td>
    </tr>
  </tbody>
</table>

<p>Profiles are independent configuration files that are attached to service configuration, they are decoupled from any Scene based configuration (so changing configuration does not require scene changes) and can even be swapped out at runtime if needed.  This enables you to have services with multiple types of configuration and apply the one that best meets the Scene or Project/platform needs.  This is crucial for XR solutions where platforms need specific setups depending on the headset they are running on.</p>

<p>All my production projects use the service framework for anything from:</p>

<ul>
  <li>Application Settings.</li>
  <li>Application State.</li>
  <li>UX design and flow.</li>
  <li>Integration with third party services.</li>
</ul>

<p>There is so much more behind the Service Framework, so you can <a href="https://serviceframework.realitycollective.net/docs/get-started">read about it here</a>, or check out <a href="https://localjoost.github.io/">Joost van Schaik</a> blog where he talks about so many different Service Framework implementations.</p>

<h3 id="reality-toolkit">Reality Toolkit</h3>

<p>The Reality Toolkit is where is all began, now stripped down to just the essential parts to be more efficient and maintainable, each feature given its own space in its own right to make building projects even easier:</p>

<ul>
  <li>The Core - Input system, critical definitions and structures, and future proofed elements to be as fast as possible.</li>
  <li>The Player framework - Defines playable areas, the XR rig definition and a multi-tiered Camera / vision setup, automatically setting up the environment in reaction to the headset / environment it is running on.</li>
  <li>The Interaction System - A vast array of building blocks for almost any kind of XR interaction, from Select, Grab, Throw, Pull, Switch and so much more. All ready to work out of the box.</li>
  <li>The Locomotion system - Enables all forms of reusable features to control locomotion for players in XR titles, including teleportation, screen effects and anchoring.</li>
</ul>

<p>And so much more, and due to the componentized nature, you only need take in those components you want or need to use.</p>

<blockquote>
  <p>Interestingly, when the MRTK raised up to V3, they took a similar approach to the Reality Toolkit and separated out the Service Infrastructure for Unity’s XRI platform. They then tried to re-create the patterns of the Service Framework into the XR Subsystems, trying to retain the approach used by the XRTK/Reality Collective.</p>

  <p>However it became too cumbersome for users to migrate to, some of those projects with existing MRTK V2 services actually included the Service Framework instead as it meant they could reuse what they had already built with little rework.</p>
</blockquote>

<p>There is even a fully <a href="https://www.oculus.com/experiences/25377052891940875/release-channels/2032095987191736/?token=LQsA7nJV">featured sample app</a> available (still actively being worked on) to feature all the components of the Reality toolkit, following a dungeon explorer style game with each room teaching you some new trick or feature:</p>

<table>
  <thead>
    <tr>
      <th style="text-align: center"><img src="/assets/img/posts/20250515/DungeonSample.png" alt="Sample Dungeon demo" /></th>
    </tr>
  </thead>
  <tbody>
    <tr>
      <td style="text-align: center"><strong>Figure 7: <a href="https://www.oculus.com/experiences/25377052891940875/release-channels/2032095987191736/?token=LQsA7nJV">Sample Dungeon</a> demo</strong></td>
    </tr>
  </tbody>
</table>

<p>The toolkit is the fastest way to get your XR project up and running and on to whichever devices you want to deploy on (provided the client plugin has been built to work with the framework)</p>

<h2 id="summary">Summary</h2>

<p>XR is still an evolving space, I have worked on and continue to work on so many different projects from Mobile to headset and beyond and AI’s introduction is only accelerating its use and development.</p>

<p>I have bright visions for the future and still continue to contribute to open source projects like the Service Framework and Reality Toolkit as time permits, as well as utilize them in production projects (I have added two new platforms to the Spatial Persistence package already recently for Google Cloud Anchors and AR Foundation Image tracking), so where the framework’s use in a project needs expansion, all efforts head back into the online projects as well.</p>

<p>Ever onwards!!</p>]]></content><author><name>Simon Jackson</name></author><category term="XR" /><category term="xr" /><category term="ar" /><category term="unity3d" /><summary type="html"><![CDATA[The journey of the Microsoft HoloToolkit for HoloLens, the evolution of the MRTK and the journey onwards.]]></summary></entry><entry><title type="html">XR Showcase</title><link href="https://darkgenesis.zenithmoon.com/XR-Showcase.html" rel="alternate" type="text/html" title="XR Showcase" /><published>2025-03-04T00:00:00+00:00</published><updated>2025-03-04T00:00:00+00:00</updated><id>https://darkgenesis.zenithmoon.com/XR-Showcase</id><content type="html" xml:base="https://darkgenesis.zenithmoon.com/XR-Showcase.html"><![CDATA[<blockquote>
  <p>TL;DR -&gt; XR is an interesting space with lots to offer, but it is not for the faint of heart as there are many challenges ahead.   Checkout my solutions that are live in the market, <strong>not fake demos</strong>.</p>
</blockquote>

<p>In a showcase of my recent efforts, I thought I would share some of the experiences I have been working on. Each has brought its own challenges, from dealing with engines and software, tackling complex integrations between vendor SDK’s and achieving the desired implementation, to the often confusing requirements set down by customers or sales.</p>

<blockquote>
  <p>These solutions are all native solutions built using Unity 3D to achieve the best performance and meet demanding customer needs.  Whilst WebXR does show promise, it is still missing key features in public browsers (those not requiring complex advanced options to be enabled) to make them functional.  Although I always keep expanding and experimenting with alternate technologies (such as React Native) to give more options in delivery.  But above all, I aim to be realistic in the capabilities of any technology.</p>
</blockquote>

<p>To begin, I will highlight some of the entertainment experiences or information booths that are often required to show a person or character that can interact with a user, impart some critical information or just to have fun.</p>

<p>Two such examples below use very different techniques to convey a message.</p>

<h2 id="showcase-1---2d-digital-holograms">Showcase 1 - 2D Digital Holograms</h2>

<p>The first showcase is A 2D hologram of a person delivering a speech or conversation piece, utilizing several techniques to record, place and then play back the message.</p>

<p>The solution even goes so far as to be able to enable anyone with a mobile device to record their own video and place themselves in space, which is a crucial defining factor to allow everyone using the solution to create their own content and fun.</p>

<blockquote>
  <p>I personally created an entire scene using multiple holograms of me fighting myself with a sword to win a fair maidens heart.</p>
</blockquote>

<p>When users engage with lifelike characters, it creates that “appear” in space, they form a better connection with the content over using a traditional photo (and infinitely more repeatable than having some pour soul wait at the door for every attendee).</p>

<video controls="" width="500" height="400" preload="metadata">
	<source src="/assets/img/posts/20250304/2DHolograms.webm" type="video/webm" />
</video>

<table>
  <tbody>
    <tr>
      <td><strong>Reality verses the digital Universe, as a 2D human hologram faces off against a 3D character</strong></td>
    </tr>
  </tbody>
</table>

<p>On the left is a video recording that has been transcribed into a 2D hologram and on the right is a 3D character model.</p>

<h2 id="showcase-2---digital-interactive-characters">Showcase 2 - Digital Interactive Characters</h2>

<p>The second showcases a 3D animated character with several interactive components. While on the surface this may look like a simple designed character, but behind the scenes it is fully configurable, speech is through any downloaded audio file with lipsync used to keep the mouth and poses moving, subtitles can be downloaded or generated. If customers want to update or change the character, this can be done remotely as the entire experience is run through configuration.</p>

<p>Characters can provide a varied range of interactions from:</p>

<ul>
  <li>A fully interactive experience such as a treasure hunt, a simple AR game or interactive back-and-to conversations.</li>
  <li>Simple snippet speeches about achievements or history.</li>
  <li>Enact poses so that users can get photos taken with characters, although only though the back facing camera as AR selfies are sadly not a thing yet.</li>
</ul>

<p>Depending on the scope of the project, characters can be embedded within the solution (to simplify download, especially in poor network areas), or like Web style projects, the assets for the character can be downloaded to the device (which also allows updates to characters without a new app release) for playing.</p>

<p>I have always focused on reusability and delivering frameworks to build such interactivity, this creates massive cost savings as newer exhibits are rolled out, as well as the ability for installations to manage their own content and not incur residual charges.</p>

<video controls="" width="500" height="400" preload="metadata">
	<source src="/assets/img/posts/20250304/CharacterPromo.webm" type="video/webm" />
</video>

<table>
  <tbody>
    <tr>
      <td><strong>The awesome <a href="https://en.wikipedia.org/wiki/Ada_Lovelace">Ada Lovelace</a> comes in for a chat to the Signals Museum.</strong></td>
    </tr>
  </tbody>
</table>

<p>This has been deployed to the <a href="https://www.facebook.com/signalsmuseumhsv">Signals Museum</a> for their recent launch, I would highly recommend checking them out if you are in the area or planning to travel to <a href="https://en.wikipedia.org/wiki/Huntsville,_Alabama">Hunstville, AL</a>.</p>

<h2 id="summary">Summary</h2>

<p>This is just the beginning, over the next month I will share more solutions I have developed this past few years, with a few tips and tricks along the way to solve some of the more complex problems faced in real-world XR delivery.</p>

<p>Stay tuned for more demonstrations.</p>]]></content><author><name>Simon Jackson</name></author><category term="XR" /><category term="xr" /><category term="ar" /><category term="unity3d" /><summary type="html"><![CDATA[With time on my hands its time to showcase what I have been up to.]]></summary></entry><entry><title type="html">My Time at Ethar</title><link href="https://darkgenesis.zenithmoon.com/My-Time-At-Ethar.html" rel="alternate" type="text/html" title="My Time at Ethar" /><published>2024-12-22T00:00:00+00:00</published><updated>2024-12-22T00:00:00+00:00</updated><id>https://darkgenesis.zenithmoon.com/My-Time-At-Ethar</id><content type="html" xml:base="https://darkgenesis.zenithmoon.com/My-Time-At-Ethar.html"><![CDATA[<blockquote>
  <p>TL;DR -&gt; <a href="https://www.ethar.com/">Ethar</a> is an XR powerhouse, using the latest technologies from leading partners and delivering award winning solutions, while also investing in XR research to make new experiences possible, quick and easy to deliver.</p>
</blockquote>

<p><img src="/assets/img/posts/20241222/Etharlogo.png" alt="Ethar" /></p>

<p>As an avid content creator and educator, these past few years have been tough since I joined <a href="https://www.ethar.com/">Ethar</a> (the premier XR Experience platform). I’ve loved being here since I joined the team and worked hard to accelerate their vision of creating the worlds first truly cross platform and cross-vendor spatial aware platform, however due to my focus I’ve not had as much time as I have had in the past to share what I’ve been up to and demonstrate to others what they can achieve.</p>

<p>The goals at Ethar are huge and we have made great strides to overcome the many complexities of running an XR spatially aware platform, whilst also delivering beyond exceptional work for our clients and <a href="https://thearea.org/">AREA</a> research projects.</p>

<p>Whilst I cannot share everything, this article is just a snippet of those solutions I’m most proud of achieving, in a cost-effective, efficient and most importantly, cross-platform way.</p>

<h2 id="cross-platform-spatial-placement">Cross-Platform spatial placement</h2>

<p>A key goal of any XR Spatial browser is the ability to locate and localize XR content in a repeatable fashion, not just a tech demo to show something cool, but ensuring the solution is deployable, re-creatable, and efficient. We achieve this in many ways, some using tech we have built ourselves and others through API integration with other partners.</p>

<blockquote>
  <p>It is important to note that the world needs to share and integrate with multiple specialized partners to succeed. Just trying to build it all yourself is a waste of precious time and resources.</p>
</blockquote>

<p>Where we differ from most, is that through our platform we can integrate with multiple solutions at the same time, dynamically switching or collaborating at runtime to fit the demand and needs of the client or consumer. This includes gathering even content and experiences from other vendors with compatible interfaces to truly deliver on the dream of a shared XR experience platform.</p>

<h2 id="localization-through-our-platform-can-be-achieved-using">Localization through our platform can be achieved using:</h2>

<ul>
  <li>Image tracking and identification</li>
  <li>GPS localized discovery</li>
  <li>Visual Positioning</li>
  <li>Manual placement with world understanding</li>
  <li>In some cases, a merging of all of these techniques as demand requires it</li>
</ul>

<p>Simply put, in the digital universe of content and data, we can reliably place and recall information and experiences almost anywhere and at any time, whilst also preserving the protection and permissions of both the content and the user.</p>

<blockquote>
  <p>Only what the user wants to see and is allowed to see is presented, a keen distinction, no clutter.</p>
</blockquote>

<video controls="" width="500" height="400" preload="metadata">
	<source src="/assets/img/posts/20241222/Retail_Clip.webm" type="video/webm" />
</video>

<table>
  <tbody>
    <tr>
      <td><strong>Retail solutions where vendor content is discovered and displayed virtually to meet the vendor’s needs.</strong></td>
    </tr>
  </tbody>
</table>

<video controls="" width="500" height="400" preload="metadata">
	<source src="/assets/img/posts/20241222/Entertainment_Clip.webm" type="video/webm" />
</video>

<table>
  <tbody>
    <tr>
      <td><strong>Browsing the high street and discovering offers and promotions from vendors.</strong></td>
    </tr>
  </tbody>
</table>

<h2 id="enriched-interactive-content-and-exhibits">Enriched interactive content and exhibits</h2>

<p>Content on its own is not enough in the advancing world, seeing things through an augmented lens is cool, but being able to truly interact with experiences opens up a new world of exploration. There are many ways to introduce interactivity, but here at <a href="https://www.ethar.com/">Ethar</a> that alone is not enough, the experiences need to be adaptable and updatable on demand according to our clients wishes.</p>

<p>That engagement can be done in many ways:</p>

<ul>
  <li>Fully interactive conversations and demonstrations.</li>
  <li>Games and discovery.</li>
  <li>Connected experiences with the real world.</li>
  <li>Long-term rewards and collectibles.</li>
</ul>

<p>Exhibits and interactions need to feel alive and offer more to the end user than a static piece of content, exploring the digital world and enriching the joy of patrons to museums and beyond needs to make the visit a memorable one.</p>

<table>
  <thead>
    <tr>
      <th style="text-align: center"><img src="/assets/img/posts/20241222/ada-lovelace.jpg" alt="Ada Character in an old sitting room" /></th>
    </tr>
  </thead>
  <tbody>
    <tr>
      <td style="text-align: center"><strong>Ada Lovelace making an appearance and talking to guests, with several opportunities to talk and interact with.</strong></td>
    </tr>
  </tbody>
</table>

<p>These installations can be historical characters, physical installations or even an image on the wall that starts a treasure hunt around the site, with the digital world there truly are no barriers.</p>

<p>At <a href="https://www.ethar.com/">Ethar</a>, we do not stand still, even in the AI revolution that is ongoing, although tempered with the experience of many technical advocates, as safety is paramount when delivering experiences to customers, especially where children are involved.</p>

<h2 id="merging-the-physical-with-the-digital-world">Merging the physical with the digital world</h2>

<p>There are many mechanisms available today to scan and digitize physical objects and people into augmented content, what many do not realize is that these capabilities are now a part of the hardware/software ecosystem of the devices we carry in our pockets every day, each with their own unique traits and rules. All that is required of vendors is to successfully integrate then with their solutions, which is where the challenge truly begins. These standards, API’s, and capabilities are constantly evolving, even more so since the integration of AI into modern devices.</p>

<p>At <a href="https://www.ethar.com/">Ethar</a>, as we specialize in cross-platform integration which is highly componentized, so that any development in one vendor does not impact others, however, this does not affect our downstream applications as they all use a common interface. Adding more vendors only extends the Ethar platforms reach without causing massive rework in our infrastructure. This enables Ethar to stay ahead of the game with limited cost impact, further benefiting our clients and keeping costs down.</p>

<p>And we do not limit what kinds of content and capabilities can be achieved with the hardware available, such as the 2D holograms shown below that can be captured, preserved and then used in digital recreations in the augmented world.</p>

<video controls="" width="500" height="400" preload="metadata">
	<source src="/assets/img/posts/20241222/Education_Clip.webm" type="video/webm" />
</video>

<table>
  <tbody>
    <tr>
      <td><strong>A 2D Hologram that has been captured on a device and then placed in the world world.</strong></td>
    </tr>
  </tbody>
</table>

<p>Our vision for such creations is not limited to single subjects or capture, but intended to enable content creators to recreate entire scenes through augmented reality using characters and content they have captured.</p>

<h2 id="world-discovery-and-recognition">World Discovery and Recognition</h2>

<p>When learning new procedures and processes, or completing complicated tasks, traditional learning tools cannot compete in a growing augmented and AI-enabled world. Procedures are becoming more complicated, the safety aspects of even the simplest task are becoming more costly to maintain and repeating training on a regular basis is becoming mandatory through regulation. This means that the cost of doing business keeps growing for achieving the same output, costs which eventually turn into higher prices or operating budgets.</p>

<p>VR training has already demonstrated significant cost reductions and higher adherence to process in a virtual environment, however, the costs to produce such solutions continue to grow as the demands of digital artists increase with higher production and maintenance costs of these virtual solutions.</p>

<p><a href="https://www.ethar.com/">Ethar</a> is at the forefront of developing solutions fully integrated with XR and AI to both simplify and enhance training and processes, ultimately reducing the costs involved and also improving safety in the workplace. We are heavily invested in building solutions that are both extensible and effective in improving outcomes in training, rehearsal, and active engagement while performing processes. Work in essence should be assisted digitally and where needed, also tracked (should the need require validation) to greatly improve safety and reduce ongoing costs.</p>

<video controls="" width="500" height="400" preload="metadata">
	<source src="/assets/img/posts/20241222/Industry_Clip.webm" type="video/webm" />
</video>

<table>
  <tbody>
    <tr>
      <td><strong>XR-assisted training, identifies the world as seen by the operative and assisted through AI recognition and support.</strong></td>
    </tr>
  </tbody>
</table>

<h2 id="discovering-hidden-worlds-through-augmented-reality">Discovering hidden worlds through Augmented Reality</h2>

<video controls="" width="500" height="400" preload="metadata">
	<source src="/assets/img/posts/20241222/Portal-demonstration.webm" type="video/webm" />
</video>

<table>
  <tbody>
    <tr>
      <td><strong>An AR portal into another world.</strong></td>
    </tr>
  </tbody>
</table>

<p>Portals are a fantastic way to showcase the hidden digital world behind windows, doors or magical gateways, even more so when you can actually walk through a door and visit that world (such as the radio operator room on the Titanic above). Ethar’s content delivery system allows us to distribute such portals anywhere with any content and even change the frame to enter or just look at the world beyond.</p>

<p>Technology keeps moving on and the techniques are challenging to implement correctly with little performance impact on the devices we deliver to for our customers.</p>

<h2 id="the-service-framework-by-the-reality-collective">The Service Framework by the Reality Collective</h2>

<p>One of the partners we integrate with is the Reality Collective who specialize in a cross-platform framework for building XR solutions, they provide both an extensive <a href="https://serviceframework.realitycollective.net/">Service Framework</a> that simplifies the creation of a robust multi-platform solution as well as an advanced cross-platform XR framework (the <a href="https://realitytoolkit.realitycollective.net/">Reality Toolkit</a>) that accelerates XR development (primarily focused on VR solutions at the moment)</p>

<table>
  <thead>
    <tr>
      <th style="text-align: center"><img src="/assets/img/posts/20241222/RealityToolkit.png" alt="The Reality Toolkit by the Reality Collective" /></th>
    </tr>
  </thead>
  <tbody>
    <tr>
      <td style="text-align: center"><strong>The Reality Toolkit and Service Framework by the Reality Collective.</strong></td>
    </tr>
  </tbody>
</table>

<p><a href="https://www.ethar.com/">Ethar</a> is a premier partner in this toolkit and helps to extend its functionality and capabilities as this greatly extends Ethar’s capabilities as well, showing that with cooperation, it is far better to work together to build solutions and platforms that benefit all rather than dedicating resources to proprietary and locked down technologies. Ethar benefits from both the investments we make and also the further investments by the Reality Collective’s other partners and host development team, essentially Open Source has more advantages to in-house development alone. Together we build better.</p>

<h2 id="summary">Summary</h2>

<p>I have wanted to blog and showcase much of what is shown above (and more) but the world does not stop spinning for long enough for me to put pen to digital paper. Even my talking engagements have significantly reduced (here’s hoping I got more time this year).</p>

<p>But ever the tech-train continues and it is important to keep skills sharp and up to date, there is no such thing as “one solution to fit them all”, so <a href="https://www.ethar.com/">Ethar</a> has to remain agile and keep enhancing it’s “toolbox” to meet the needs of our customers, and I endeavor to be at the front, driving that train to an unknown destination. I don’t know what it looks like yet, but I am excited to find out!</p>]]></content><author><name>Simon Jackson</name></author><category term="XR" /><category term="xr" /><category term="ar" /><summary type="html"><![CDATA[A walk through the awesome real-world delivered solutions at Ethar.]]></summary></entry><entry><title type="html">.NET 8, meet MonoGame</title><link href="https://darkgenesis.zenithmoon.com/DotNet-8-meet-MonoGame.html" rel="alternate" type="text/html" title=".NET 8, meet MonoGame" /><published>2023-12-11T00:00:00+00:00</published><updated>2023-12-11T00:00:00+00:00</updated><id>https://darkgenesis.zenithmoon.com/DotNet-8-meet-MonoGame</id><content type="html" xml:base="https://darkgenesis.zenithmoon.com/DotNet-8-meet-MonoGame.html"><![CDATA[<blockquote>
  <p>TL;DR -&gt; .NET 8 language support is now available for MonoGame and opening up a whole new world of goodness and speed for games.</p>
</blockquote>

<p><img src="/assets/img/posts/20231211/getthepartystarted.gif" alt="Get the .NET8 Party started" /></p>

<blockquote>
  <h6 id="note-the-information-contained-below-is-for-those-developers-who-want-access-to-the-cutting-edge-as-it-requires-access-to-the-development-source-with-the-exception-of-upgrading-your-game-to-net-8">*Note, the information contained below is for those developers who want access to the cutting edge, as it requires access to the development source. (with the exception of <a href="#actually-you-can-build-net-8-already">upgrading your game to .NET 8</a>)</h6>

  <h6 id="the-full-release-of-the-net-8-monogame-support-will-be-included-with-the-39-release-coming-soon">The full release of the .NET 8 MonoGame support will be included with the 3.9 release, coming soon.</h6>
</blockquote>

<p>MonoGame may have seemed stagnant or unmoving in the past, mainly because of the rigors of a group of developers working unpaid on the development of an OpenSource framework, meaning the focus had to be on what enabled the developers to make money in their own projects based on MonoGame.  But thanks to recent investments by ReLogic and our awesome MonoGame community, the MonoGame Foundation was born and more significant investments could be made.</p>

<p>Granted, the MonoGame Foundation board (the majority of the core developers) are still NOT getting paid, but there is a renewed focus and understanding of what is needed to make MonoGame (and its predecessor XNA) great again. (not to say it has not always been great, of course)</p>

<p>So on to today’s news (a few weeks late), that one of the first items brought up at the <a href="https://monogame.net/foundation/meeting-2023-11-22.html">MonoGame Foundation board meetings</a> has now been completed, the <strong>upgrade from .NET 6 to .NET 8</strong> for the public version of MonoGame.  You can read the <a href="https://github.com/MonoGame/MonoGame/pull/8089">nitty-gritty of the change here in the PR</a> for the update, and this article will help explain the rest.</p>

<p><img src="/assets/img/posts/20231211/woopwoop.gif" alt="Fan fare!! woop woop" /></p>

<blockquote>
  <p>It may also be interesting to note, that the work was NOT done by a Foundation Board member, but by one of the MonoGame community, none other than <a href="https://github.com/AristurtleDev">Aristurtle</a>.  Make sure to give them a virtual clap on the back when you see them on Discord!!</p>
</blockquote>

<ul>
  <li><a href="#what-will-net-8-do-for-monogame">What will .NET 8 do for MonoGame</a></li>
  <li><a href="#actually-you-can-build-net-8-already">Actually, you can build .NET 8 already</a></li>
  <li><a href="#accessing-the-developer-version-of-the-monogame-packages">Accessing the Developer version of the MonoGame packages</a></li>
  <li><a href="#getting-access-to-the-net-8-developer-version-of-monogame-with-visual-studio">Getting access to the .NET 8 developer version of MonoGame with Visual Studio</a></li>
  <li><a href="#getting-access-to-the-net-8-developer-version-of-monogame-with-visual-studio-code">Getting access to the .NET 8 developer version of MonoGame with Visual Studio Code</a></li>
  <li><a href="#do-not-forget-about-the-tools">Do not forget about the tools!</a></li>
</ul>

<h2 id="what-will-net-8-do-for-monogame">What will .NET 8 do for MonoGame</h2>

<p>Initially, not much.  Apart from inheriting .NET 8’s inherent speed upgrades and compilation updates, nothing has really changed.  Stuff you get for free for being on the latest version of .NET is just that, free stuff.</p>

<blockquote>
  <p>Of note, one developer noticed a 1.5x performance boost by simply upgrading to .NET 8, everything ran smooth without any tricks or fixes.  Just by changing a number!</p>

  <p>Simply stating:</p>

  <p><strong>The .NET 8 upgrade of MonoGame was really worth it, it is a good release.</strong></p>
</blockquote>

<p>What this does enable however, is for MonoGame to start utilizing some of the additional features enabled with the latest and greatest .NET framework, namely:</p>

<ul>
  <li><a href="https://learn.microsoft.com/en-us/dotnet/core/whats-new/dotnet-8#serialization">Improved Serialization.</a> with even more control over serialization configuration.</li>
  <li><a href="https://learn.microsoft.com/en-us/dotnet/core/whats-new/dotnet-8#stream-based-zipfile-methods">Stream-based ZipFile methods.</a></li>
  <li><a href="https://learn.microsoft.com/en-us/dotnet/core/whats-new/dotnet-8#methods-for-working-with-randomness">Even more methods for working with randomness.</a></li>
</ul>

<p>While it will take time to fully realize some of these benefits in the core part of the MonoGame library, initially providing advantages in the Content Pipeline and the writing of some really cool <a href="https://www.youtube.com/watch?v=5mEQqCgTaLU&amp;ab_channel=TheDarksideofMonoGame">Content Pipeline extensions</a>, which are a fantastic way to fully empower your content in any MonoGame project.</p>

<p>But you are now free to fully utilize any and all improvements from the .NET 8 SDK without limitation (other than making sure it works on your intended platform).</p>

<blockquote>
  <p>One small Caveat to the announcement is that the .NET upgrade is ONLY for the <strong>public</strong> version of MonoGame. For consoles and other private areas (due to the licensing enforced by partners), the team is working hard in this release to get those updated, but that will come later.</p>
</blockquote>

<h2 id="actually-you-can-build-net-8-already">Actually, you can build .NET 8 already</h2>

<p>Now, one misnomer to get over at this point, is that you can <strong>TODAY</strong>, with the <strong>release version</strong> of MonoGame, actually build a .NET 8 executable for your game, and in that, use .NET 8 features in your project.  But the MonoGame Libraries are still .NET 6 and limited to the .NET 6 instruction set, so any functionality you write can only be enhanced in your code and not the base of the MonoGame Framework.</p>

<p>You still get some of the performance gains in your .NET project for the code you write in your game so it is worth doing!</p>

<h2 id="accessing-the-developer-version-of-the-monogame-packages">Accessing the Developer version of the MonoGame packages</h2>

<p>The developer versions of the MonoGame packages are currently published on GitHub using GitHub’s own NuGet packaging service, which can be found at <a href="https://github.com/orgs/MonoGame/packages">https://github.com/orgs/MonoGame/packages</a></p>

<p><img src="/assets/img/posts/20231211/00-MonoGame-packages.png" alt="MonoGame GitHub Packages" /></p>

<p>You can download each package from here manually if you wish, but it is better to do it directly in your project, to do this however, you will also need a <strong>Personal Access Token</strong> for your client to successfully authenticate with GitHub to access the packages.</p>

<blockquote>
  <p>Although the packages are public, like the official NuGet servers, they are actually held behind GitHub’s authentication which needs a user account to access.</p>
</blockquote>

<p>To authenticate, you need:</p>

<ul>
  <li>Your GitHub username (or email).</li>
  <li>A <a href="https://docs.github.com/en/authentication/keeping-your-account-and-data-secure/managing-your-personal-access-tokens">Personal Access Token</a> with at least <strong>READ</strong> access to GitHub Packages.</li>
</ul>

<p>To create a Personal Access token, simply:</p>

<ol>
  <li>Visit the GitHub website, logged in of course.</li>
  <li>Click on your Profile Picture in the top-right-hand corner of the screen and select <strong>“Settings”</strong>.</li>
  <li>In the menu on the left, scroll to the bottom and select <strong>&lt; &gt; Developer Settings</strong>.</li>
  <li>Expand the drop-down for <strong>Personal access tokens</strong> and select <strong>Tokens (classic)</strong>.</li>
  <li>
    <p>Click on the <strong>Generate new token</strong> button, select <strong>Generate new token (classic)</strong></p>

    <blockquote>
      <p>GitHub Packages only support authentication using a personal access token (classic). For more information, see “<a href="https://docs.github.com/en/authentication/keeping-your-account-and-data-secure/creating-a-personal-access-token">Managing your personal access tokens</a>.”</p>
    </blockquote>

    <p><img src="/assets/img/posts/20231211/01-GitHubPersonalAccessToken.png" alt="GitHub Personal Access Token" /></p>
  </li>
  <li>
    <p>As shown above, give the token a recognizable name, select the</p>

    <p><strong>read:packages</strong> scope</p>

    <p>(which only allows this token to read packages, nothing else) and finally set the expiration date.  (For read tokens like this, I usually set the expiration to “Never expire”, although GitHub will warn you if you do)</p>
  </li>
  <li>When done, scroll to the bottom of the page and click <strong>Generate Token</strong></li>
  <li>Finally, on the next screen, GitHub will show your new key in a highlighted row in the Token list, now <strong>VERY IMPORTANT</strong>, copy your key from here and save it somewhere securely as GitHub will <strong>NEVER</strong> show you this key again.  The only way to access the key again is to regenerate it by editing the Key and requesting a new one.</li>
</ol>

<blockquote>
  <p>Your key will need to be regenerated if:</p>

  <ol>
    <li>You forget it, basically get a new one and update wherever you used it, for authentication, GitHub actions or wherever.</li>
    <li>The key expires and you need a fresh one.</li>
  </ol>

  <p>GitHub will NEVER ask you for a key and will not send you an email requesting it, so NEVER share it and NEVER publish it to a GitHub repo (even private ones).  Only use secrets online.</p>
</blockquote>

<p>Now armed with your key, you can use this as your <strong>password</strong> for authenticating with GitHub to access packages stored on GitHub for repositories your account can access.</p>

<h2 id="getting-access-to-the-net-8-developer-version-of-monogame-with-visual-studio">Getting access to the .NET 8 developer version of MonoGame with Visual Studio</h2>

<p><img src="/assets/img/posts/20231211/VisualStudio2022.jpg" alt="Visual Studio Logo" /></p>

<p>Starting with Visual Studio, as it is the simplest to do, upgrading MonoGame to .NET 8 is as simple as adding access to the GitHub NuGet package source and updating your packages.</p>

<ol>
  <li>Open your MonoGame project up in Visual Studio</li>
  <li>
    <p>Right-click and select properties on your Project File (not Solution file), then change the <strong>Target Framework</strong> to <strong>.NET 8.0</strong>, as shown below:</p>

    <p><img src="/assets/img/posts/20231211/02-TargetFrameworkSetting.png" alt="Setting Target Framework for Project" /></p>
  </li>
  <li>Save and close the window, which now changes the building of your project to <strong>.NET 8</strong></li>
  <li>Next, we need to add a new NuGet source so that you can access the developer packages instead of the publicly published ones on NuGet. Right-click the <strong>Dependencies</strong> branch of your project and select <strong>Manage NuGet packages</strong>.</li>
  <li>From here you can see (by default) what NuGet packages are installed in your project, for which you should see the existing MonoGame packages.  Now, click the <strong>COG</strong> icon next to the <strong>Package Source</strong> drop-down in the top-right-hand corner of the screen, which will bring up the <strong>Package Sources</strong> configuration for your project.</li>
  <li>We now need to add a new source to be able to select packages from the MonoGame GitHub repository, click on the “<strong>+</strong>” button in the top-right-hand corner of the window which will add a new item to the list and select it (if it does not select it, just select the item labelled “Package Source”).</li>
  <li>Next, enter the following details:
    <ul>
      <li>Name: MonoGame Development</li>
      <li>Source: <a href="https://nuget.pkg.github.com/MONOGAME/index.json">https://nuget.pkg.github.com/MONOGAME/index.json</a></li>
    </ul>
  </li>
  <li>
    <p>Once you have entered the details, click on the “Update” button to save the changes and you should see the updated screen below:</p>

    <p><img src="/assets/img/posts/20231211/03-NuGetSource.png" alt="NuGet Source Settings" /></p>
  </li>
  <li>
    <p>Now just click <strong>OK</strong> and select the new <strong>Package Source</strong> in the drop-down (if it is not selected already)</p>

    <blockquote>
      <p>The first time you access the MonoGame developer NuGet source on GitHub, you will be asked for your authentication credentials.  Simply enter your <strong>GitHub Username</strong> (or email) and your <strong>Personal Access Token</strong> (for the password) that you generated earlier to progress.</p>

      <p><img src="/assets/img/posts/20231211/04-GitHubAUthenticationPrompt.png" alt="GitHub authentication" /></p>
    </blockquote>
  </li>
  <li>Sadly, all we can still see are the existing <strong>Release</strong> packages at this point, to see the development versions you need to also check the “<strong>Includeprerelease</strong>” checkbox next to the search bar at the top of the screen, and WHOOSH, the MonoGame packages list will update to show the VERY latest versions.</li>
</ol>

<p>From here you should simply be able to select the installed packages and update them to the latest without issue.  Congrats you are now using the .NET 8 version of the MonoGame Framework!</p>

<p>Next Step, <a href="#do-not-forget-about-the-tools"><strong>jump to this section</strong></a> to also update the MonoGame tools, e.g. the MGCB content tool.</p>

<h2 id="getting-access-to-the-net-8-developer-version-of-monogame-with-visual-studio-code">Getting access to the .NET 8 developer version of MonoGame with Visual Studio Code</h2>

<p><img src="/assets/img/posts/20231211/visualstudiocode.png" alt="Visual Studio Code Logo" /></p>

<p>For Visual Studio Code, the flow is a little more manual and also a bit trickier as we no longer have a UI in which to make changes, so we need to apply the updates by hand.</p>

<ol>
  <li>Open Visual Studio Code in your MonoGame Project folder.</li>
  <li>Select the <strong>CSPROJ</strong> file in the folder tree.</li>
  <li>
    <p>Change the <strong>TargetFramework</strong> value from <strong>net6.0</strong> to <strong>net8.0</strong>. (yay your project will now build for .NET 8)</p>

    <blockquote>
      <p><code class="language-plaintext highlighter-rouge">&lt;TargetFramework&gt;net8.0&lt;/TargetFramework&gt;</code></p>
    </blockquote>
  </li>
  <li>
    <p>Next, to be able to access the GitHub Packages, we need to authenticate with GitHub to access the developer packages, open a new <strong>Terminal Window</strong> in VSCode (“<strong>Terminal -&gt; New Terminal</strong>” or “<strong>Ctrl+Shift+’</strong>”) and then type the following:</p>

    <pre><code class="language-dotnetcli"> dotnet nuget add source --username &lt;your GitHub Username/&gt; --password &lt;your GitHub PAT/&gt; --name MonoGame "https://nuget.pkg.github.com/MonoGame/index.json"
</code></pre>

    <blockquote>
      <p>Making sure to replace the username and password with your GitHub credentials, your username and the Personal Access Token you generated.</p>
    </blockquote>

    <p><img src="/assets/img/posts/20231211/05-addmonogamesource.png" alt="Command Line output" /></p>
  </li>
  <li>
    <p>With the authentication in place, enter the following command for each package you have installed:</p>

    <p><code class="language-plaintext highlighter-rouge">.NET add package MonoGame.Content.Builder.Task --version 3.8.1.534-develop</code></p>

    <blockquote>
      <p>To check the correct version to use for the packages you want to install, visit the <a href="https://github.com/orgs/MonoGame/packages">Packages list</a> on the GitHub repository and click on each package to see all the versions for the package and even the command-line command, as shown above.</p>
    </blockquote>
  </li>
</ol>

<p>If you now check the <strong>Solution Explorer</strong> tab in the Browser window on the left, you will see the dependency packages updated to the development versions of MonoGame (assuming your <em>nuget.config</em> is configured with the right credentials)</p>

<h2 id="do-not-forget-about-the-tools">Do not forget about the tools</h2>

<p><img src="/assets/img/posts/20231211/tools.gif" alt="MonoGame Tools need love too" /></p>

<p>You have updated your project to .NET 8 as well as your MonoGame Framework dependencies.  So, why when you do a build does it still use the old .NET 6 versions of the MonoGame Tools (like MGCB)?</p>

<blockquote>
  <p>The simple answer is because you are still telling it to.</p>
</blockquote>

<p>To update your project to use the newer .NET 8 version of the tools, you also need to update the <strong>.NET-tools.json</strong> configuration located in your projects <strong>.config</strong> folder.</p>

<p>Simply edit the file in Visual Studio or VSCode and swap out the older <strong>3.8.1.303</strong> version number with the newer version you installed with your packages, which at the time of writing was <strong>3.8.1.534-develop</strong>, as shown below:</p>

<div class="language-xml highlighter-rouge"><div class="highlight"><pre class="highlight"><code>{
  "version": 1,
  "isRoot": true,
  "tools": {
    ".NET-mgcb": {
      "version": "3.8.1.534-develop",
      "commands": [
        "mgcb"
      ]
    },
    ".NET-mgcb-editor": {
      "version": "3.8.1.534-develop",
      "commands": [
        "mgcb-editor"
      ]
    },
    ".NET-mgcb-editor-linux": {
      "version": "3.8.1.534-develop",
      "commands": [
        "mgcb-editor-linux"
      ]
    },
    ".NET-mgcb-editor-windows": {
      "version": "3.8.1.534-develop",
      "commands": [
        "mgcb-editor-windows"
      ]
    },
    ".NET-mgcb-editor-mac": {
      "version": "3.8.1.534-develop",
      "commands": [
        "mgcb-editor-mac"
      ]
    }
  }
}
</code></pre></div></div>

<p>Done, next time you perform a <code class="language-plaintext highlighter-rouge">.NET restore</code> or build your project, the latest version of the tools with be downloaded and made available (they will not be available until you do your FIRST build after making the update)</p>

<blockquote>
  <p><em>*Note</em> this is still a manual task. Every time you update the dependencies, you will also need to update the tools versions.</p>
</blockquote>

<h2 id="conclusion">Conclusion</h2>

<p>To the beginner, this upgrade will not mean much at all, except to state that you will be running on the latest “supported” version of Dot Net (as .NET 6 is now in maintenance only), which also means you will get all the latest fixes and updates to the backbone of your project. As well as the modest speed improvements from the latest and greatest of .NET.</p>

<p>For the more adventurous, newer C# features and .NET 8 specific functionality are now within your project, so much so that I couldn’t fit them into a single article :D</p>

<blockquote>
  <h3 id="but-you-can-check-out-the-net-8-docs-for-even-more-details"><a href="https://learn.microsoft.com/en-us/dotnet/core/whats-new/dotnet-8">But you can check out the .NET 8 docs for even more details.</a></h3>
</blockquote>

<p>I wish you well on your continuing adventure with MonoGame and make sure to keep an eye on what the Foundation will promise next (but no Galactic Empire falls predicted yet if you are watching the Foundation TV series).</p>]]></content><author><name>Simon Jackson</name></author><category term="MonoGame" /><category term="game development" /><category term="xna" /><category term="monogame" /><summary type="html"><![CDATA[The journey has begun and the road to building .NET 8 based games has begun.]]></summary></entry><entry><title type="html">MonoGame on the Web, No Really!</title><link href="https://darkgenesis.zenithmoon.com/monogame-on-the-web-No-really!.html" rel="alternate" type="text/html" title="MonoGame on the Web, No Really!" /><published>2023-11-14T00:00:00+00:00</published><updated>2023-11-14T00:00:00+00:00</updated><id>https://darkgenesis.zenithmoon.com/monogame-on-the-web--No-really!</id><content type="html" xml:base="https://darkgenesis.zenithmoon.com/monogame-on-the-web-No-really!.html"><![CDATA[<p><img src="/assets/img/posts/20231114/weblaunch.gif" alt="It shoots web?" /></p>

<blockquote>
  <p>TL;DR -&gt; With a little effort, publishing MonoGame projects to the Web is possible, so long as you remember it is the Web and you cannot do EVERYTHING!</p>
</blockquote>

<p>When it comes to GameJams, <a href="https://darkgenesis.zenithmoon.com/gamedev-jamming-with-monodame.html">like the one mentioned in this post</a>, pushing out the finished project as an EXE or Appx usually results in your project either getting downvoted or ignored, because who wants to infect their machine with an unknown just to test out a Jam project.
This applies to most Game Engines out there that are not web-based, including MonoGame, but thankfully due to the hard work of <strong><a href="https://community.monogame.net/u/nkast">Nikos Kastellanos</a></strong> (<a href="https://github.com/nkast">NKast</a>) there is an option available to us.</p>

<p>Now you have to keep in mind, that the Web is NOT your desktop or some high-powered beast, sure, there are continual developments to make Web projects work better or support more features, but it is unlikely to match that of your modern desktops or consoles.  Some things either do not work because they are too complex, others because there is insufficient support in all web browsers or devices.  So long as you keep in mind the limitations (usually only found by trying to run your game in a browser), then you can truly fly.</p>

<blockquote>
  <p>Personally, Keep your expectations moderate. First, make your project work with the minimum, then just add more until it breaks :D.  Start with the keyboard only and go from there.</p>
</blockquote>

<ul>
  <li><a href="#welcome-to-the-kni-project">Welcome to the KNI project</a></li>
  <li><a href="#installing-the-templates">Installing the Templates</a></li>
  <li><a href="#making-a-build">Making a build</a></li>
  <li><a href="#what-could-go-wrong">What could go wrong</a></li>
  <li><a href="#extra-credit-publish-to-github-pages">Extra credit, publish to GitHub Pages</a></li>
</ul>

<blockquote>
  <p>BIG thanks to <a href="https://github.com/nkast">NKast</a> For the amazing work with the <a href="https://github.com/kniEngine/kni">KNI project</a> which offers another extended way to build MonoGame projects with some additional platforms and features!</p>
</blockquote>

<h2 id="welcome-to-the-kni-project">Welcome to the KNI project</h2>

<p><a href="https://monogame.net/">MonoGame</a> is an awesome game development framework, made even more awesome by the growing community that surrounds it.  A prime example of this is the <a href="https://github.com/kniEngine/kni">KNI Engine</a> made and supported by one of MonoGame’s long time supporters <strong><a href="https://community.monogame.net/u/nkast">Nikos Kastellanos</a></strong> (<a href="https://github.com/nkast">NKast</a>), their tireless devotion brings non-other than Web Support plus a host of other features for projects written using MonoGame.</p>

<p><img src="https://github.com/kniEngine/kni/blob/main/Images/Icon.png?raw=true" alt="KNI Engine" /></p>

<p>Like MonoGame, KNI supports the <a href="https://opensource.org/licenses/MS-PL">Microsoft Public License</a> for the majority of the code, with a few proprietary exceptions which are detailed in its components. KNI is free and open-source, however, maintaining and expanding the framework requires ongoing effort and resources that relies on the support of the community to continue delivering top-notch updates, features, and maintenance.</p>

<p>KNI Supports the same platforms that MonoGame does (because it is a fork of MonoGame) plus a few additions, which include:</p>

<ul>
  <li>Additional Math support.</li>
  <li>A WPF based MonoGame Content Pipeline editor.</li>
  <li>Video player support.</li>
  <li>An improved Font Processor.</li>
</ul>

<p>Plus a few performance tweaks for KNI based projects.  Worthy of checking out!</p>

<h2 id="installing-the-templates">Installing the Templates</h2>

<p>Now, unlike base MonoGame these days, KNI does require a full Visual Studio 2022 installation, mainly to support the additional Project templates that KNI provides, these are all installed by the KNI Engine installer (much like MonoGame did before it upgraded to .NET6 in its entirety):</p>

<h3 id="kni-engine-releases---latest-at-time-of-writing-v399001"><a href="https://github.com/kniEngine/kni/releases">KNI Engine Releases</a> - Latest (at time of writing) <a href="https://github.com/kniEngine/kni/releases/tag/v3.9.9001">v3.9.9001</a></h3>

<p>Like MonoGame, most of the libraries behind the templates are published on NuGet, but the Project templates (like the Web project template) still require Visual Studio to create them. (Maybe with your support this can be updated in the future!).</p>

<ul>
  <li>Simply run and install the <a href="https://github.com/kniEngine/kni/releases/download/v3.9.9001/KniSdkSetup3.9.9001.exe">KniSdkSetup3.9.9001.exe</a> to install the templates.</li>
</ul>

<blockquote>
  <p>At the time of writing, there is a <strong>Known</strong> issue with the Visual Studio templates, which is mainly Visual Studio’s fault (honest), whereby the templates may not immediately show up and require either:</p>

  <ul>
    <li>Restarting Visual Studio a “few” times.</li>
    <li>Require running the command <code class="language-plaintext highlighter-rouge">devenv /updateConfiguration</code> in the Visual Studio installation folder, e.g. <strong>C:\Program Files\Microsoft Visual Studio\2022\Community\Common7\IDE</strong>.</li>
  </ul>

  <p>If your User Profile is not in the default <code class="language-plaintext highlighter-rouge">C:\Users</code> folder, you might also have to check/update your Visual Studio “locations” setup and move/copy the installed templates there:
<img src="assets/img/posts/image-not-found.png" alt="Visual Studio Templates Folder" />
Just be sure to run the above <code class="language-plaintext highlighter-rouge">devenv /updateConfiguration</code> command <strong>AFTER</strong> moving them to update Visual Studio.</p>
</blockquote>

<p>Maybe with your support, this situation can be improved.  All it takes is a little support.  But once you are working, you can be ready to fly.</p>

<h2 id="making-a-build">Making a build</h2>

<p>With the templates installed and everything ready, you should have access to the new KNI templates, and for this article more importantly, the <strong>KNI Web Browser Template</strong> as shown below:</p>

<p><img src="assets/img/posts/image-not-found.png" alt="KNI Web Browser Template" /></p>

<p>Just create your new project using this template and you are already 90% of the way there:</p>

<p><img src="assets/img/posts/image-not-found.png" alt="New KNI Web Browser project" /></p>

<p>Running the project results in a new Web Browser being launched against your local machine, ready to test and play with:</p>

<p><img src="assets/img/posts/image-not-found.png" alt="Web Browser Output" /></p>

<p>Fantastic, so what was too hard about that?</p>

<blockquote>
  <p>KNI Web uses <a href="https://dotnet.microsoft.com/en-us/apps/aspnet/web-apps/blazor">Microsoft Blazor</a> (which uses Razor files) as the backend, which is a C# compiled Web system for building web apps.  It is really useful as MonoGame is C# based and Blazor is a C# based web system, it just works.  Some other Web solutions for MonoGame used a cross-compiler to turn C# into JavaScript, but Blazor is just cleaner and more efficient.</p>
</blockquote>

<p>Looking into the project, you should see a few subtle differences, which we should discuss, so that you don’t change anything you should not by mistake, namely:</p>

<p><img src="/assets/img/posts/20231114/01-SolutionExplorer.png" alt="KNI Browser project" /></p>

<table>
  <thead>
    <tr>
      <th>File</th>
      <th>Location</th>
      <th>Description</th>
    </tr>
  </thead>
  <tbody>
    <tr>
      <td>Program.cs</td>
      <td>Root</td>
      <td>A custom version of Program.cs (like most platforms) designed for Web Builds, DO NOT TOUCH :D</td>
    </tr>
    <tr>
      <td>KNIBrowserGame.cs</td>
      <td>Root</td>
      <td>This is basically your normal Game1.cs definition, hack away freely.  But if you change the Class name, also update <code class="language-plaintext highlighter-rouge">Index.razor.cs</code></td>
    </tr>
    <tr>
      <td>Index.razor</td>
      <td>Pages</td>
      <td>This is the Razor (web) equivalent of Program.cs, it is the initialization page for the project. It defines a renderable canvas on which to draw the game.</td>
    </tr>
    <tr>
      <td>Index.razor.cs</td>
      <td>Pages (under Index.razor)</td>
      <td>The c# code behind for the main Razor web page, this is the code initialization for the Web project</td>
    </tr>
    <tr>
      <td>KNIBrowserContent.mgcb</td>
      <td>Content</td>
      <td>The MGCB project for the Web solution, albeit, using KNI’s own MGCB editor due to “Visual Studio”</td>
    </tr>
    <tr>
      <td>wwwroot</td>
      <td>Root</td>
      <td>The deployable web folder for the project, unless you are a seasoned web dev, best not to touch this :D</td>
    </tr>
    <tr>
      <td>!Other files</td>
      <td>Root</td>
      <td>Just do not touch them, mainly Razor setup files and such</td>
    </tr>
  </tbody>
</table>

<p>Out of the box, you should not need to change anything and the only thing you will need to keep in sync is the NAME of your Game class and the entry point in <code class="language-plaintext highlighter-rouge">Index.razor.cs</code>, in the same way we do for other MonoGame projects between the Game class and the Program class.</p>

<p>Here is a GIF of the GameState Management sample (with a few alterations) running using a KNI Web Build.</p>

<p><img src="/assets/img/posts/20231114/02-gamestatemanagement.gif" alt="GameState Management Web" /></p>

<h2 id="what-could-go-wrong">What could go wrong</h2>

<p>Now, this is the web we are targeting and there is a lot of history and patches to make modern web browsers work, so it should come as no surprise that not EVERYTHING is going to work out of the box:</p>

<ul>
  <li>Some features are missing, like GamePad and Touchscreen support.</li>
  <li>Some shaders may not work as expected, or require reduced features.</li>
  <li>File access can be… Tricky, pesky permissions.</li>
</ul>

<p>To name but a few, no doubt there are more, much more.  But this being an Open Source project, if you have the skills and are willing to contribute to make it better, I encourage you to do so!!.</p>

<p>When you do hit an issue, and more likely than not I am afraid, you will, you will see the following result when you run your project:</p>

<p><img src="/assets/img/posts/20231114/03-KNIWebError.png" alt="KNI Web Error" /></p>

<p>A pretty purple screen with a “Reload” option, which is not really that helpful on its own and Visual Studio is no help here really because you have left the confines of your debugger and entered “The Web Zone”!</p>

<p>Luckily, most browsers have an “<strong>F12</strong>” developer option, so by pressing “<strong>F12</strong>” you will get the not-so-friendly “Web Debugger” window, as shown below:</p>

<p><img src="/assets/img/posts/20231114/04-BrowserErrors.png" alt="KNI Web Error" /></p>

<p>These outputs are more friendly to Web Developers (Well, I assume so?) full of lots of information to help you diagnose what is going on, in this case, the issue was simple:</p>

<blockquote>
  <p>The sample was using a <strong>GamePad</strong> for input and GamePads are not currently supported using the KNI Engine for the web.</p>
</blockquote>

<p>If you are only doing a web project, just fix / remove the offending code, if you have a multi-platform project, then just encase the offending code with the following pre-compiler definition (#if):</p>

<div class="language-csharp highlighter-rouge"><div class="highlight"><pre class="highlight"><code><span class="cp">#if !BLAZORGL
</span>                <span class="n">CurrentGamePadStates</span><span class="p">[</span><span class="n">i</span><span class="p">]</span> <span class="p">=</span> <span class="n">GamePad</span><span class="p">.</span><span class="nf">GetState</span><span class="p">((</span><span class="n">PlayerIndex</span><span class="p">)</span><span class="n">i</span><span class="p">);</span>
<span class="cp">#endif
</span></code></pre></div></div>

<p>Which will exclude the offending lines from being included in the Web Build (just make sure things still work / compile).</p>

<p>Feel free to experiment and play, and for those cunning individuals who are experienced in Web Development, I encourage you to help enlighten those who are not.</p>

<h2 id="extra-credit-publish-to-github-pages">Extra credit, publish to GitHub Pages</h2>

<p><img src="assets/img/posts/image-not-found.png" alt="Extra Credit" /></p>

<p>Having a web build on your machine that you can view locally is all well and good, but what about everyone else?  You cannot exactly ask them all to come to dinner to view your creation, what about pushing it to the web?</p>

<p>To get your build out there, you have a couple of options:</p>

<ul>
  <li>Painstakingly setup a web host, build your project, connect to your host, upload your files and pray everything works.
or</li>
  <li>Let GitHub do it for you.  Hosted for free, using free time and none (well a little) of yours.</li>
</ul>

<p>Thanks to GitHub actions (automation) and GitHub Pages (free static web hosting) we can manage the source of our project online and then create/update a build every time we push an update to source control.</p>

<p>To achieve this, assuming you have a GitHub repo setup and have pushed your source code to it, the tasks we need to complete are:</p>

<ul>
  <li>Configure the permissions for automation.</li>
  <li>Setup GitHub pages.</li>
  <li>Create a GitHub Pages deployment workflow.</li>
</ul>

<p>As easy as 1,2,3, honest.</p>

<h3 id="configure-automation-permissions">Configure automation permissions</h3>

<p>Because we want our automation to publish content to GitHub pages, and write back to the repository, we need to allow it to (by default, it is turned off).
To do this, navigate to “Settings -&gt; Actions -&gt; General -&gt; Workflow Permissions” and set the option to “Read and write permissions” as shown below:</p>

<p><img src="/assets/img/posts/20231114/08-workflowpermissions.png" alt="Enable read/write permissions for automation" /></p>

<p>This allows the automation to publish on your behalf.</p>

<h3 id="setup-github-pages">Setup GitHub Pages</h3>

<p>Enabling GitHub pages is very simple and GitHub continually works to improve the flow to make it easier and easier.</p>

<p>Next, you need to:</p>

<ul>
  <li>Navigate to “Settings -&gt; Pages”</li>
  <li>Change the “Source” to “GitHub Actions”</li>
  <li>In the selection that appears called “Static HTML”, click on the “Configure” button.</li>
</ul>

<p><img src="/assets/img/posts/20231114/06-pagessetup.png" alt="Enable GitHub Pages" /></p>

<p>Done, there is more to do, but GitHub Pages is now setup.  Now for the final and slightly trickier part, the automation workflow.</p>

<h3 id="configure-your-deployment-workflow">Configure your deployment workflow</h3>

<p>Following on from the previous step, you should now see the following default workflow setup, which is close but will not build our MonoGame project.</p>

<p><img src="/assets/img/posts/20231114/07-initialyaml.png" alt="Starter YAML" /></p>

<p>To get the result we want, we need to add the following:</p>

<ul>
  <li>Setup .NET 6 on the automation host.</li>
  <li>Build/Publish our Blazor webpage complete with our MonoGame project.</li>
  <li>Package the build output, not just the entire repository.</li>
  <li>Deploy (this is actually there, but we need to check the order)</li>
</ul>

<p>The updated YAML should be replaced with the following:</p>

<div class="language-yaml highlighter-rouge"><div class="highlight"><pre class="highlight"><code>
<span class="c1"># Simple workflow for deploying static content to GitHub Pages</span>
<span class="na">name</span><span class="pi">:</span> <span class="s">Deploy MonoGame web project to GitHub Pages</span>

<span class="na">on</span><span class="pi">:</span>
  <span class="c1"># Runs on pushes targeting the default branch</span>
  <span class="na">push</span><span class="pi">:</span>
    <span class="na">branches</span><span class="pi">:</span> <span class="pi">[</span><span class="s2">"</span><span class="s">main"</span><span class="pi">]</span>

  <span class="c1"># Allows you to run this workflow manually from the Actions tab</span>
  <span class="na">workflow_dispatch</span><span class="pi">:</span>


<span class="c1"># Sets permissions of the GITHUB_TOKEN to allow deployment to GitHub Pages</span>
<span class="na">permissions</span><span class="pi">:</span>
  <span class="na">contents</span><span class="pi">:</span> <span class="s">read</span>
  <span class="na">pages</span><span class="pi">:</span> <span class="s">write</span>
  <span class="na">id-token</span><span class="pi">:</span> <span class="s">write</span>


<span class="c1"># Allow only one concurrent deployment, skipping runs queued between the run in-progress and latest queued.</span>

<span class="c1"># However, do NOT cancel in-progress runs as we want to allow these production deployments to complete.</span>
<span class="na">concurrency</span><span class="pi">:</span>
  <span class="na">group</span><span class="pi">:</span> <span class="s2">"</span><span class="s">pages"</span>
  <span class="na">cancel-in-progress</span><span class="pi">:</span> <span class="kc">false</span>

<span class="na">jobs</span><span class="pi">:</span>
  <span class="c1"># Single deploy job since we are just deploying</span>
  <span class="na">deploy-to-github-pages</span><span class="pi">:</span>
    <span class="na">environment</span><span class="pi">:</span>
      <span class="na">name</span><span class="pi">:</span> <span class="s">github-pages</span>
      <span class="na">url</span><span class="pi">:</span> <span class="s">$</span>
    <span class="na">runs-on</span><span class="pi">:</span> <span class="s">ubuntu-latest</span>
    <span class="na">steps</span><span class="pi">:</span>
      <span class="pi">-</span> <span class="na">name</span><span class="pi">:</span> <span class="s">Checkout</span>
        <span class="na">uses</span><span class="pi">:</span> <span class="s">actions/checkout@v3</span>
      <span class="pi">-</span> <span class="na">name</span><span class="pi">:</span> <span class="s">Setup Pages</span>
        <span class="na">uses</span><span class="pi">:</span> <span class="s">actions/configure-pages@v3</span>
      <span class="pi">-</span> <span class="na">name</span><span class="pi">:</span> <span class="s">Setup .NET Core SDK</span>
        <span class="na">uses</span><span class="pi">:</span> <span class="s">actions/setup-dotnet@v3</span>
        <span class="na">with</span><span class="pi">:</span>
          <span class="na">dotnet-version</span><span class="pi">:</span> <span class="s">6.0.x</span>
      <span class="pi">-</span> <span class="na">name</span><span class="pi">:</span> <span class="s">Publish .NET Core Project</span>
        <span class="na">run</span><span class="pi">:</span> <span class="s">dotnet publish Platforms/Web/KNIBrowser.csproj -c Release -o release --nologo</span>
      <span class="pi">-</span> <span class="na">name</span><span class="pi">:</span> <span class="s">Upload artifact</span>
        <span class="na">uses</span><span class="pi">:</span> <span class="s">actions/upload-pages-artifact@v2</span>
        <span class="na">with</span><span class="pi">:</span>
          <span class="c1"># Upload wwwroot from publish action</span>
          <span class="na">path</span><span class="pi">:</span> <span class="s1">'</span><span class="s">release/wwwroot'</span>
      <span class="pi">-</span> <span class="na">name</span><span class="pi">:</span> <span class="s">Deploy to GitHub Pages</span>
        <span class="na">id</span><span class="pi">:</span> <span class="s">deployment</span>
        <span class="na">uses</span><span class="pi">:</span> <span class="s">actions/deploy-pages@v2</span>
</code></pre></div></div>

<p>The critical elements to watch out for are:</p>

<ul>
  <li>“Publish .NET Core Project” - Make sure the <strong>csproj</strong> file path is correct.  In this instance it is “Platforms/Web/KNIBrowser.csproj”</li>
  <li>The “Upload Artifact” path, which selects the files from the build to upload.  By default the “dotnet publish” command outputs to the root of the folder.</li>
</ul>

<p>If in doubt, run the commands locally in your project folder to make sure you get the output you expect.</p>

<p>Click save and “Commit to main” (or create a pull request) to activate the workflow.</p>

<blockquote>
  <p><strong>WARNING</strong> this will run straight away, as the workflow is activated on checking in code.  But do not worry, you have 2000 minutes of FREE time on GitHub for automations.</p>
</blockquote>

<h3 id="check-the-action-output">Check the Action output</h3>

<p>Providing everything is correct, you have put in the paths correctly and checked it DID actually build locally, then you should get the following result:</p>

<p><img src="/assets/img/posts/20231114/09-actionsresult.png" alt="Successful automation" /></p>

<p>Clicking on the completed Action, you shall see the output of the Action, INCLUDING the URL that your build was actually published to:</p>

<p><img src="/assets/img/posts/20231114/10-actionsoutput.png" alt="Upload result" /></p>

<p>Check out my build here:</p>

<h4 id="httpdarkgenesiszenithmooncomgamestatemanagementsample-web"><a href="http://darkgenesis.zenithmoon.com/GameStateManagementSample-Web/">http://darkgenesis.zenithmoon.com/GameStateManagementSample-Web/</a></h4>

<h3 id="danger-will-robinson">Danger Will Robinson</h3>

<p><img src="assets/img/posts/image-not-found.png" alt="Danger" /></p>

<p>One issue I did hit which actually prevented my build completing, required me to edit my KNI Engine csproj file and remove a line.  The line in question was:</p>

<div class="language-text highlighter-rouge"><div class="highlight"><pre class="highlight"><code>  &lt;Import Project="$(MSBuildExtensionsPath)\MonoGame\v3.0\MonoGame.Content.Builder17.targets" /&gt;
</code></pre></div></div>

<p>Rather ironically, local builds will work fine and run with this in, but automated builds will not.  Without it, everything is squeaky clean. (fingers crossed)</p>

<h2 id="the-game-is-afoot">The game is afoot</h2>

<p><img src="/assets/img/posts/20231114/05-thegameisafoot.gif" alt="Let the games begin" /></p>

<p>We have come to the end of this little web journey, I hope others are encouraged and excited to ship your games or hack projects to the web to demonstrate your skills, especially if there is a <a href="https://itch.io/jam/monogamejam5">GameJam going on :D</a>.</p>

<p>Here is hoping this is a little light in the darkness to get you going!</p>]]></content><author><name>Simon Jackson</name></author><category term="MonoGame" /><category term="game development" /><category term="xna" /><category term="monogame" /><category term="gamejam" /><summary type="html"><![CDATA[By default, MonoGame does not, or cannot publish to WebGL/The Web, but thanks to NKast, there is a Fork of MonoGame that can! Read on for details.]]></summary></entry></feed>