MonoGame - Building multi-platform solutions
To accompany the video project for the walkthrough of building multi-platform solutions with MonoGame, this blog post will walk you through some best practices and tips and tricks for starting and managing your MonoGame projects, with the aim to take them to as many platforms as possible with the least amount of pain.
The video for this post can be found here if you prefer video:
This and more content can be found on my dedicated MonoGame channel here: http://bit.ly/darksideofmonogame
Days gone by with XNA
As with most posts in my MonoGame series, I like to give a brief overview of what happened in XNA days, mostly to show you how MonoGame has evolved but also to help you if you are upgrading old XNA projects.
XNA Game Studio did not really have a multi-platform strategy as such, sure you were able target multiple platforms but nothing like what we have today with UWP and Xamarin. There was some sharing going on, mainly surrounding the Content Projects. Code wise however, the only sharing that was really considered, was being able to build reusable code for the same platform. To share code between different platforms you had to resort to some basic coding practices in order to make things happy.
Sharing Content
As you can see here, sharing content was easy enough between any platform. You just had to be sensible about what content you shared paying careful attention to resolution, size and so on:
Xbox and Windows Project using the same Content Project
Sharing Code
XNA provided you with special Game Library projects to allow you to store code outside of your project, similar to normal C#/VB Library Projects. If you tried normal library projects they would only work on Windows and not on Xbox or Phone. The drawback with these specific class libraries was that you could only use them on the platform you created them for, so they could not be used by any other platform:
Libraries only compatible with projects for the same platform
These worked well if you build say a Sprite Animation system or a good save game library for a platform that you wanted to reuse for all your games, but no good if you wanted to use it elsewhere.
This left you with the traditional options to use the same code:
- Copy / Duplicate the code
Not very practical, double the effort and a nightmare to debug. - Reuse the code from another platform
Worked but created problems when you needed to manage platform differences, messy code. - Create multiple library projects and link the code
This was a practical option but meant more management and control over the library code. - Store shared code in another project / folder and link the files
Best practice but needed a firm hand. Had to share / link the code since there were no libraries able to cross platforms. All code kept within the project.
Everyone I know from those days used what worked for them, everyone had their own preferences. Personally I used a combination of 3 & 4 depending on what was being shared. Specific libraries were kept separate in their own projects and true game code always stayed in the project.
Nowadays we have more tools to hand to make the job easier, which I will highlight with MonoGame
Building the future
With MonoGame, a lot of the above still applies, but I will walk-through some of the best practices with a few tips and tricks on how to make the best of it.
Others will still have different ideas, so I encourage anyone to comment below if they have some other ways of working. What follows is what I use as a rule of thumb with all my own projects.
Sharing Content
Sharing Content Projects are quick and easy. Multiple Content Projects per-platform are supported.
Not much has changed regarding sharing content, no point in breaking what was already a good solution. Content is managed separately, has its own projects and more importantly, they are no boundaries. If anything, the MonoGame content project system is a further evolution on the content system:
- Content Project definitions are text based
The XNA system was good but you had to work with all of MSBuilds way of managing a csproj file. It worked but there was a lot of overhead. MonoGame’s Content Project definition files are much simpler and they use a cut down XSD schema focusing on just the content and what it is. Plus (if you wish) you can easily generate them on the fly (if you build your own packaging system).
In a lot of ways, they were made to be human readable so you can either use the MGCB tool to manage them, or just open your test editor and hack away, your choice. - Their platform is determined when you build the project
You can either fix the platform build type (which is like setting a default) and build the content manually (you can also call the MGCB tool programmatically from a build script to build it separately if you wish as well, for advanced users). Alternatively, if you have your content file attached to your solution (which is the default), then Visual Studio will tell the Content Project which platform to build based on the platform you are building automatically, regardless of whether you share the project or not. This means you do not have to worry if the content will work on the platform or not (as different platforms use different methods for compression, formatting and so on. An XNB file built for Windows likely wo not work on Android for example. - They are extensible
Like its XNA predecessor, MonoGame has the same Content Pipeline Extension capabilities and can support building your own methods for interrogating (importing) and processing (exporting) asset files. This is extremely useful when you want to manipulate the asset or get more data out in multiple structures that your game can use. Say extracting Normal and Tangent data from a model for lighting calculations, or using the colors of an image to generate a heightmap. (more posts in the future on this)
Sharing Code
Out of the box sharing code between platforms has not changed much, although MonoGame can now benefit from more modern standards for sharing code if you wish (with a little work). What follows are my personal best practices when starting any project which you intend to deploy across multiple platforms, even if you only start with one, if you follow these simple steps you will save yourself a ton of rework later when you want to add more.
Some considerations you should keep in mind (will go in to more detail later):
- Where possible, write core game code within a single solution (except plugin’s and libraries). Keeping everything about the game in one place, such as: Data structures, logic, movement, workflows and state management. This will make sharing the core of the game a lot easier.
- Use a Game specific namespace for all your core game code. Keep it separate from any platform, ideally it should be platform agnostic.
- Identify Platform specific features you intend to use based on what it is, say Achievements, Leaderboards, etc and design them as something your game will integrate with inside your project. Keep the platform specific behind this layer. Your game should talk to your game code, not directly to a platform specific component.
- Build platform specific integrations on the platform and have them integrate with your games subsystem based on it is type. So that platform specifics do not deeply interfere with your core game, they only integrate with your games abstraction of the service. So Steam achievements ONLY talk to your games achievements sub system and are not hooked deeply in the game code.
Some of these are more advanced topics, so do not worry if not all of them are familiar to you at the moment.
With those in mind, I will now walk through a few things to get you started. I will follow up on more advanced topics in future posts.
Getting Started with a MonoGame multi-platform project
To make things clearer, I will walk through the common steps I use when creating a new project.
I will reiterate, these are the tips and tricks I have picked up over the years, it is certainly not going to be everything and it is the way I work, you can choose your own path by picking and choosing from the suggestions here. If you have other ideas, feel free to comment below and add to the discussion
(this is not another GIF vs JIF debate
)
New Project
Once you have created your project (or if you have an existing one) there are a few steps to get it ready for the future.
Bear in mind this is future planning, it does not mean you want (or even have the capacity to) build for multiple platforms at once, it just means you start working in a way that is going to remove pain in the future and avoid massive amounts of rework.
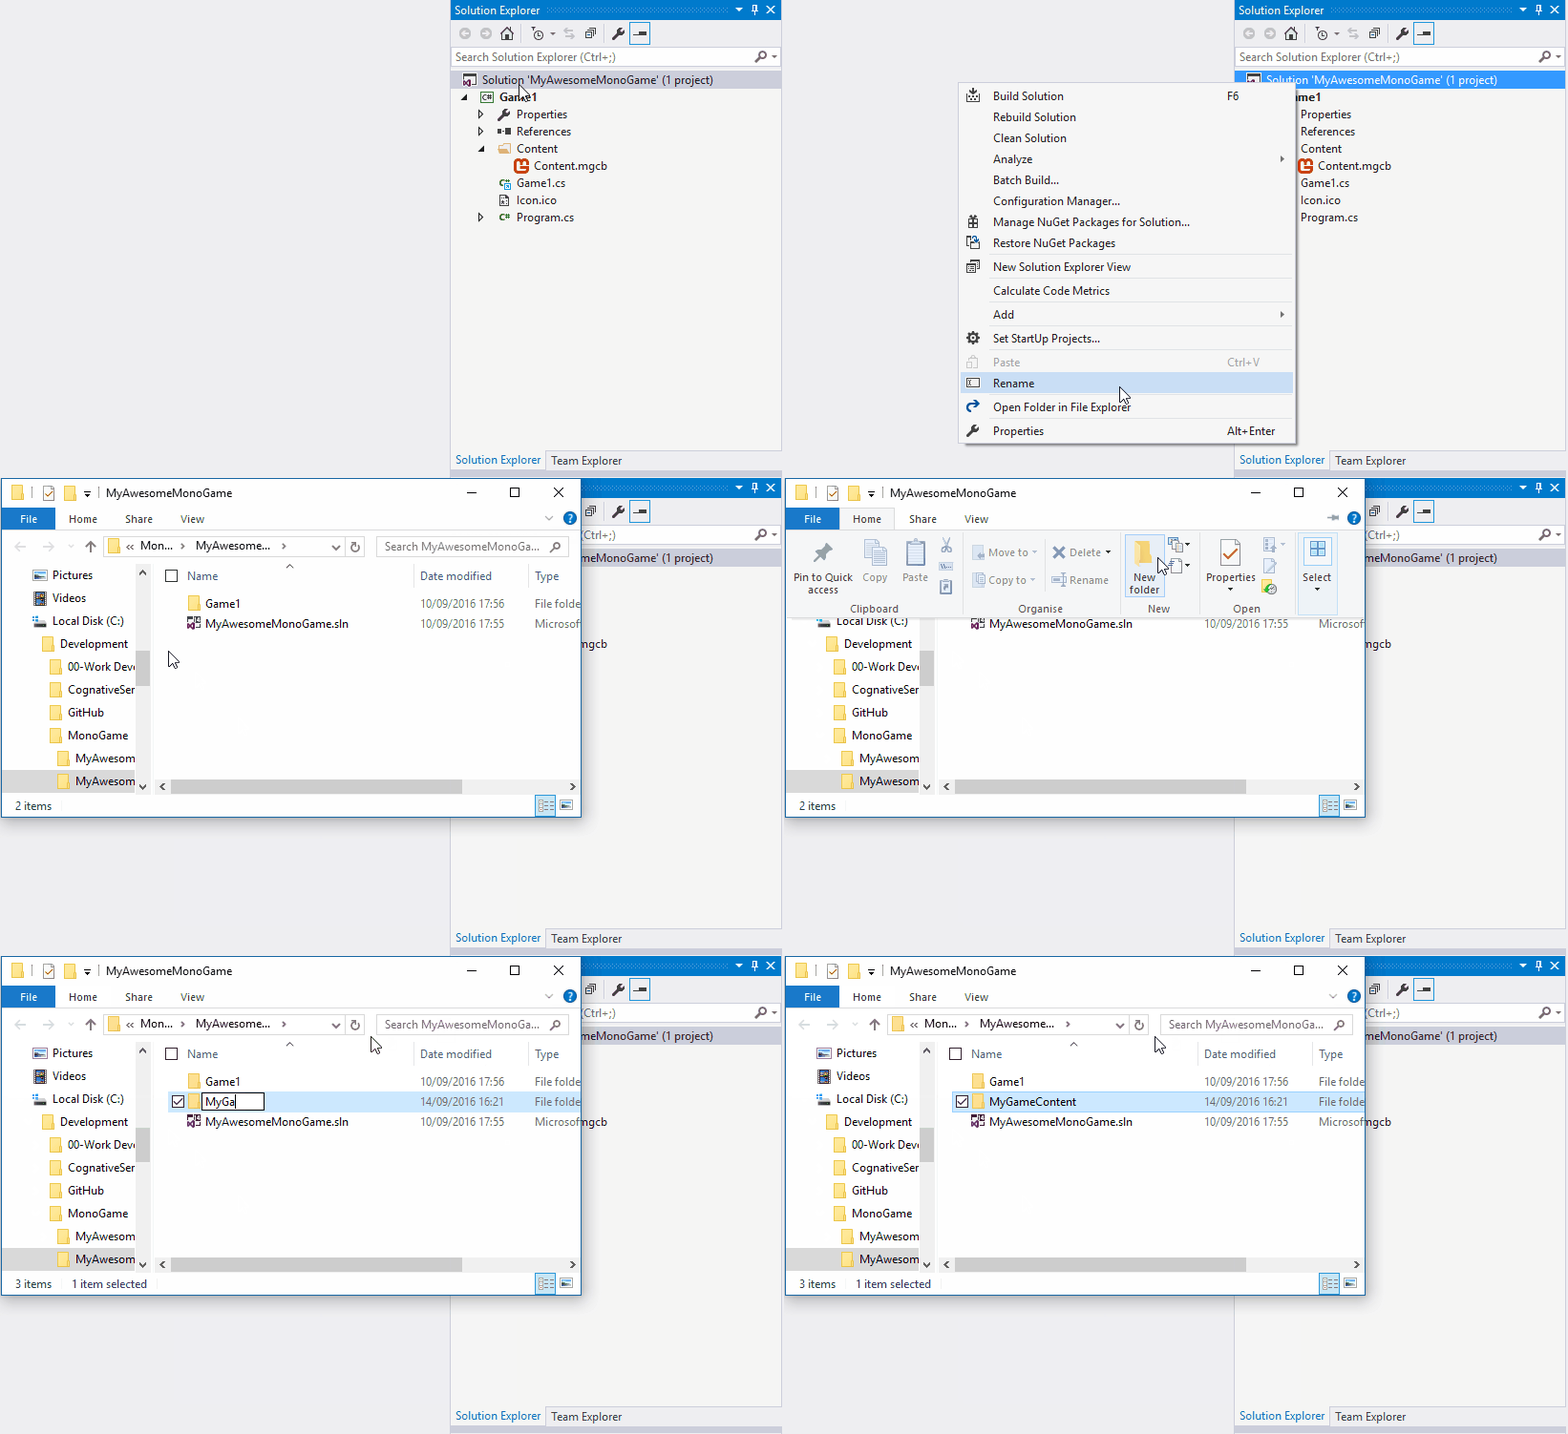
Within the solution folder, create a new Content folder to hold all the shared assets for the game
This is to create a centralized home for all your shared content. You can always create more or re-use the content folder / project in the platform project for platform specific assets, but I find it better to keep all the asset files in ONE location, so you know where to find everything. You can have multiple MGCB files in the asset folder if you wish as they do not have to use all assets in the folder, only what you configure for each.
Click on the images to enlarge them
Move / Copy the default MGCB content project definition to the new Content folder.
When starting fresh, it is best to just move the MGCB file that the templates created for you, or alternatively use the Content Builder tool to create a new one. Either way is fine, just so you end up with your main shared content project definition. Feel free to rename it if you wish.
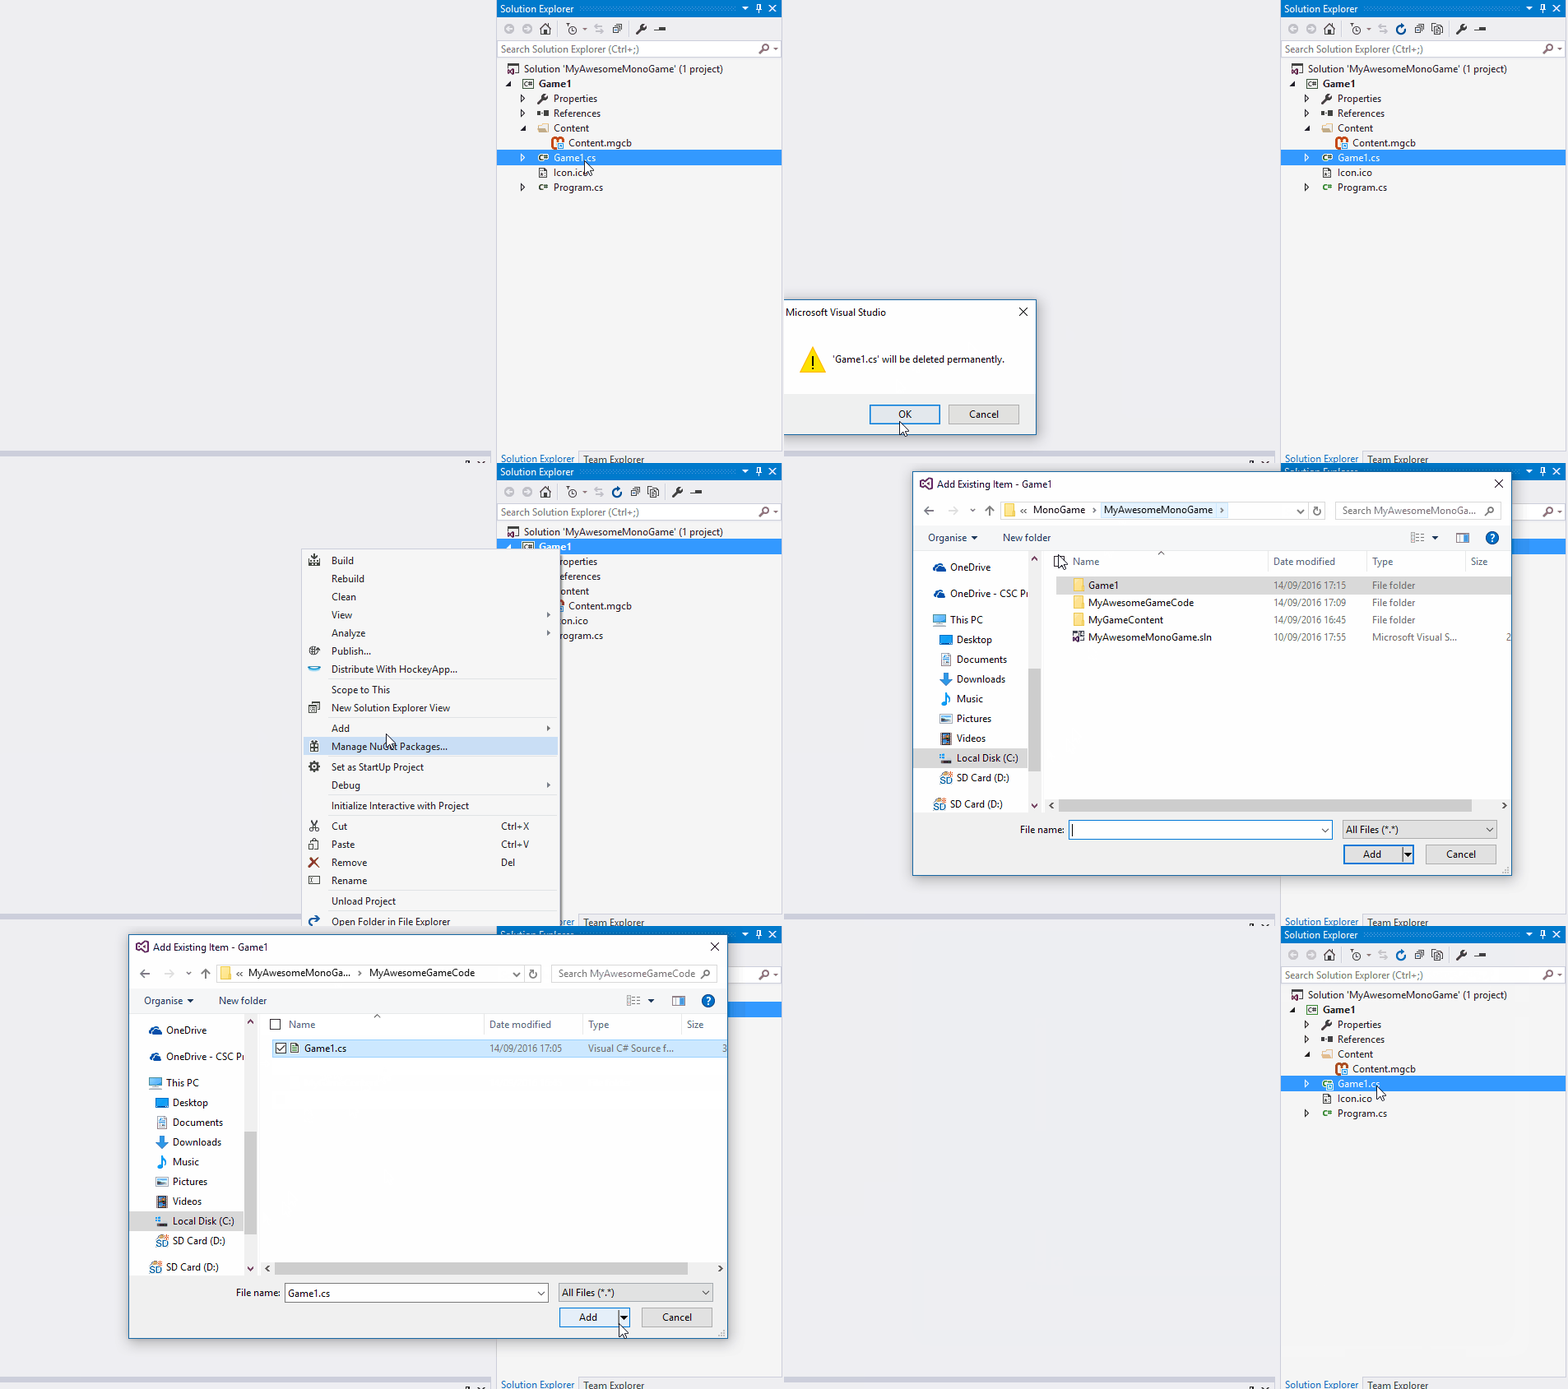
Delete / remove the existing content definition from the project and create a new link to the one in the new Content folder
This is to clean up your project so that it uses your new central shared content project. Another option is to leave the old platform content project there (renaming it to be clear) and just adding the shared project to the platform. Either way is fine and all depends on how you want to manage your content.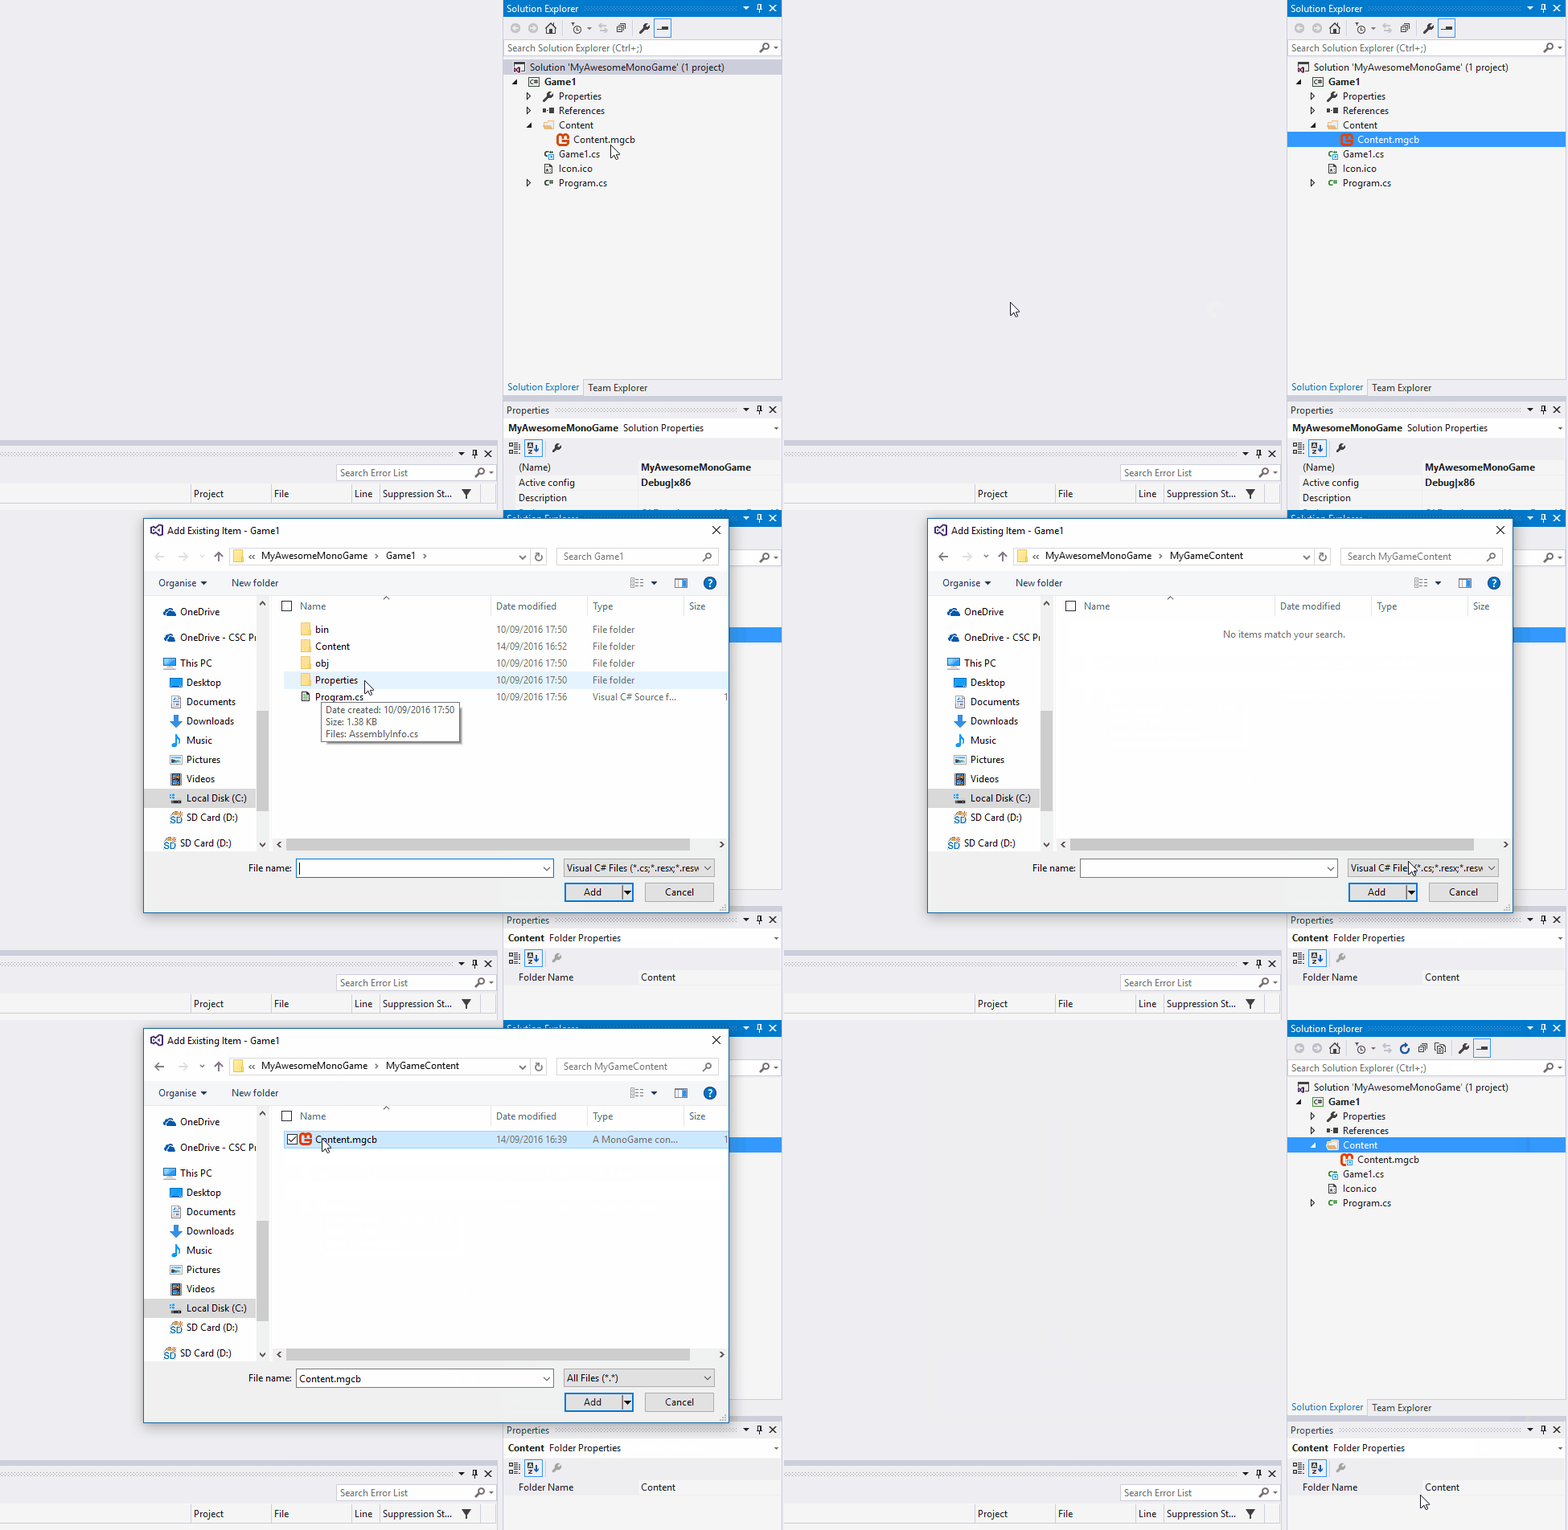
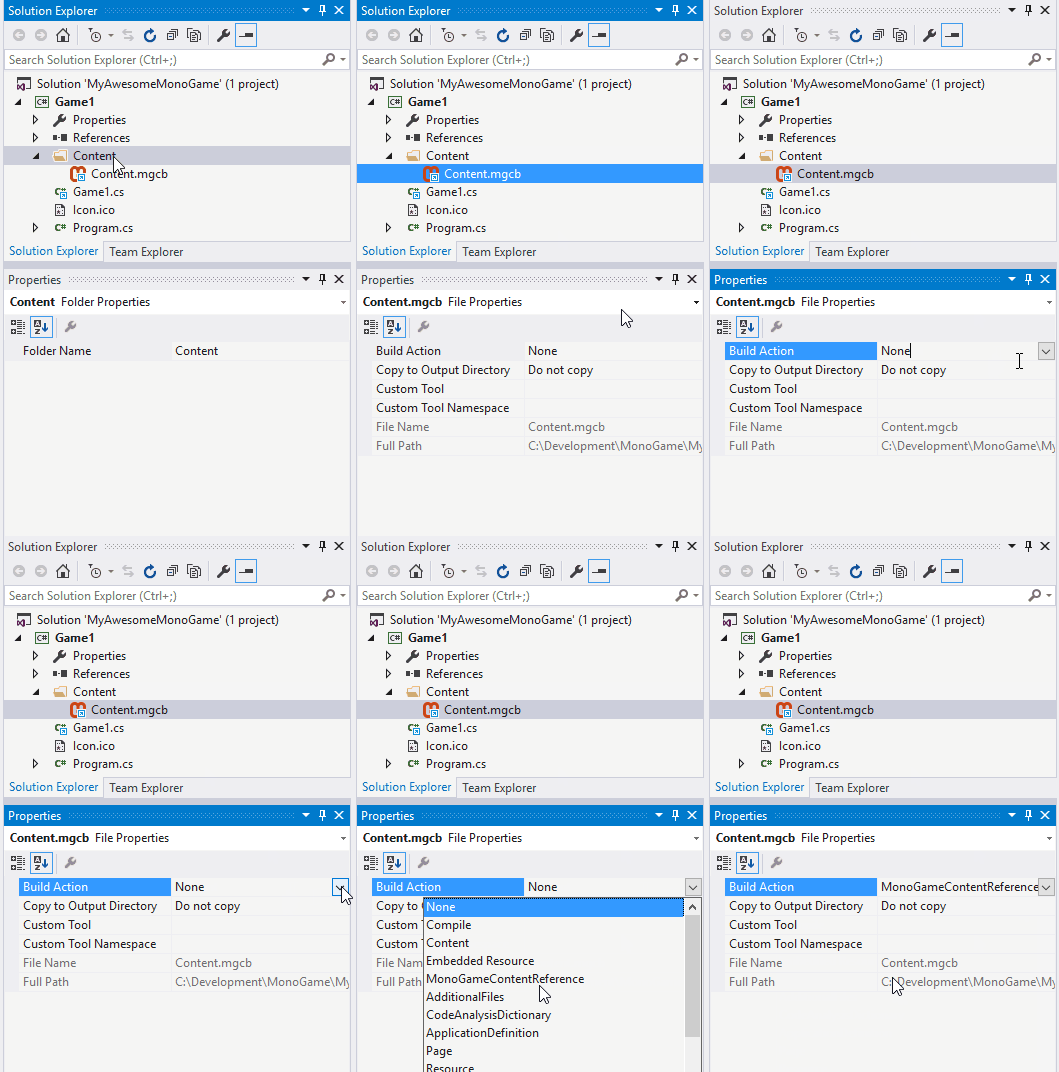
Update the Build Action of the MGCB file to “MonoGameContentReference” <- never forget 
No Retreat, No Surrender
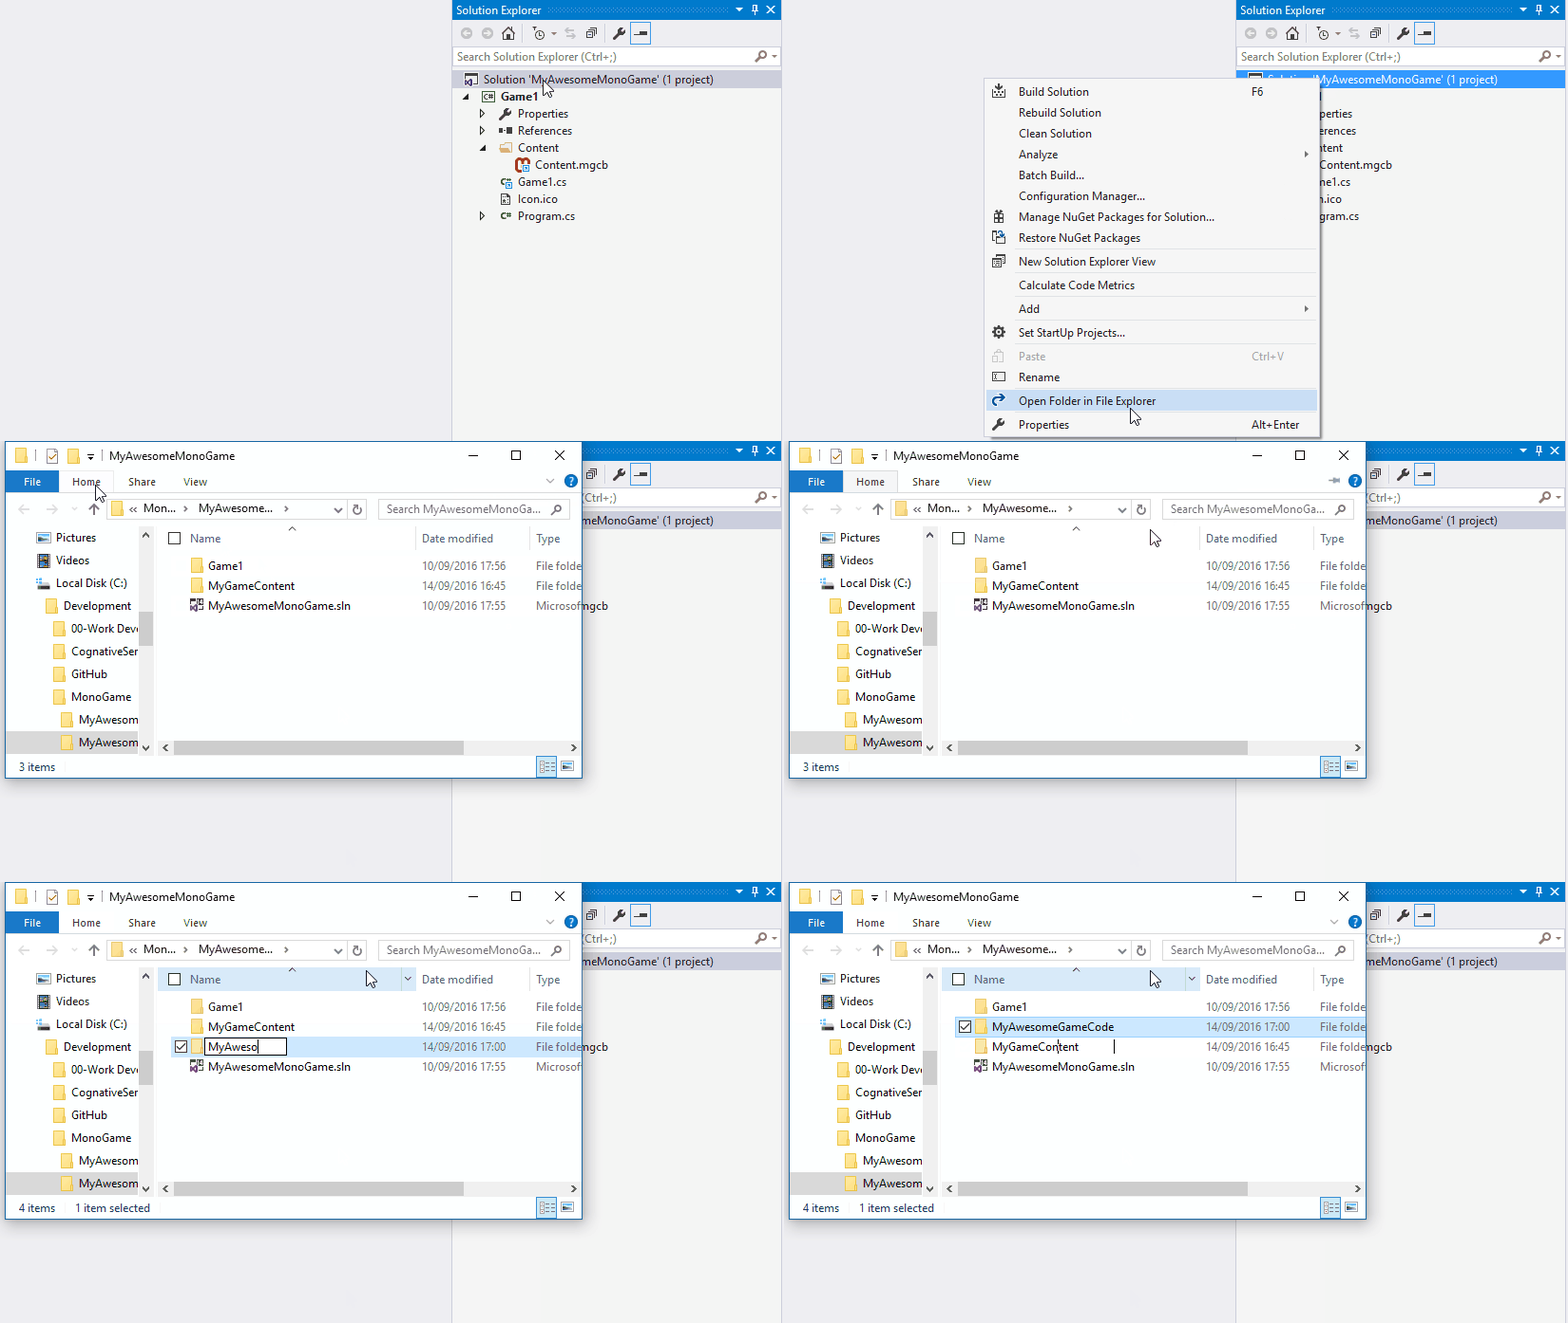
Within the solution folder, create a new GameCode folder to hold all core code for the game itself
Do the same for the game code as you did with the shared content project bycreating a new shared area for your game code in one place. There are other things to consider if you are using any additional source libraries (libraries you create in source rather than just reference DLL’s), like whether to have their own folder or store in the project. Use whatever makes sense to you.
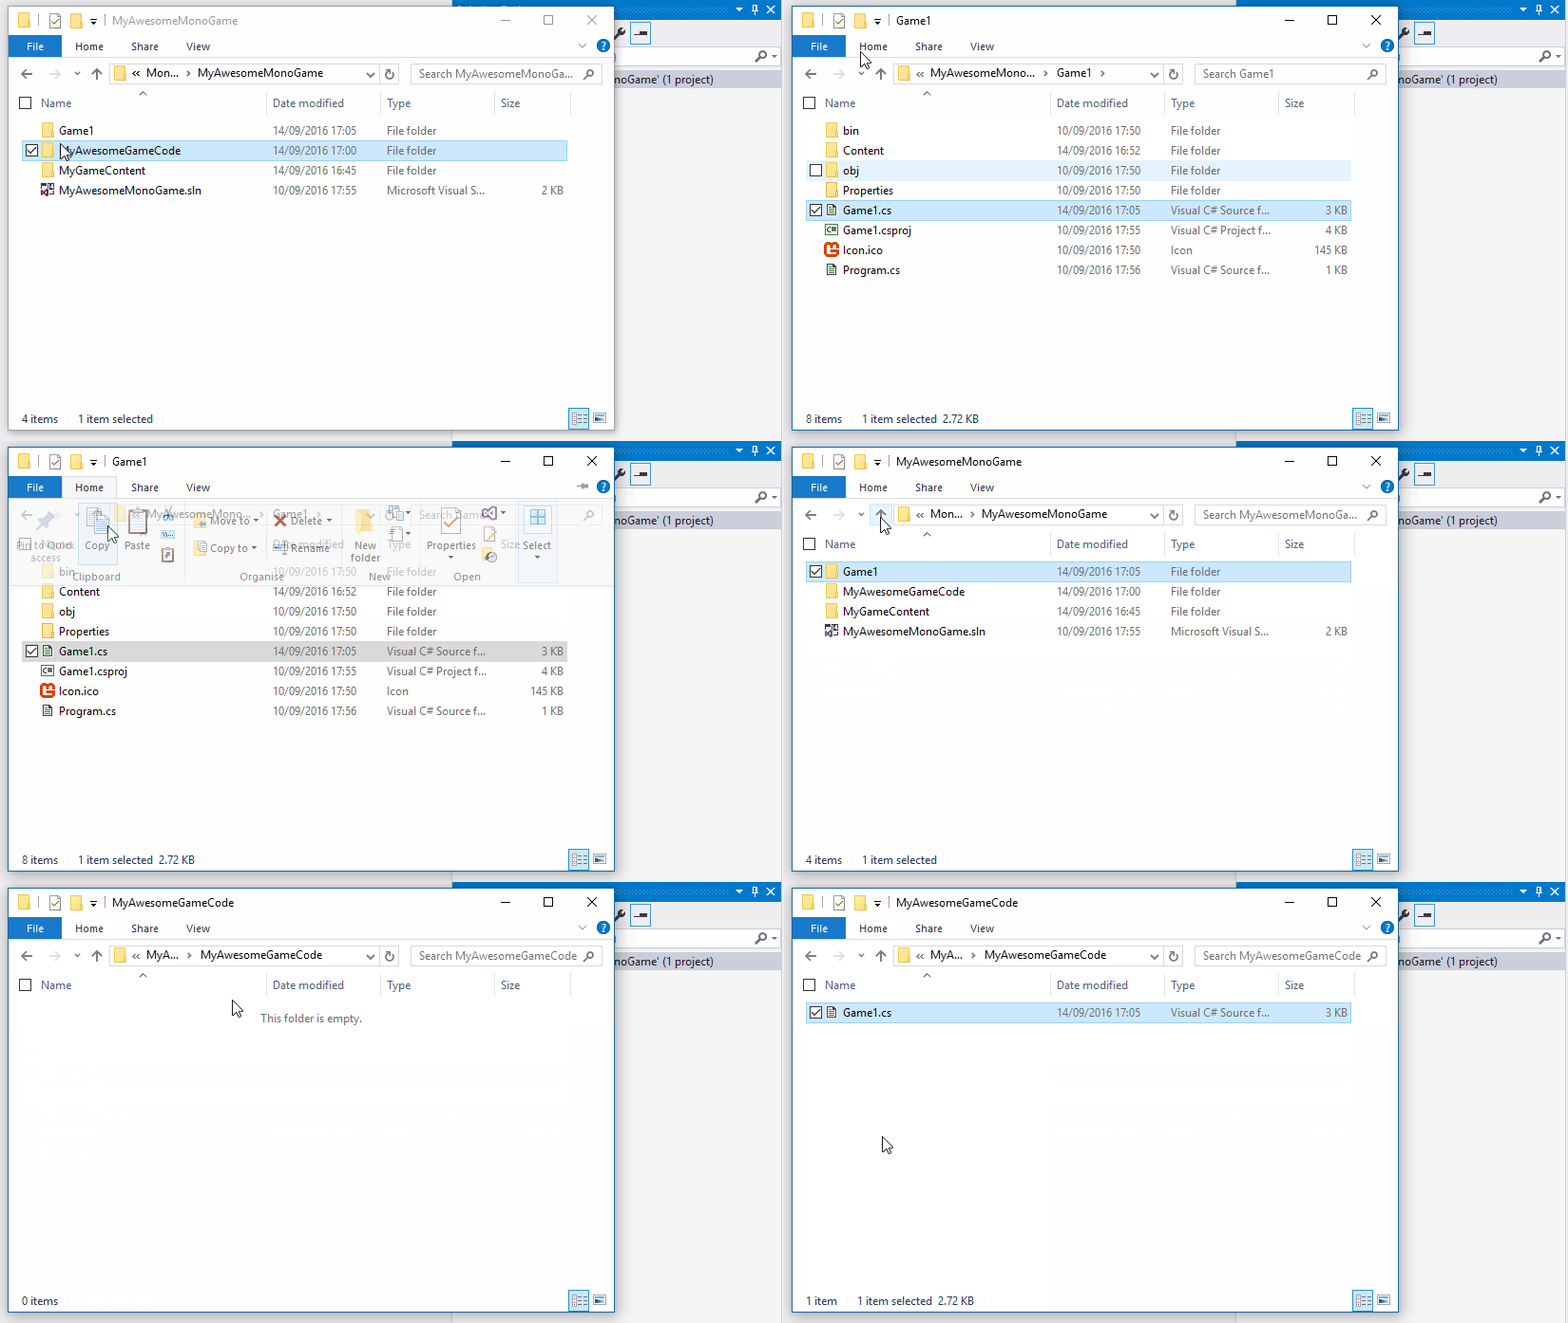
Move / Copy the Game.cs from the platform project to the new GameCode folder
You already have a starting class, so you might as well reuse it. If you are coming from an existing project, just move the code across.
Like with the MGCB file, in the code editor, remove the old Game.CS and create a link to the version in the GameCode folder
As this is shared game code, best to make it clear and name it appropriately, this is also to ensure it is not confused with your platform or library code.
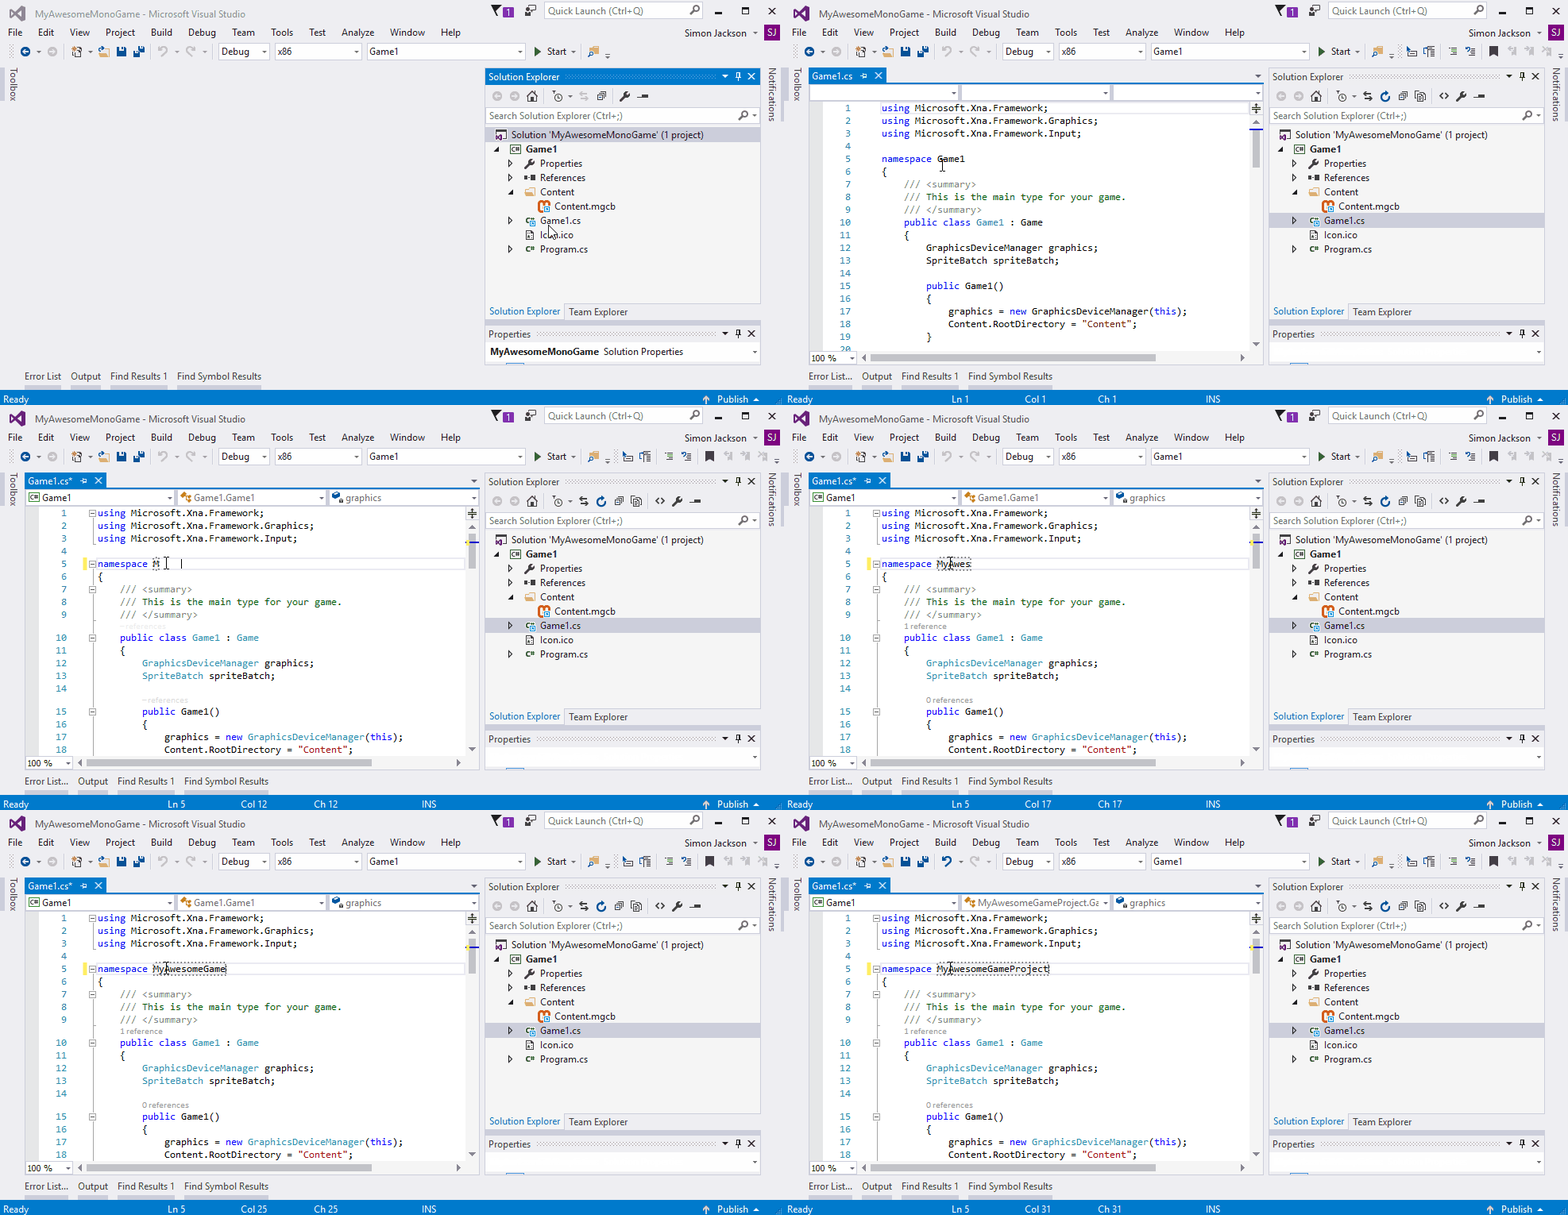
Edit the Game.cs (can rename if you like) and change the namespace to something specific about the game
VERY IMPORTANT, you should encapsulate all your game code within its own coding namespace to ensure any code you write is not going to conflict with anything else (platform code, libraries, dependencies, etc)
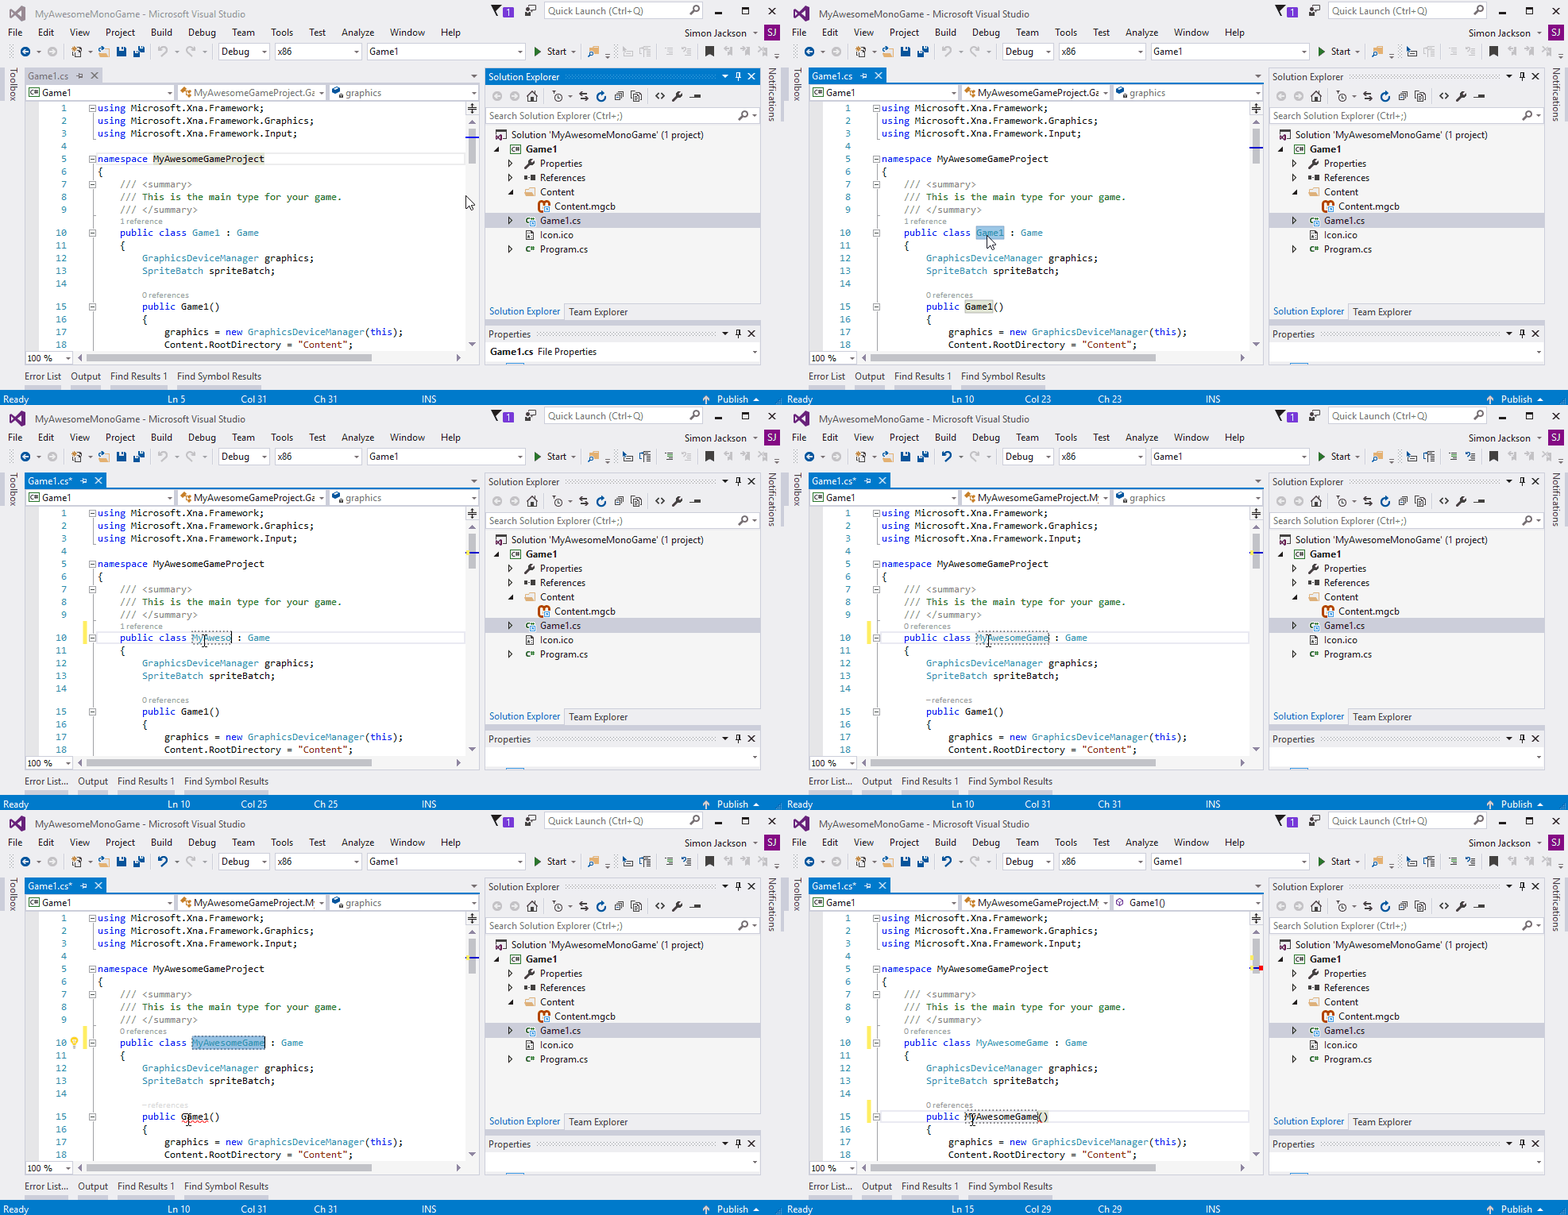
Change the Game class name to something specific about your game
_(remembering to also rename the constructor to the same)_Might as well make the game code unique, so that you know when you are calling it from your platform projects, makes it easier to you know what you are referring to.
_ *Note, Do not name any classes in your project the same as the Namespace else it will create confusion. _
Update platform project instantiation class (program.cs on windows activity.cs on Android)
You need to add a “ using ” reference to your shared game project and update the Game class object to initialize. This will fix the project and enable it to build and run using your new shared code.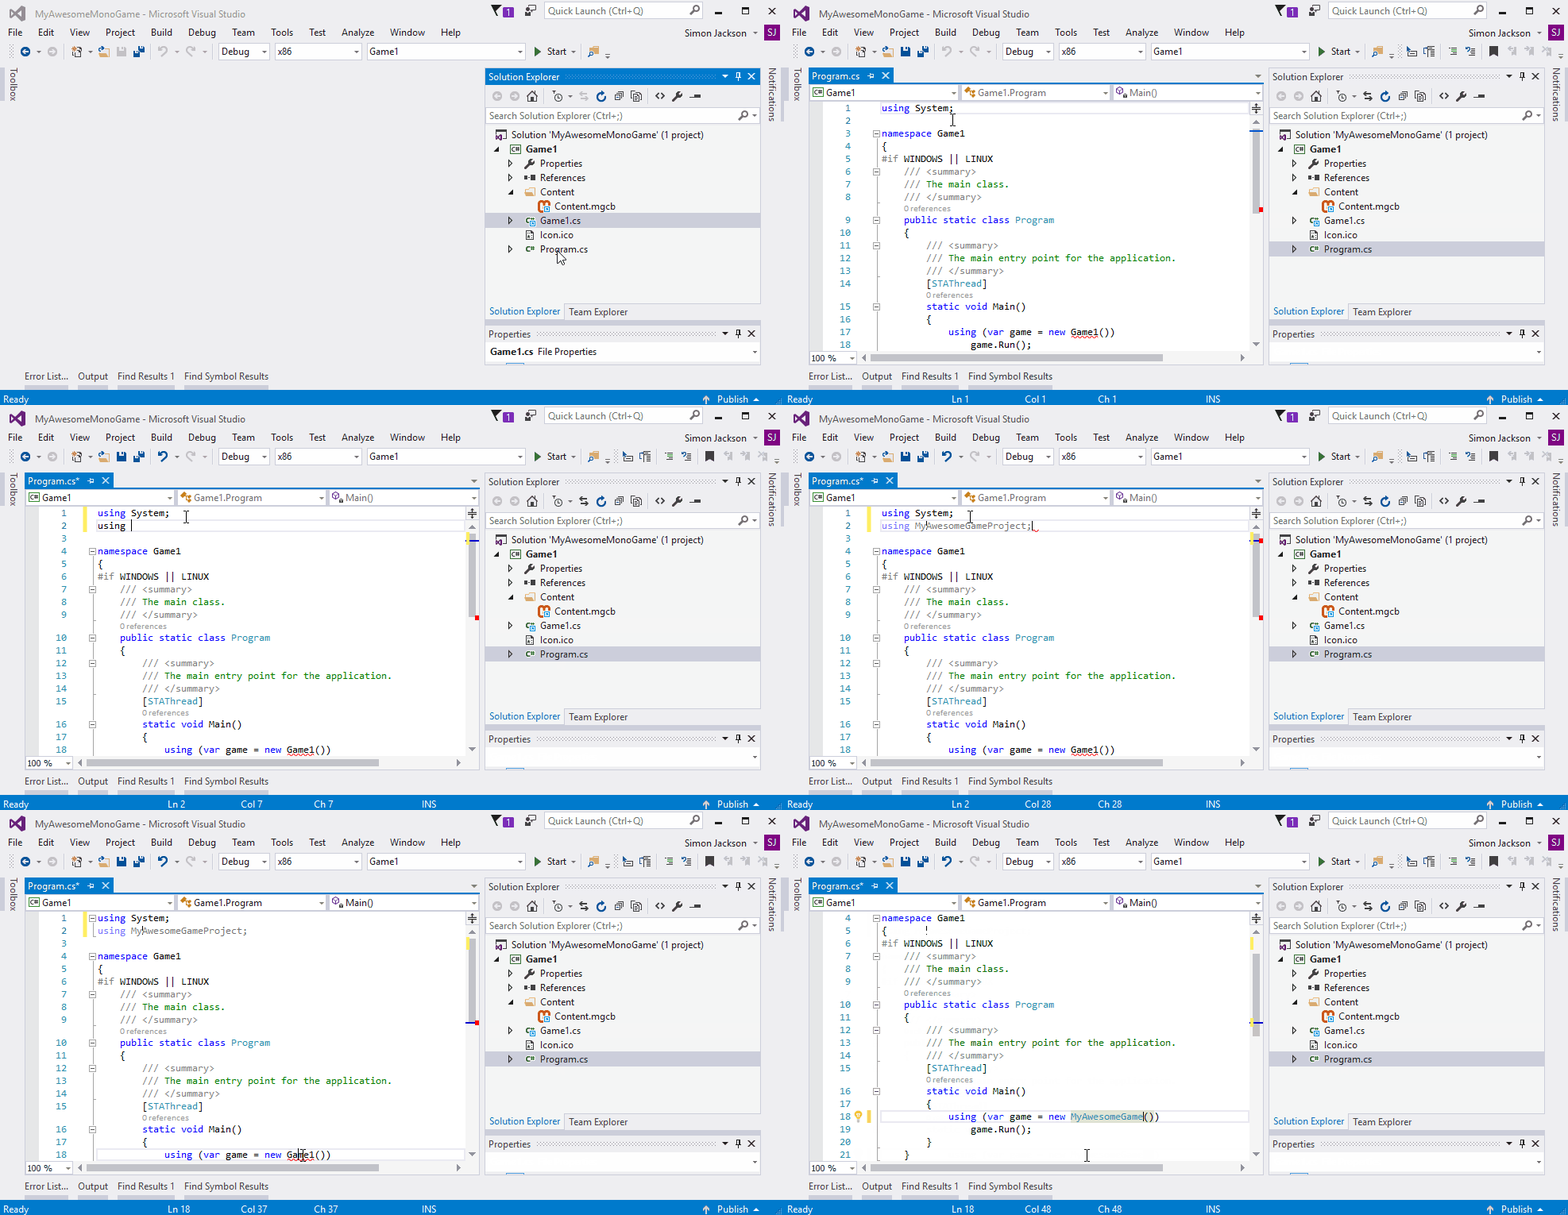
Now that you have your project setup, I would recommend adding another platform project and repeating the above steps where you remove and re-link the shared assets (not the copying of course) as well as the final step. Even if you do not intend to do anything with it at the moment, it is good to practice.
As you add code in the future, either create it in your shared folder, or move it later (I recommend the former) and keep linking new files in as you add them. This will give you a grand appreciation for everything you have in your project.
Personally, I only do the above for full projects. For sandbox or POC’s, leave it all behind and just play within the project template because at the end of the day you will likely thrown those projects away, so they do not need the extra complexity.
Extra Credit
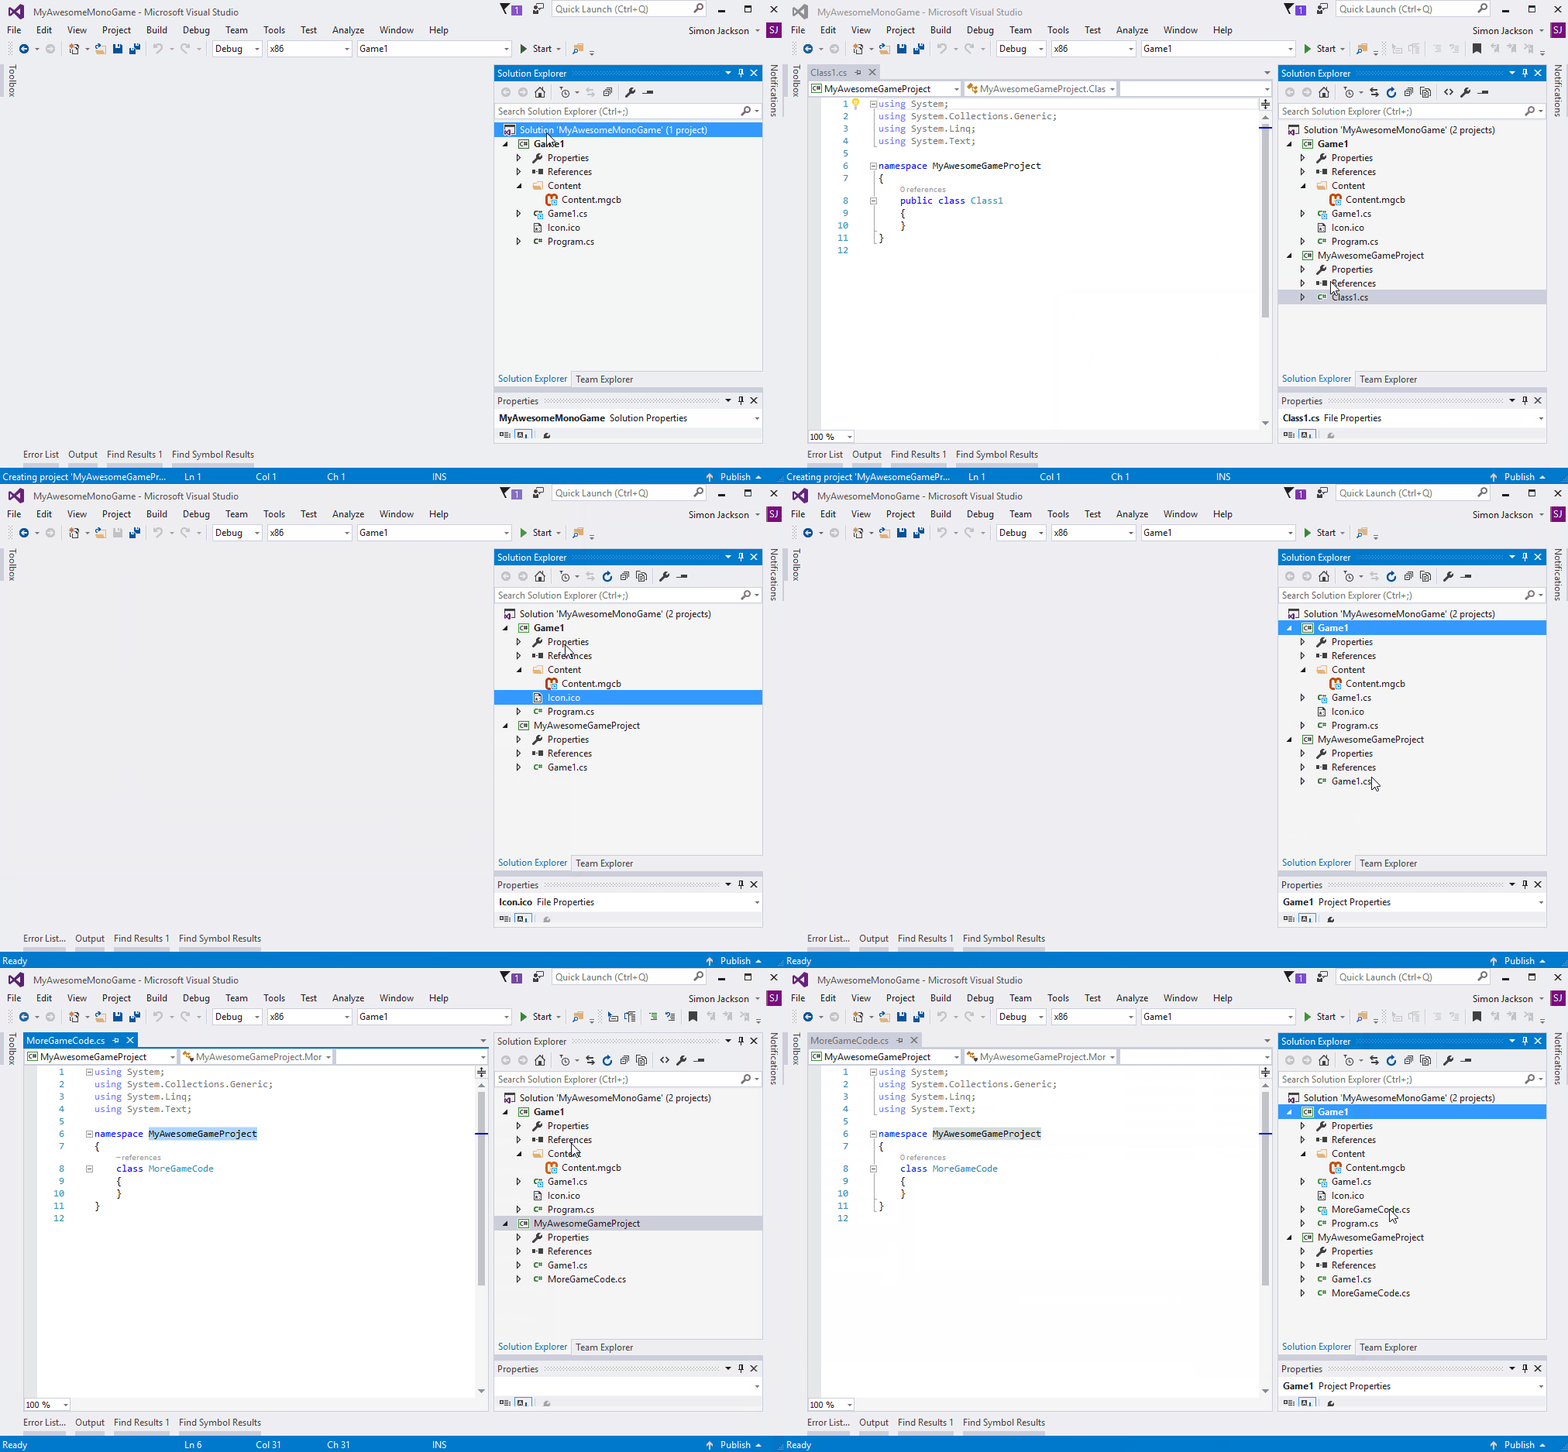
Another approach some projects to is to create a “fake” class library in the Shared folder, just to simplify creating new classes. You still need to link the shared code from the shared library but it gives you a GUI to work with, as well as defaulting the layout of your class files.
You never reference this “faux” library, it is only there to manage the code / classes.
To do this, simply add a new “Class Library” project to your solution, save it in its own folder in your solution. Add any existing code you have in the folder as well.
In the clip below, I assume you have followed the steps above and want to add a class library to an existing project, because you ca not create a new project in to an existing folder, so:
- I simply create the new class library using the name of my games “Namespace”, that way all new class files will come pre-loaded with the same namespace.
- I then copy in the old Game.CS and re-reference it in my Platform project
- Finally, I then create a new class, just for fun and link it in my platform project to show the workflow for adding new classes.
The approach you use will ultimately be the one you are most comfortable with, I can only show you the door, you’re the one who have to walk through it.
Using pre-processor directives in shared code
Whilst you want to keep as much of the platform specific “stuff” in the platform project, there will be times when you need to make a choice as to what to use / do or reference depending on which platform your game is running on, to do this we use pre-processor directives. This is a C# method you can use that tell the compiler (the handy machine that builds your code and spits out your project to run on a platform) which segment of code to use.
You can also create your own, not just those supplied by MonoGame if you wish.
You can see the directives MonoGame supplies you by default if you look at the Build tab of your project properties, as shown below:
 |
 |
 |
| Windows | Linux / OpenGL | Android |
Where these come in handy is where you need to:
- Use one asset on one platform but a different one on another, e.g. Keyboard vs Gamepad or different gamepads
- Only use certain code on specific platforms but not on others
- If you compile the project on a Tuesday and need to make tea instead of coffee (ok, maybe not this)
Using them is very simple, using the asset suggestion above, here is how you could set a particular Texture2D property to use a different asset in your content project based on the platforms shown:
 Texture2D myLogo; protected override void LoadContent() { #if WINDOWS myLogo = Content.Load<texture2d>("MyWindowsLogo");
#elif LINUX
            myLogo = Content.Load<texture2d>("MyLinuxLogo");
#elif ANDROID
            myLogo = Content.Load<texture2d>("MyAndroidLogo");
#else
            myLogo = Content.Load<texture2d>("MyGenericLogo");
#endif
        }</texture2d></texture2d></texture2d></texture2d>
As you can see:
- If the platform is “Windows” then it will load the “MyWindowsLogo” asset
- Else, if the platform is “Linux” then it will load the “MyLinuxLogo” asset
- Else, if the platform is “Android” then it will load the “MyAndroidLogo” asset
- Finally, if all else fails, then it will load the “MyGenericLogo” asset, because it is being built for some other platform that I have not built the custom assets for yet
There are many ways this can be done. However, there is one really nice thing that most code editors will do for you, is that it will highlight the “Active” code branch, depending on which project you opened the file from, even if it is the same shared / linked file. As shown here:
 |
 |
 |
File opened from Windows project
File opened from Linux project
File opened from Android project
This helps when debugging and you are unsure which is running. Another thing to note is that it does not matter how many variations or #else / #elif statements you have, only the valid path will actually go into the final project output. but it will make it harder to read, eventually ![]()
you can use as many or as few statements / choices as you like, if you only want something to happen on one platform and not on others, then just have one #if block. So many ways to use them.
A keen thing to note however, is that for the majority of cases you wo not need to do this, MonoGame already handles 90% of most of the platform specific things to do under the hood. So use these wisely and only where you need to.
If you want to know more about C# Pre-Processor directives, check out the documentation on Microsoft’s site – https://msdn.microsoft.com/en-us/library/ed8yd1ha There is a lot here and I have only given you the highlights.
Other alternatives
There are other options out there since MonoGame is a much more modern framework than XNA, it is using .NET 4.5 and beyond for instance. Some of these include:
Portable Class Libraries (PCL’s)
These are special class library projects that only let you put code in the library that is compatible across all the platforms it is configured for. So if you configure a PCL project to be compatible for Windows, Android and iOS. Then you can only use code that will compile for all three. However, thanks to all the work done with Xamarin and others, this is quite extensive.
The only drawback is that in order to reference MonoGame namespaces (aka, Microsoft.XNA.Framework), then you need a PCL compatible version of MonoGame. There is a beta version available now which you can use but it is not 100% certified (however I have not had issue with it) and a new version in the works. So use if you wish (check other posts on my blog regarding this, there are quite a few)
Shared Projects
With Xamarin and Microsoft UWP projects, you can add a special kind of library called a “Shared Project”. This project acts like a shim / overlay on your platform project meaning it inherits all the references of that platform, effectively extended the code that will eventually be compiled by that project. In short it allows you to create a project that will be combined with your platform when it is built.
These certainly have advantages over PCL projects, except they will let you put any code in the project you wish and you wo not know if it works fully until you compile and run it.
MonoGame also has not been fully tested with Shared projects but I have not heard any complaints so far from others who have used them.
Happy building
Well, I hope either this post or the video version have helped you on your multi-platform adventure. There is a lot more you can do in separating your game from the platform in such a way to make it easy to manage and this article only scratches the surface. But it should go a long way to getting you started with your projects in a way that will make it easier to manage when you decide to take on another platform.
As I said earlier, if you have other tips or suggestions to better work with a multi-platform project, then drop a note in the comments or on my MonoGame YouTube channel (http://bit.ly/darksideofmonogame) and let’s discuss.
Solidarity brothers and sisters!


