Running an event in AltspaceVR - an end to end guide
Following on from my previous overview of the most common virtual services, this article is the first in the series doing a much deeper dive into each service, its offerings and how to set up and run an event.
These detailed articles are focused on what you need to do to set up an online meeting for your user group or event and will focus on those steps. There are many other features available for the service which you can explore as well. In future articles, I will also cover some of the more advanced features such as creating spaces and your own 3D content/SDK blocks.
For reference, here are the links to each article for easy reference:
- Overview
- AltspaceVR (you are here)
- Mozilla Hubs (Coming soon)
- RecRoom (Coming soon)
- Microsoft Teams (Coming soon)
- Zoom (Coming soon)
- Discord / Slack (Coming soon)
- Microsoft Teams Live (Coming soon)
- Mixer (Coming soon)
- Twitch (Coming soon)
AltspaceVR – altvr.com
- Intro to AltspaceVR
- Creating/Scheduling your event
- Room preparation
- Choosing the right presentation method
- Running the meeting
- Recording
- Tips and Tricks
AlspaceVR has been around for many years now, even before it was purchased by Microsoft and it has gone from strength to strength offering new facilities and capabilities in its client.

AltspaceVR’s main focus and attraction is to create interesting and organised meeting spaces, offering theatre and conference-style rooms as well as more fun event spaces (if you check out their “worlds” beta)
It is perfect for user groups, conferences and more and more these days, educational content for schools and Universities worldwide. These are not their only goals, given it is also geared to be a social space (akin to old programs like Second Life) for anyone to freely meet or just hang out in their own virtual room.
The Educators in VR team reached out to share a success story in their use of AltspaceVR for their platform. In their MASSIVE online VR event, they had up to 1400 users attend some of their sessions which ran over several days. Some sessions were just panels, some were just talks without slides showing that you can run just about any event you wish, even if you only want to “meet up”
Visit the “Educators in VR” team at – https://educatorsinvr.com/
Setting up your event/meeting
Once you are registered and logged on, you can start creating your events via the “My Events” tab on the website.
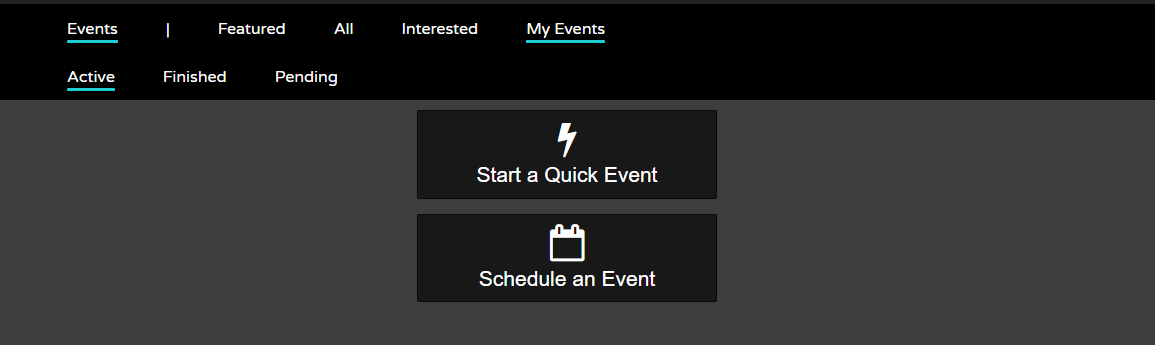
You can just set up a “quick event” to start a space immediately (you can also invite other users into your home space too if your permissions allow it, simply ask them to “Go To” you from the Online Friends List). As this article is about scheduling an online event, you can click “scheduling your event” to begin.
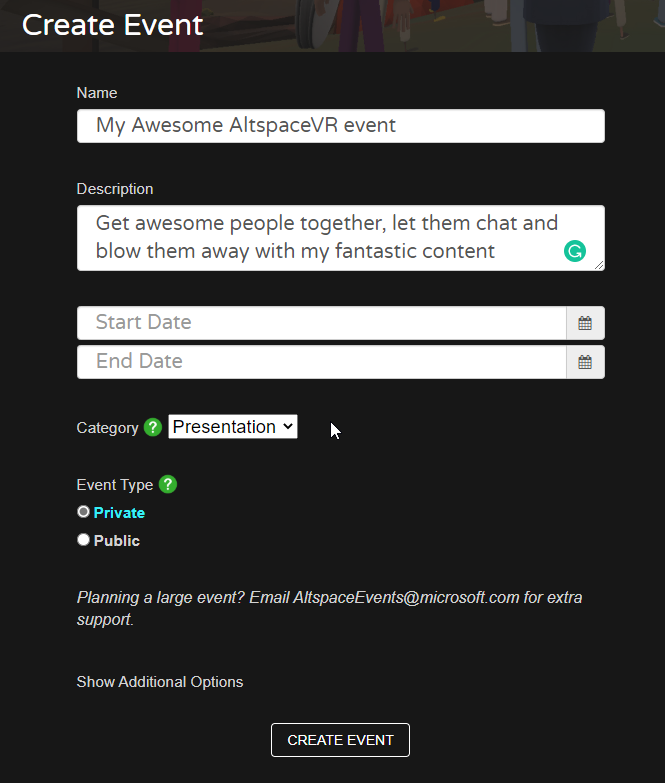
Most things are fairly self-explanatory, what is it called, how would you describe, when and how long will your event be, also if you are running a private (only people with the link can enter) or public.
Spaces generally support up to 80 people in a single room/event, but you can contact AltspaceVR (at least 48 hours* before the event) and they will spin up additional rooms and synchronise the content between each.
Check with each venue for its recommended occupancy (User count) when setting up your event to ensure it meets your needs. This is generally down to the complexity of the space and the number of users AltspaceVR recommends. Again if you need more users in a room, contact the AltspaceVR team.
This is still FREE, AltspaceVR is a completely free platform
*Note at the time of writing, due to the COVID response, there may be longer wait times for AltspaceVR team members to respond, so allow more time in advance when contacting them.
A Category can also be applied to the event, which is only really critical for public events to provide information to viewers should they wish to attend the event, the categories include:
- Presentation – for a typical stage event
- Talk Show – for Panels or stage talk sessions
- Performance – For screenings of the arts or performances
- Watch party – Typical couch coop movie watching
- Meetup – as it said, just turn up and meet
- Gaming – Either watching or playing in one of AltspaceVR’s gaming rooms
Once you have described your event, the next critical step is to select your space and there are many to choose from:
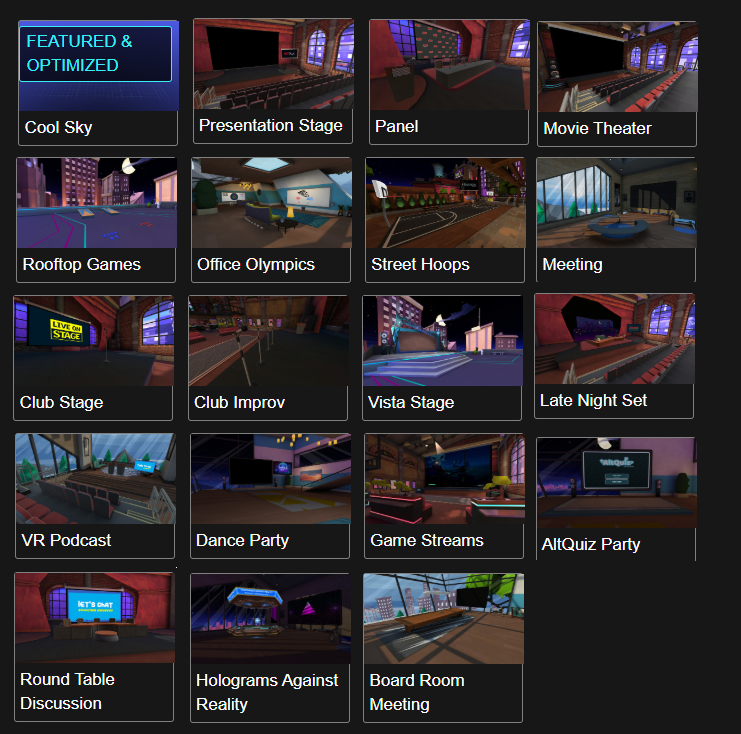
These are just starting spaces and you can change the venue if you wish, but more critically, you can also customise your space in preparation for your event which we will cover in the next session.
There is the option to import your own world/space into Altspace via their developer tools and site options, but this may incur
Setting up roles
In most cases an event is not organised by just one person, usually, there is the host (or group of hosts), a presenter, staff to help set up the stage and surroundings, a band (sometimes?), moderators and someone to hold the mic for questions. AltspaceVR recognises this and allows you to set up staff at the event for the tasks they need to perform. To setup roles you need to go back and edit your event to define these:
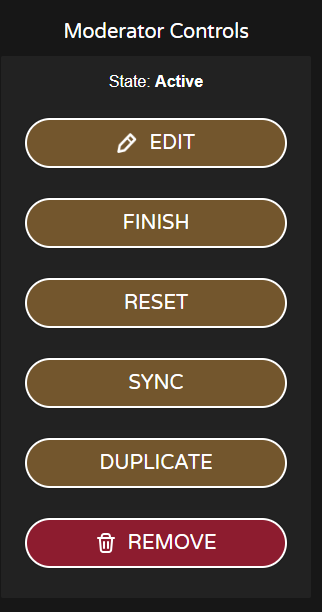
In the admin screen for the event, the host can perform several actions, most of which are self-explanatory, for now simply click on the “Edit” button to modify the event.
On this “Edit” screen, you can change the location of the venue, but only before the event starts. Any modifications you have made to the space will be lost should you change its virtual location.
Here you will see the same screen as before when creating the event plus some additional configuration, as shown below:
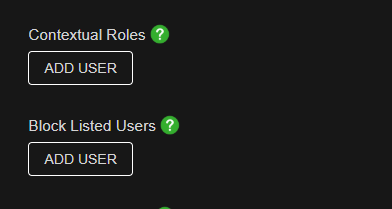
By clicking on “Add User” in the Contextual Roles section, you can give pre-existing users a specific role in the event:
Users can have more than one role should you wish to configure them that way, but it’s best to give them a single role which has the permissions you trust that user to have.
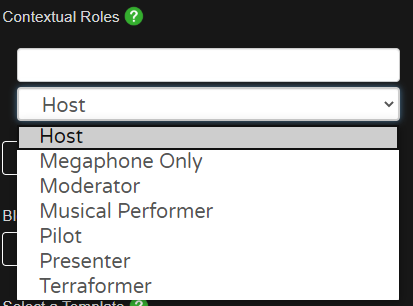
These roles are as follows:
- Host – Can edit and manage the event, can have more than one
- Megaphone Only – Usually reserved for bots as a microphone stand
- Moderator – Provides privileges to admit and boot people from sessions, as well as mute controls.
- Musical Performer – Another bot speaker, for piping audio input through for background music
- Pilot – Enables this user to fly, very useful as a camera operator
- Presenter – This gives users access to the stage even when blocked and the ability to amplify their voice (microphone)
- Terraformer – Enables a user to add/remove content from the environment
These roles all require an existing AltspaceVR user account, which you will need to have set up in advance. Use the name of that user to assign roles (not their email).
That is the meeting setup, but what is a venue without some finesse, time to “Set the stage”
Preparing for the event
With the event you have created, you have a blank canvas based on the template you selected, which his fine to start with but some might like to customise the space before the meeting starts, just as you would in a real in-person event.
This article will only cover the basics for using AltspaceVR’s built-in templates for virtual spaces. In a future article, I will cover some more advanced options for crafting your own worlds and SDK items
If you have any prepared assets or branding, the first thing you need to do is upload them to your AltspaceVR account via the website, as shown below:
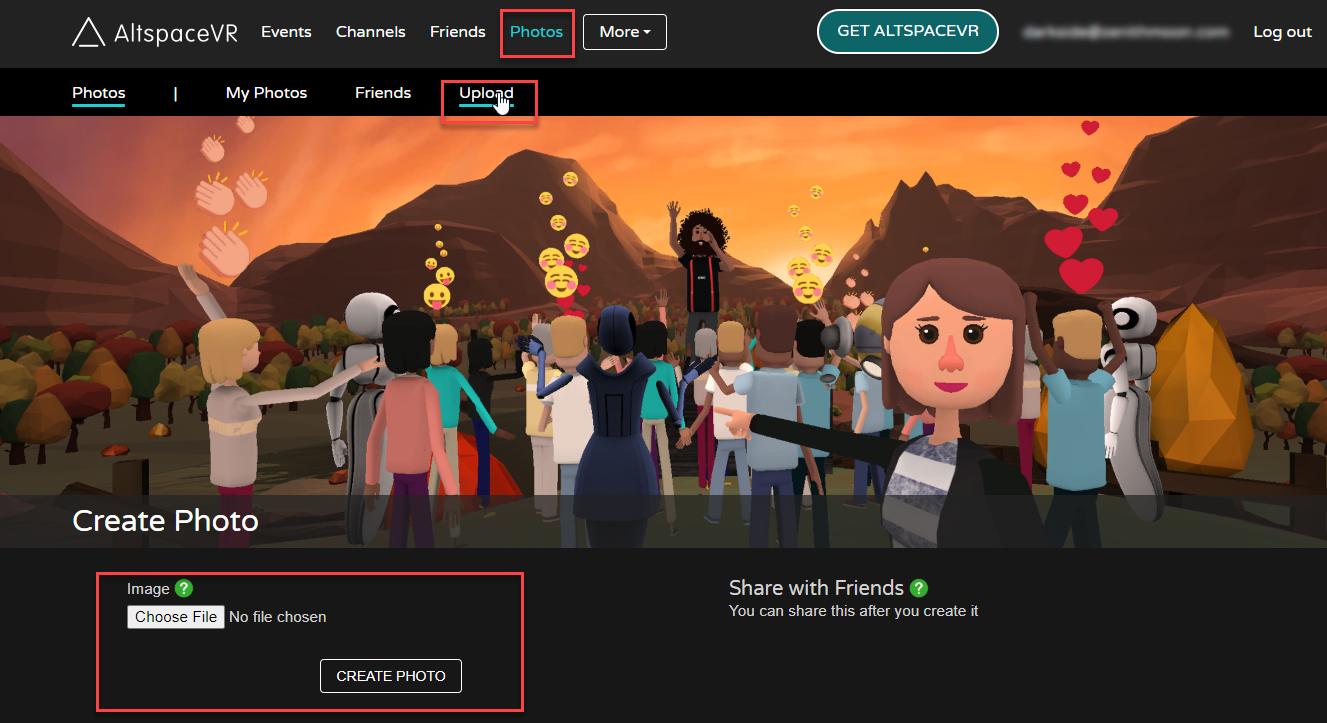
Simply log in, go to the Photos -> Upload section and create all the asset you will need.
Next, you will want to decorate your new space and brand it for your event as preparation is everything. To do so, you will need to launch the client from your preferred device and once in your home, click on the AltspaceVR icon, select events and jump into your new event space. Any user with the Host, Presenter or Terraformer roles can enter the space in advance to prep.
*Note, launching from the website before the event starts is not supported.
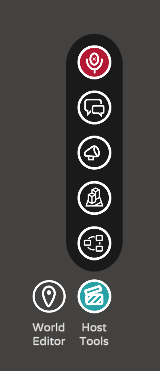
Once you enter your space, either from the website to by launching the AltspaceVR client and browsing your events, you will need to enable the “ World Editing ” tools from the settings screen as shown here:
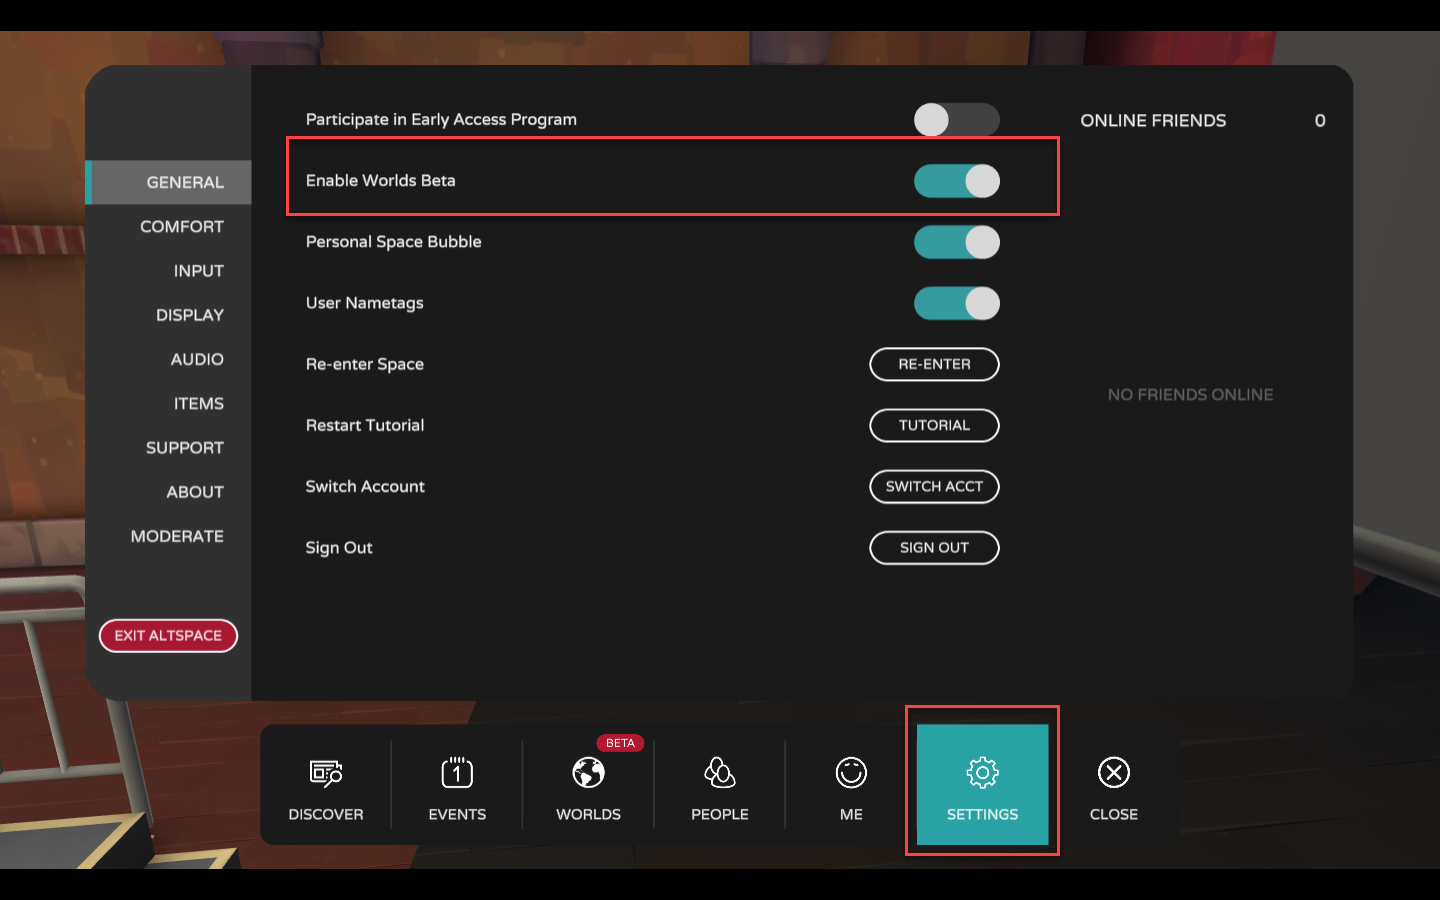
World editing tools are only available to users with either the Hosts or Terraformer roles.
Once enabled, you will have a new option in your AltspaceVR view called the “ World Editor ” (next to the “ Host Tools ” on the right-hand side), clicking it will bring up the editor window:
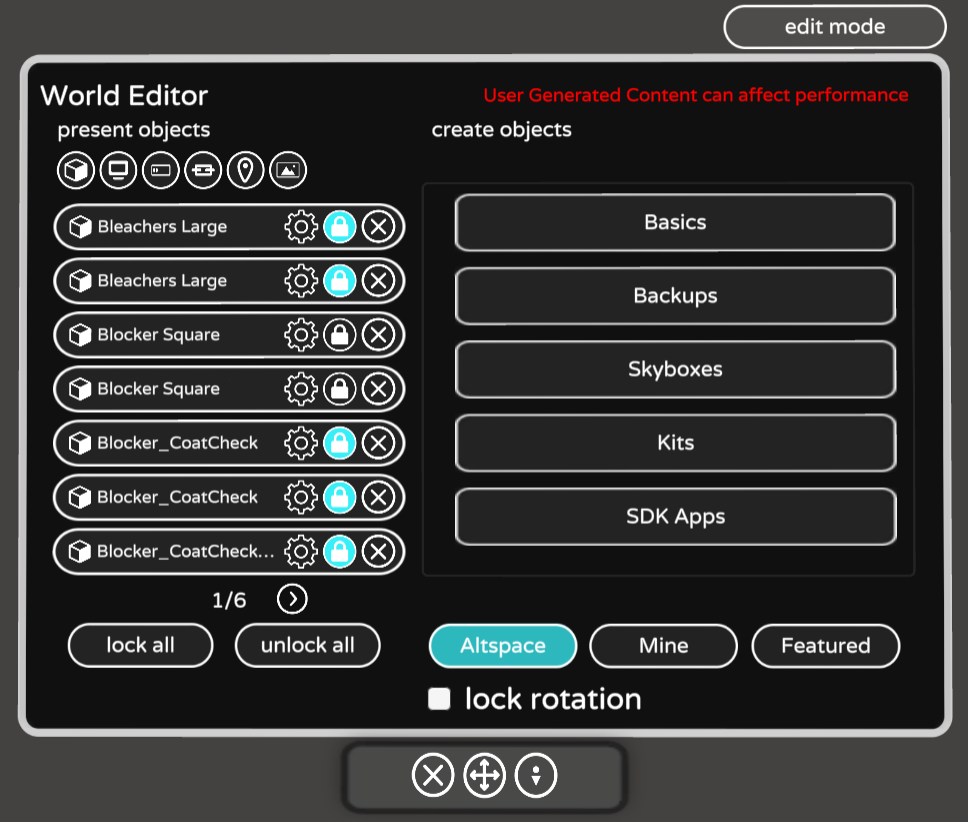
From here you can select many things to place in your event space, from:
- Basics
Generic components to add Browser windows, Labels/Notices, Teleport points, Models and apps - Skyboxes
To change the view outside the event for effect. - Kits
Collections of different objects to liven up the event - Photos (Mine)
Access to your personal photo gallery to pin up in your scene, such as branding assets - SDK Apps
These are applications built using the AltspaceVR SDK. AltspaceVR provides you with some out of the box (such as a Hat changer), but you can extend this by creating your own.
We will not be covering the creation of new SDK components in this article, this will be covered at a later date
A word of warning, with every click, what you have selected will be placed in your scene. So if you do not see it straight away just look around, that is unless you want 50 boxes of random things scattered around your event.
A feature to be aware of at this point is the “ Lock Rotation ” option which is at the bottom of the “ World Editor ” window.
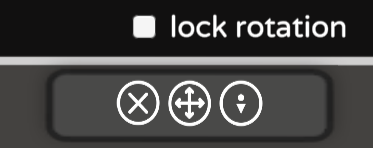
When enabled, this will fix the rotation of the selected object as you move it around the scene to its starting rotation, in other words, it will always face the same way. To allow the object to orientate itself to your view, you will need to uncheck the box shown below. Do it now as you experiment.
If you close the World Editor, you should see the new object you spawned into the scene and by clicking and holding on it, it will move around the scene with you, scrolling your middle mouse button while moving it will also enlarge or reduce the size of the object. Simply walk around the room and find an appropriate space/wall to place your object, in my case, a photo I took in a previous event.
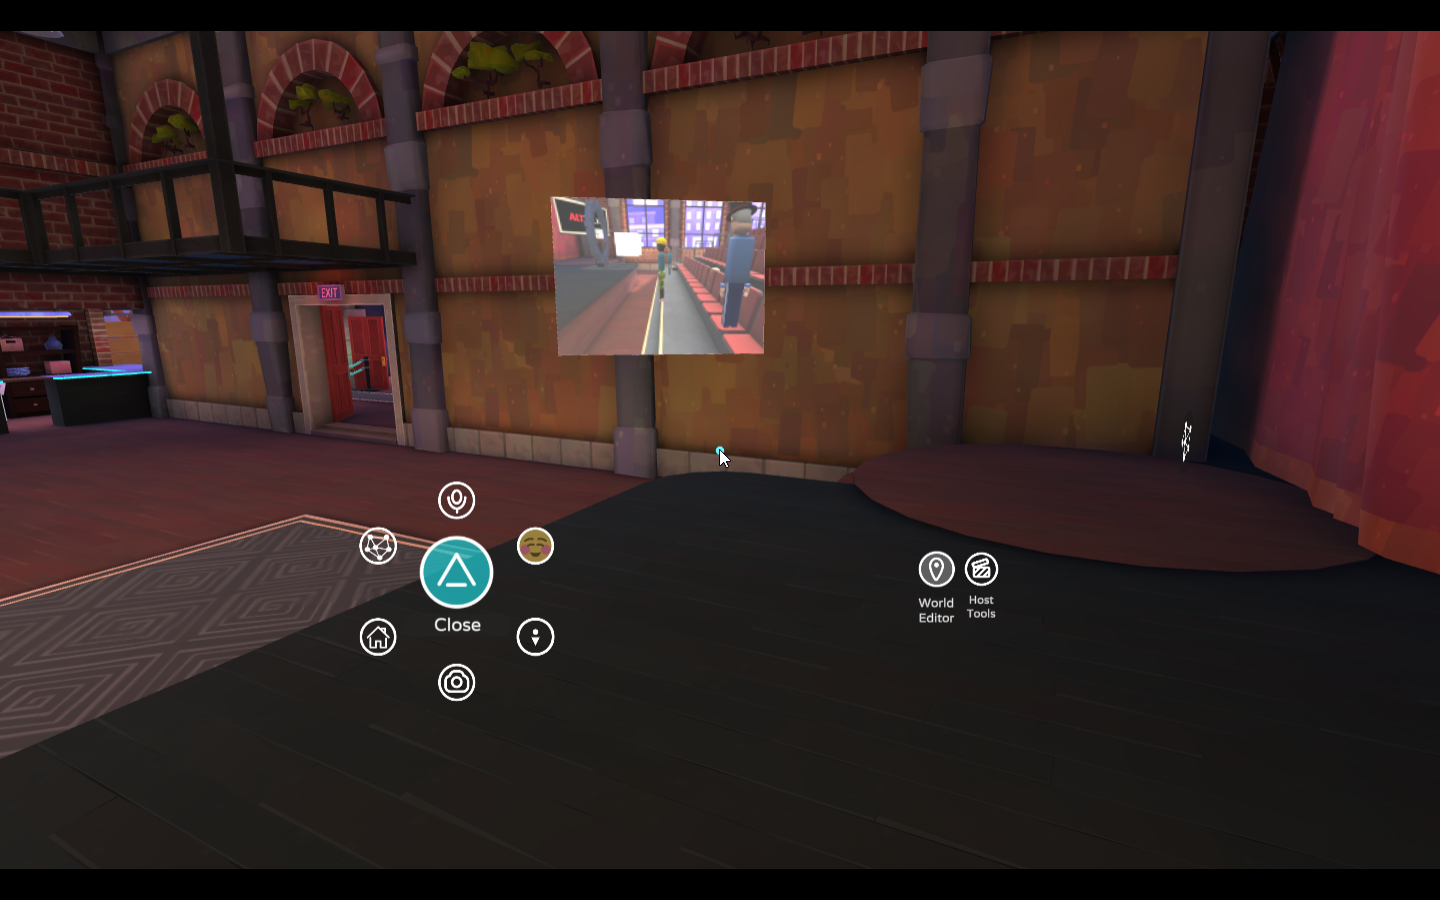
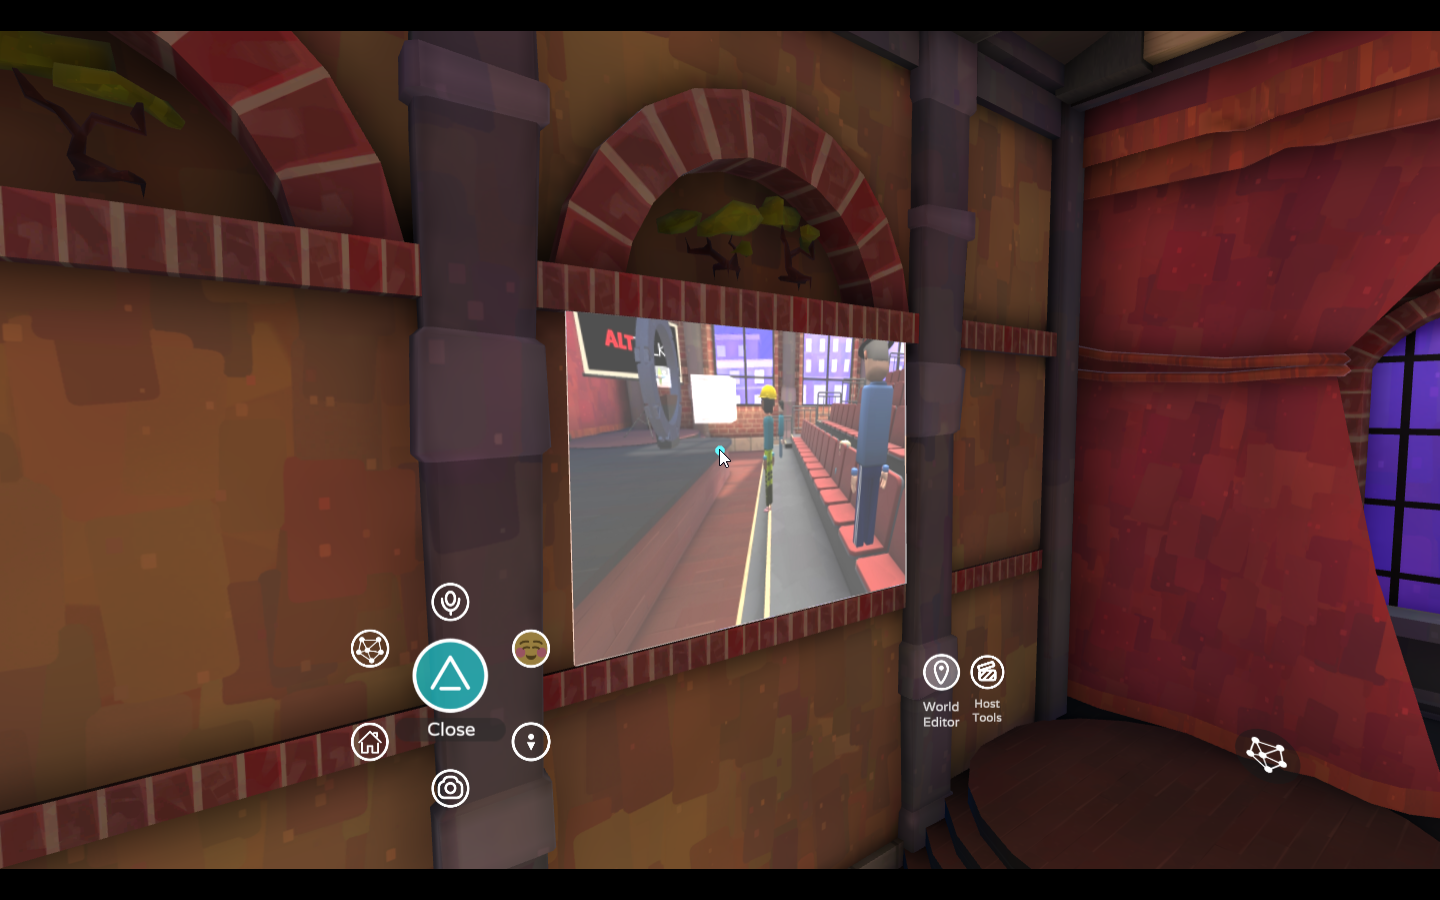
You should note, that while you are in “ Edit Mode ” you can fly around your space to reach those hard to reach, yet visible spaces to place your content.
Once you have finished, simply disable Edit Mode from the World Editor screen. Although watch out, when you turn it off, flying is no longer an option.

Now that your space is set up how you like and you HAVE put the dates back to their actual scheduled date, you are all ready for your event.
Getting the presentation right
The key to any good event (assuming it has a presentation) is the delivery from the speaker and the tools they have available to them to make that delivery a success.
For this, you need to get used to the controls and services available while running the event, in the standard stage platform as shown above we have:
- Speaker/mic output – for speaking
- Main presentation window – browser led
- Picture board – photos only
Speaking is easy, just choose an empty stage with what you need, whether it is a sofa or set of seats.
Services for presentations
AltspaceVR recommends the following services for presentation material, but you can use almost any web-based slide solution. For presentations, you need to plan ahead based on what the contents of the slides contain and guide the presenter:
- If the slides are static, you can use either Google Slides or Slides.com
- If the slides contain video or animations, then Slides.com is your only option
- If you are showing just video, then make sure it is hosted on a supported video site like Youtube or Mixer
For most cases, I would also recommend Slides.com as it offers some unique benefits:
- Has support for animated transitions and animation
- Supports video effectively
- It provides a mobile client for remotely controlling a slides presentation (moving slides, etc), which can be done by the presenter or a helper.
- The slide link can be shared with viewers to watch on another screen if they wish
For more advice on setting up Slides.com, I would recommend visiting the Slides documentation and guidance, as there is more information there than can reliably fit into this article. This article can also help with running Slides.com presentations in AltspaceVR:
https://help.altvr.com/hc/en-us/articles/360038760734-Using-Slides-com-for-Presentations-in-AltspaceVR
Putting your content on the screen
Once you have selected your source, you need to decide on how you want to put the content on stage, for which again there are a few options available based on the type of content you are showing:
- Main stage browser
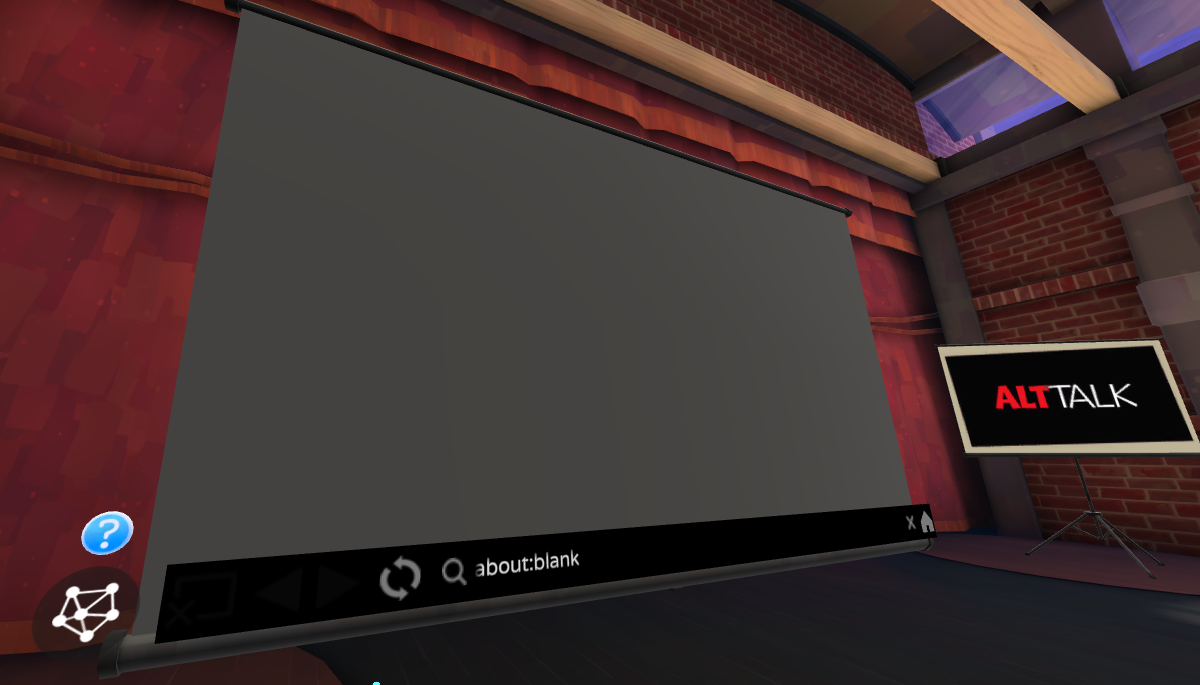
You can control the stage presentation browser screen (separate to your personal browser) using a simple URL, however, once presenting the URL cannot be changed. Click on the Browser icon next to the window to activate the URL address bar
- Using a Personal browser to control the stage
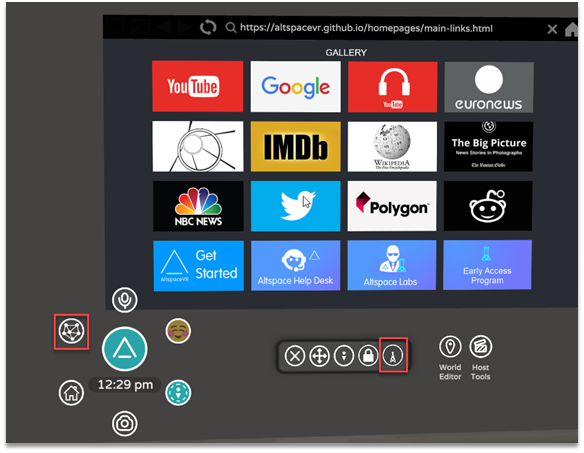
From your personal AltspaceVR menu, you can activate your personal browser for navigating. You can then broadcast the view to the stage.
Once you have the webpage ready to view (note, once it is on stage it is very hard to change it, so be ready), then you can click on the “ Broadcast ” button above to send it to the screen, that will then present the following screen to choose the broadcast method:
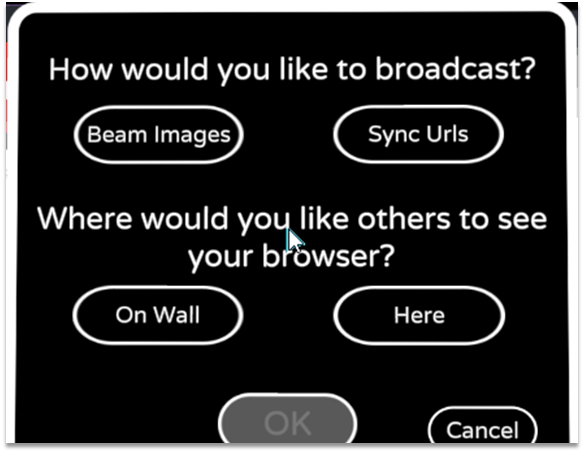
When “ Beaming Images “, the browser window stays open and copies the screen to the stage, this works well for static pages and gives the presenter a window to control the view with that the audience cannot see.
When using “ Sync URLs “, the URL for the page you are looking at is sent to the stage and the browser window is closed. This is a lot cleaner and works better for video, but control is now only via the stage window itself. This is where I would recommend Slides.com as it gives you another method to control your slides.
Other surfaces
There is also a clipboard on stage which supports only images, which is great for putting the presenter information on or yet more branding.
Running the event
When you are ready to take your event on the road and prep for the big day, the first thing you need to do is ensure your audience is also prepped and ready.
Once you have defined your event in your preferred event management solution or distribution list, it is key that you give attendees (especially those not yet on AltspaceVR) enough information to join the event and how to get set up and ready for the event.
To achieve this, your welcome mail for the event list items like the following:
- The “ Join URL ” for the event in AltspaceVR
It is worth noting the URL only works for desktop VR machines. For Mobile platforms or users already in VR or the AltspaceVR client, users should pre-register their interest via the website to find the event in the “Interested” section of the events browser in the app. - Directions for installing the AltspaceVR client on their machine or device
- Ask them to try the client in advance of the event and walk through the tutorial.
The last thing you want is for attendees being unable to watch the event as the tutorial messages keep popping up. - Advise attendees to visit the URL link on AltspaceVR to register interest for the event. This helps discovery for the event ensuring the event appears in their “Interested” list in the application.
- Give advance tips about good meeting etiquette.
Etiquette should cover more than just good verbal behaviour, but to direct attendees when questions should be asked, and also not to wander around in front of the stage or other attendees during the event and block the view of others.
Tools to run the event
Once you are in your event and ready to get going, AltspaceVR provides you with a selection of tools to help manage the event, especially in the area of speaking.
The host tools that are available to every host of the event give some broad controls for general attendee management, enabling:
- Muting of the entire audience (does not affect Hosts / Presenter roles)
- Broadcasting messages to all attendees
- An amplify control to quickly speak to all attendees no matter where you are
- A toggle for allowing or blocking attendees from the stage (where applicable)
Beyond these basic controls, the last button opens up the dedicated Hosts panel which has two views.
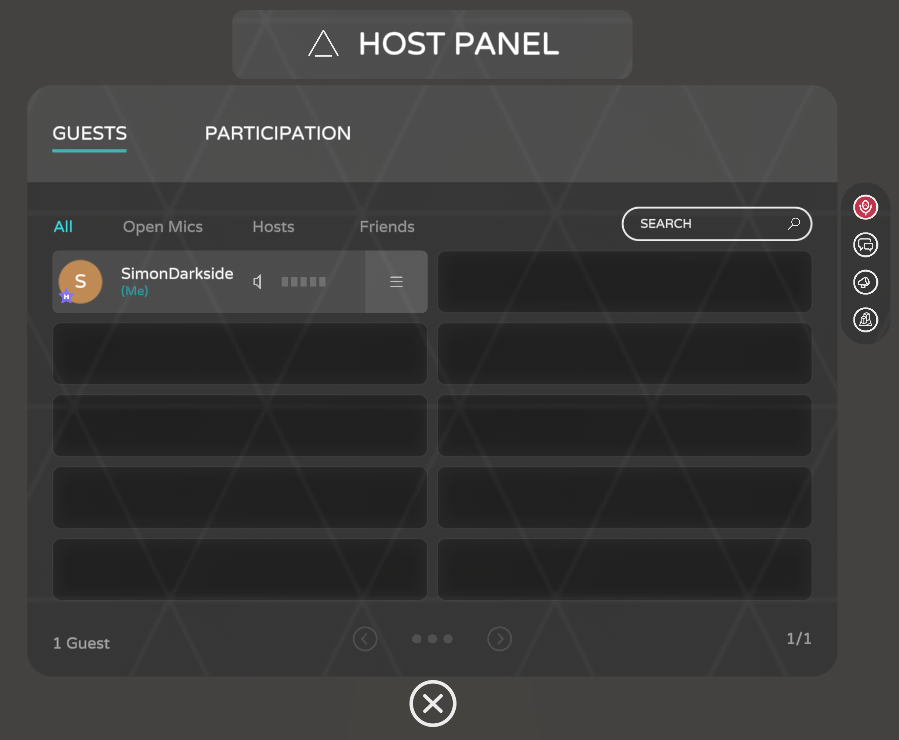
In the Hosts Guest panel, this lists out all participants and allows you to Mute or Amplify each attendee individually, as well (if it is required) allows hosts/moderators to expel people from the event. The tabs show different filters for the event so you can quickly see who has an open mic (to mute them), the hosts in attendance and your friends who have joined.
Additionally, you can promote attendees to either Host or Moderator roles if you need to quickly expand the team (or forgot to add them earlier).
This is a great view for knowing just who is at the event and to find them if you cannot see them
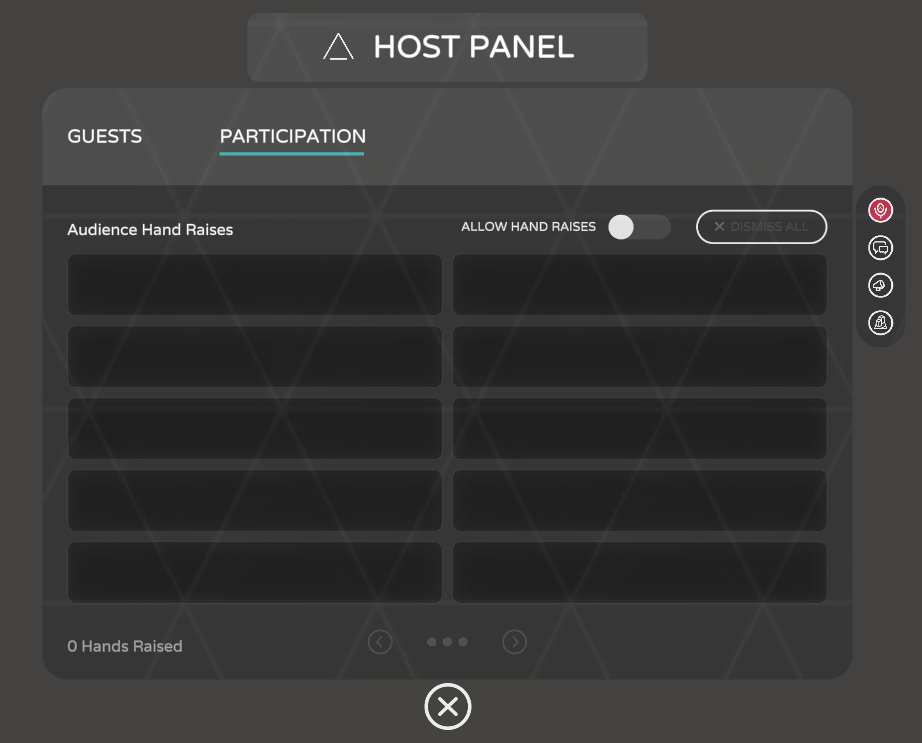
If your event needs a more “hands-on” approach to controlling questions from the audience, then you can enable the “ Allow hand Raises ” mode for the event. This allows attendees to raise their hand to ask a question, then from this view Admins and moderators can list pending requests in the order that they asked and amplify/mute them in order.
A lot easier than having to wander a room with a microphone (but you can if you wish :D)
Recording the Event
If you want to record the event for others to view who couldn’t make it or simply for prosperity, there are a few hoops to jump through as AltspaceVR (like most immersive hosts) do not provide any inbuilt recording tools today, but the process is fairly easy to do (you can even stream the event if you wish)
There are a few requirements to achieve this, namely:
- A camera operator account (or another willing body)
- Assigning the “ Pilot ” role to the operator
- A PC running the AltspaceVR client in 2D mode
- Some desktop recording software, such as OBS (Open Broadcaster Software) or Windows Game Bar
The camera operator requires its own specific AltspaceVR account to run the camera for the event. This account will need to have the “Pilot” role assigned for the event as shown below:

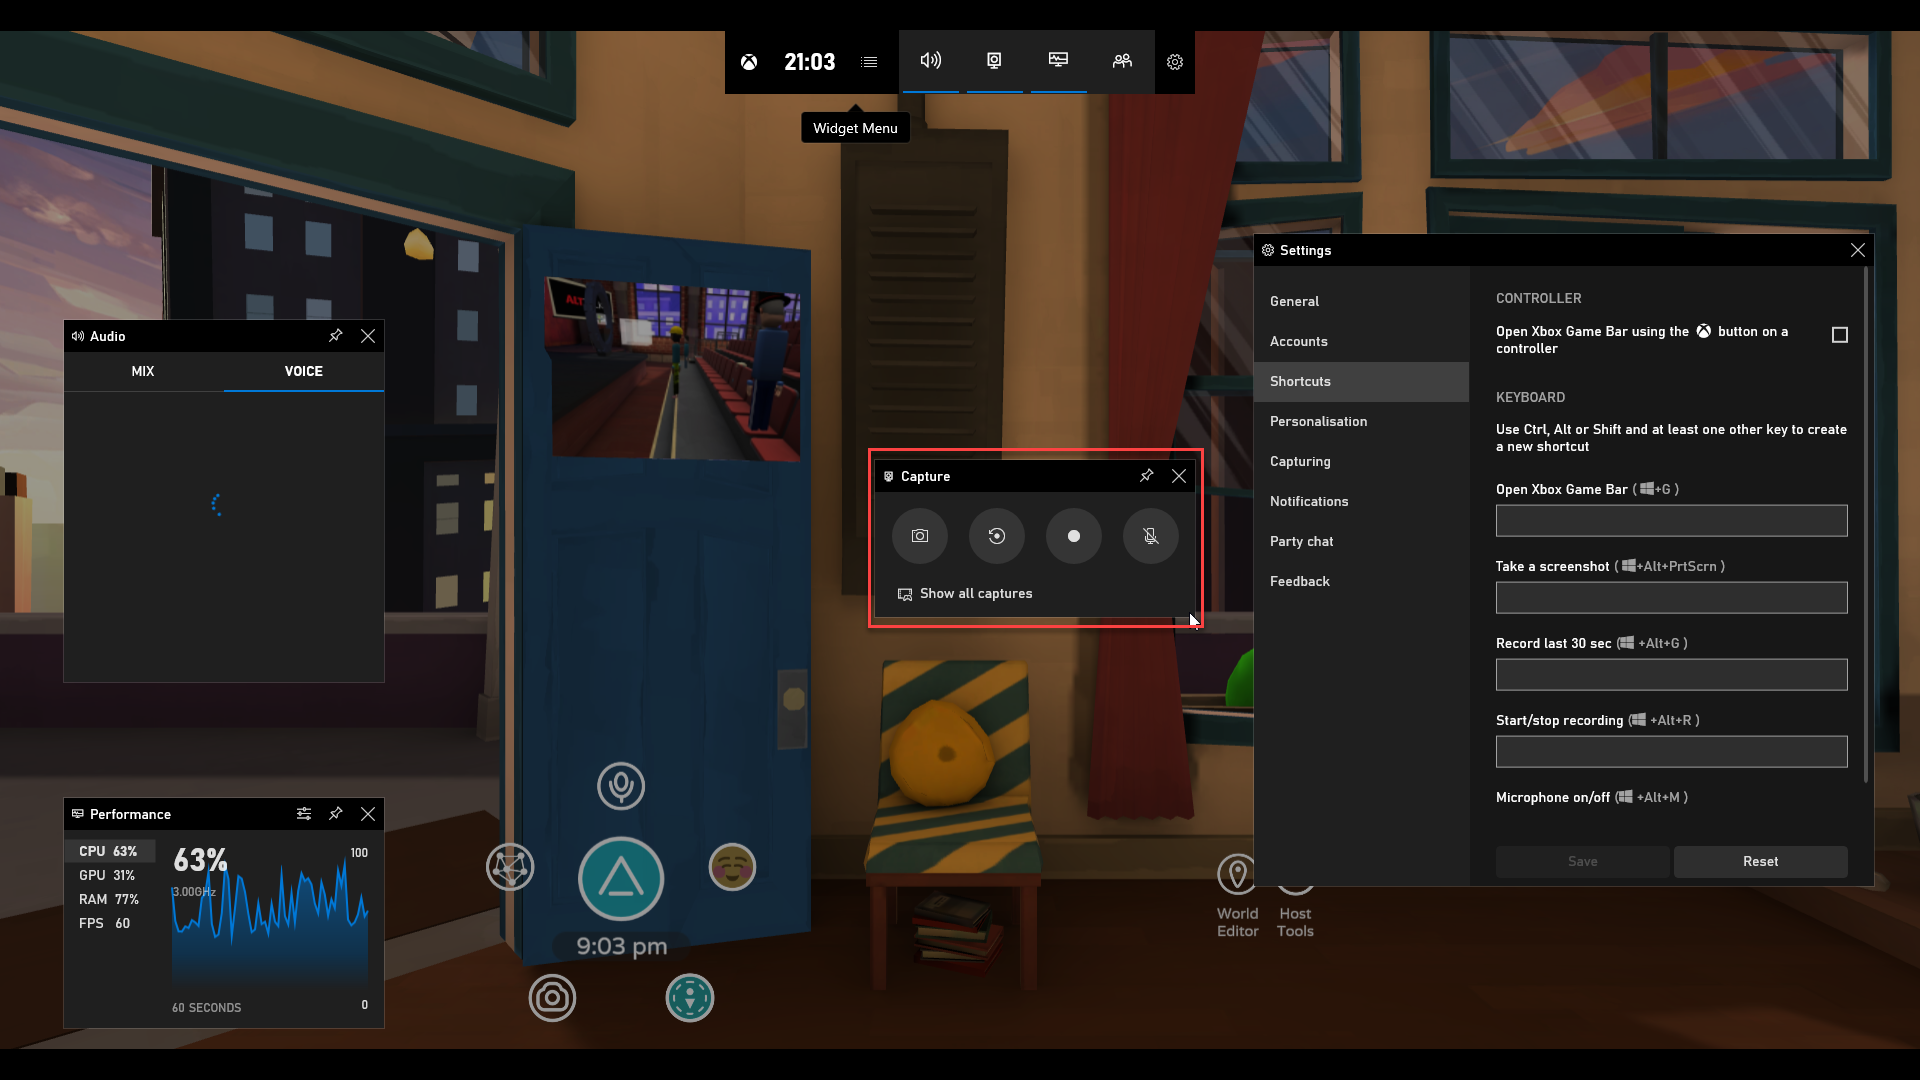
Once the camera operator enters the event, they need to enable flying mode in their AltspaceVR settings under the Input tab as shown below:

Now that they have donned their cape and are ready to fly, the operator simply needs to position themselves at a good vantage point with a good view. My preference usually on the top floor or even outside the upstairs booth, which has a grand view of the stage and prevents getting the camera view blocked by those pesky attendees.

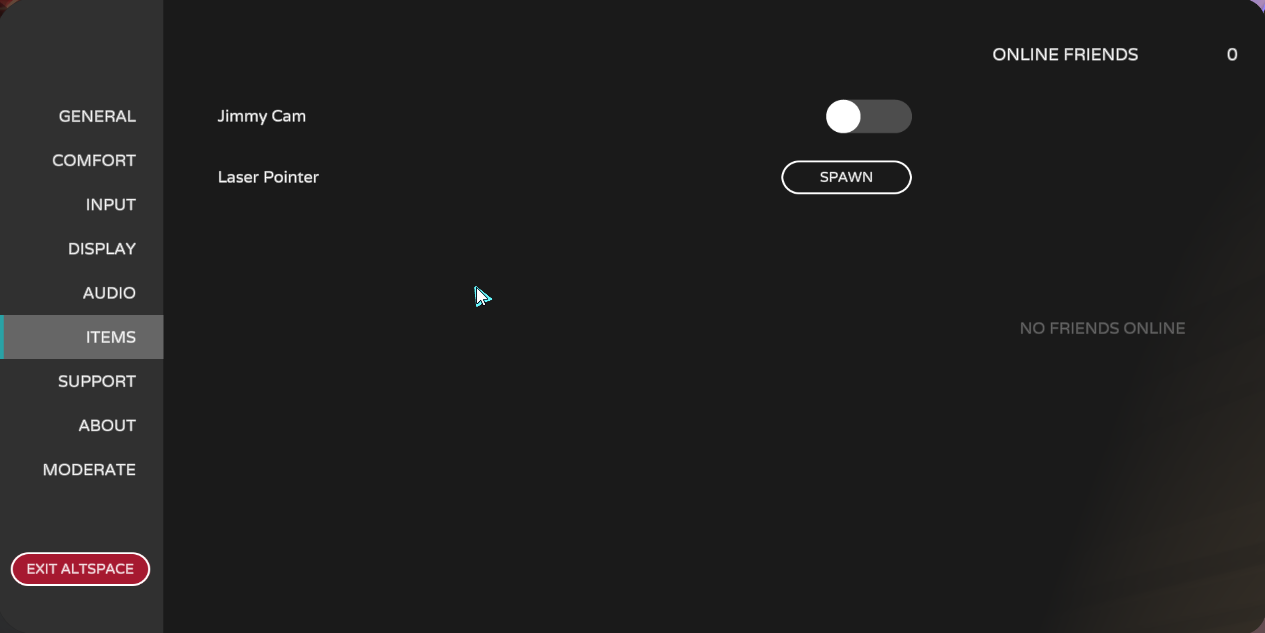
The last piece of the AltspaceVR puzzle is to disable the AltspaceVR UI (as shown above) by enabling the “ Jimmy Cam ” setting, this makes the view full screen and ready to record. You will find this in the operator’s Settings -> Items page as shown below:
Now that your camera is ready, the last thing to do is set up your recording software on the camera operators PC to record both the screen with the AltspaceVR client on and the system audio from the PC.
Another trick, especially if the presenter is using slides.com is to also capture the slide deck in a separate browser window on another screen (assuming you have a second screen) and then do some switching during the editing of the video. This is up to how you want to run the recording of your event.
The main software I have used in the past are:
- Windows 10 Game Bar (Win + G)
This comes installed on Windows 10 machines and is also available from the Windows Store. Recording the view is as simple as launching the GameBar using Win+G and clicking on “Record”. Your recording will be available afterwards in your Captures folder.
This is good for recording but no longer supports streaming.
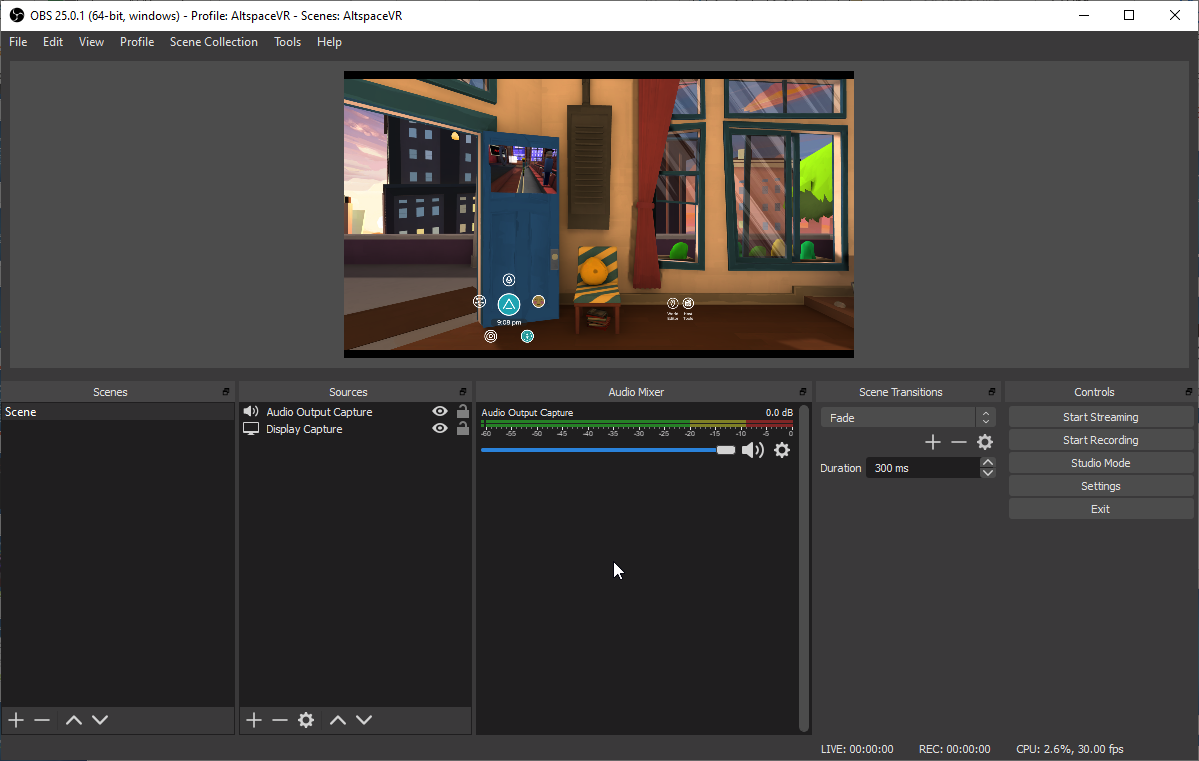
- Open Broadcaster Software (OBS)
This truly is my go-to client for recording/streaming and almost everything else due to the power it has, it’s also free too.
It can take a little time to master, but you can see my common setup below, using a Display Capture to record the monitor AltspaceVR is presented on and an Audio Output Capture to record the system audio (just be sure it’s the audio output the AltspaceVR client is using!)
If you want to record, just hit record, if you want to stream just setup your stream destination in settings and then click Start Streaming.
For more details on OBS use, check out their website and forums
Tips and Tricks for your event
Through the events I attended, hosted and participated in, here are a few tricks I have learned along the way:
- Set aside time for the presenter and moderators to practice
- The microphone on stage will broadcast whoever is near it
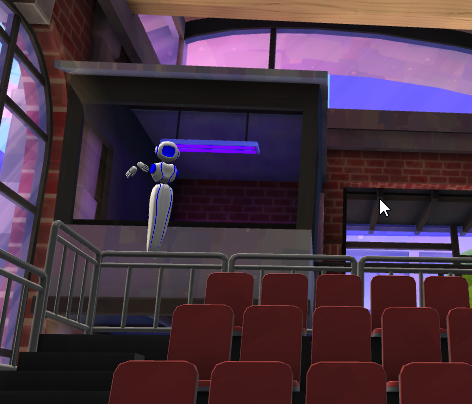
- You can spawn a microphone or laser pointer yourself if needed
- Be aware, as you would for any other event
- Guide the audience at the beginning of the session to ensure everyone in attendance knows how to behave appropriately, and welcome them in. Always good to do a warm-up event like at real live show events.
(some attendees like to run to the stage to wave and get attention)
A note about language
If you have international attendees or people who can speak multiple languages (great people), encourage and work with them to help set up more events in their local language. AltspaceVR is a great platform and the most common language used at events is English, but it would be very great and helpful to help others either replicate your event or create their own events in other languages to.
The online world is an amazing and culturally rich environment and we should celebrate that and try and get more content that is more personal to everybody no matter their language.
On a personal note, if anyone wants to take this article and translate it to other languages (beyond google translate) to help others learn and share the benefits of the platform, you have my full permission to do so (just give me a nod if you can 😀 )
On with the show
Have fun, play with setting up events between yourselves, practice and have fun. Even visit the campfire or host conversations from your own room in AltspaceVR.
I will be following up this article with an in-depth overview of some of the more advanced AltspaceVR features, creating your own content and some of the incoming beta features to make life easier. Stay tuned.