Grabbing Screenshots in AR Foundation
An interesting challenge came across my desk that, on the face of it, should have been very easy.
Take a Screenshot of an Augmented Reality scene and then place that content in the AR scene as an anchored object.
Easy I said, no problem, forgetting a couple of little problems:
- This is in Unity - multiply the obvious difficulty by 2
- This is using ARFoundation - multiply the time required by 3
- The only way to test this is on a device - Multiply the time required by 10
:D
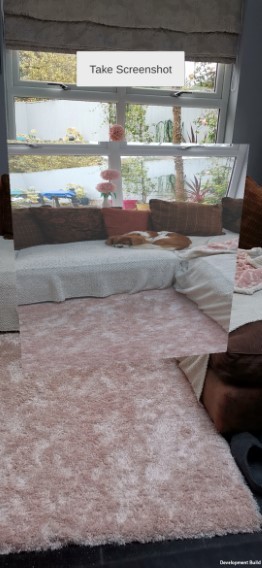
This was the eventual result that was desired (apologies for the low res)
Here is the journey to create this interesting little project for all to enjoy.
Contents
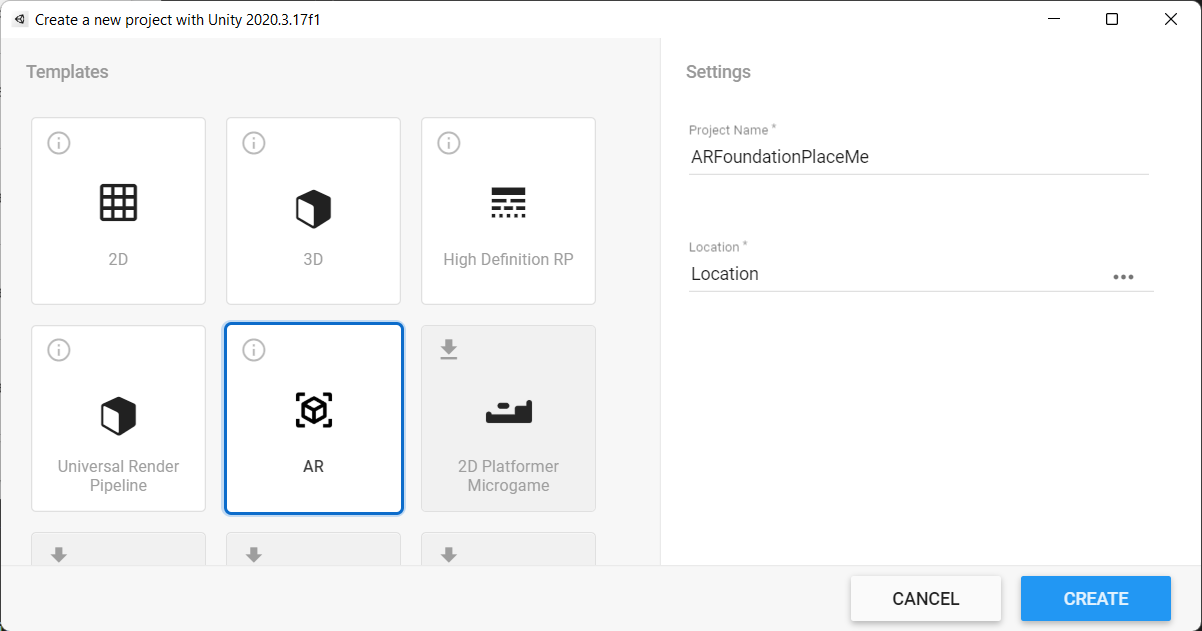
Project Setup
For this example you can create a new project using Unity’s new AR project template using the latest Unity 2020 LTS, this will give you everything you need setup ready to use ARFoundation.
Everything should be setup ready in the ExampleAssets\SampleScene
If you are setting up your project manually, add/update the following packages:
- AR Foundation 4.1.7 (or later)
- ARCore XR Plugin (Android) or ARKit XR Plugin (iOS) or both
Then create a new scene, delete your main camera and add the session origin using “GameObject -> XR -> AR Session Origin” and a AR Session “GameObject -> XR -> AR Session” to have everything configured to run AR Foundation.
First Step - grabbing a screenshot
The first step is usually the easiest, surely. Getting a screenshot in Unity is actually quite easy, no need to “faff” around with cameras, or native device plugins, Unity just provides a simple way to get what is currently on the user’s screen and thankfully this includes camera feeds plus any 3D content, just “copy the Unity camera”.
    var screenShot = new Texture2D(screenShotWidth, screenShotHeight, TextureFormat.RGB24, false);
    screenShot.ReadPixels(new Rect(0, 0, screenShotWidth, screenShotHeight), 0, 0);
    screenShot.Apply();
Easy…
- We create a texture to match the size of the screen, to place the screenshot in
- Use the ‘ReadPixels’ function to grab the pixels from the “Main” camera
- ‘Apply()’ then commits these changes to the texture, ready for use (although in testing this was not “required” but it is good practice)
Except
This being Unity, you cannot use the above code just anywhere, it can only be run in the ‘OnPostRender’ method from the Camera you want to read from.
This gives you two options, either:
- Write a MonoBehaviour script to apply to the Camera to perform the act on demand
- Write a MonoBehaviour to expose the ‘OnPostRender’ event that your scripts can attach to, in order to capture the event
My preference is always the second option, to avoid bloating “other” objects with code I actually need elsewhere.
Screenshot solution
To solve this implementation, I wrote two scripts, one for the camera and another for the button that will take the screenshot.
1 - “CameraRenderEvent” script
Create one script and attach this to the camera you want to grab the screenshot from
using System;
using UnityEngine;

[RequireComponent(typeof(Camera))]
public class CameraRenderEvent : MonoBehaviour
{
    private Camera cam;

    public event Action OnPostRenderEvent;

    void Start()
    {
        cam = GetComponent<Camera>();
    }
    private void OnPostRender()
    {
        OnPostRenderEvent?.Invoke();
    }
}
A simple script to attach to the camera that you want to capture the screenshot from.
2 - “Screenshot” script
Create a second script that will contain the rest of the Screenshot logic, in the example I have simply added this to a button, but you can call the code from anywhere.
using UnityEngine;

public class Screenshot : MonoBehaviour
{
    // Grab the camera's view when this variable is true.
    private bool grabScreenshot;

    [SerializeField]
    [Tooltip("Assign the camera that is taking the screenshot")]
    private CameraRenderEvent cam;

    // Start is called before the first frame update
    void Start()
    {
        if (cam == null)
        {
            // Not the most ideal search, Cameras should be tagged for search, or referenced.
            cam = GameObject.FindObjectOfType<CameraRenderEvent>();
        }
        if (cam != null)
        {
            //Subscribe to the Render event from the camera
            cam.OnPostRenderEvent += OnPostRender;
        }
    }

    public void TakeScreenshot()
    {
        grabScreenshot = true;
    }

    private void OnPostRender()
    {
        if (grabScreenshot)
        {
            //Set the screen/image width and height parameters
            int screenShotWidth = Screen.width;
            int screenShotHeight = Screen.height;

            // store in image
            var screenShot = new Texture2D(screenShotWidth, screenShotHeight, TextureFormat.RGB24, false);
            screenShot.ReadPixels(new Rect(0, 0, screenShotWidth, screenShotHeight), 0, 0);
            screenShot.Apply();

            //Stop grabbing a screenshot
            grabScreenshot = false;
        }
    }
}
The code is highly commented and put simply:
- The script starts and gets its reference to the Camera the screenshot should be taken from (take care that this camera only sees what you want screenshots of)
- It binds the OnPostRender method to the same event exposed by the CameraRenderEvent script.
- Finally, the public TakeScreenshot method, when called, sets the grabScreenshot flag to capture the result of the next frame from the camera.
This now gives you the framework to grab screenshots when you want, but what to do with them?
Second Step - placing in view
Placing an object in the scene and applying the grabbed texture to it, easy… Or is it.
    // Spawn a Quad Primitive
    var spawnedObject = GameObject.CreatePrimitive(PrimitiveType.Quad);

    // Set a position Forward for the camera view
    Vector3 pos = cam.transform.position + cam.transform.forward;
    spawnedObject.transform.position = pos;

    // Apply the grabbed screenshot texture to the Quad's material
    var renderer = spawnedObject.GetComponent<MeshRenderer>();
    renderer.material.mainTexture = screenShot;
In this script, we simply:
- To create a Primitive (a quad as it has the least amount of geometry)
- Define a position in front of the camera and set the Quad there
- Assign the texture to its renderer
PRO Note When placing content in 3D and want to place something “in front” of another, such as a camera, make sure to use the Object’s Forward direction and NOT just use Vector3.Forward
  // Use This
  Vector3 pos = gameObject.transform.position + gameObject.transform.forward;

  // NOT this
  Vector3 pos = gameObject.transform.position + Vector.forward;
Else you will be in for a little head-scratching when it does not appear where you expect!
Job done, surely.
Except
The issues here are on several fronts:
- The Quad does not face the camera, so you cannot see the image
- The Quad is just a square and does not match the dimensions of the image (making it squished)
- Based on the orientation of the device, the image may be portrait or landscape
- Unity has no way of sizing a GameObject to a set of dimensions!
Placing solution
To overcome these little complexities, we need to alter our implementation to address these limitations. Some by just coping with the setup of the device and some by sheer brute force.
Rotating the quad to face the camera is fairly easy by simply forcing the Gameobject to face the camera like this:
spawnedObject.transform.LookAt(spawnedObject.transform.position + cam.transform.rotation * Vector3.forward, cam.transform.rotation * Vector3.up);
The LookAt method simply takes the position and rotation of another gameobject (in this case the camera) and orientates it to face its own Forward direction face it.
- The Cameras position, taking in to account its forward rotation
- The Cameras current rotation based upon its upward direction
Changing the dimensions of the Quad is a little trickier, as I stated, there is no way to “Make” the dimensions of the Quad match the texture (like we can in the UI System), what we can do however, is to make the aspect ratio of the image match that of the camera’s view. To do this we need to know the devices orientation so we can calculate the correct proportions.
    Vector3 scale = spawnedObject.transform.localScale;
    float screenAspectRatio;

    switch (Screen.orientation)
    {
        case ScreenOrientation.Portrait:
        case ScreenOrientation.PortraitUpsideDown:
            screenAspectRatio = screenShotWidth / (float)screenShotHeight;
            scale.x *= screenAspectRatio;
            break;
        default:
            screenAspectRatio = screenShotHeight / (float)screenShotWidth;
            scale.y *= screenAspectRatio;
            break;
    }

    spawnedObject.transform.localScale = scale;
In this we “copy” the current scale of the Quad (as you cannot manipulate individual properties of a gameObjects scale directly, only the scale itself) and then we calculate the aspect ratio depending on the orientation of the device.
Aspect Ratio = Shortest Edge / Longest Edge (you can use Height divided by Width in all occasions for the aspect ratio but it will give you different proportions / scale to use)
We then multiply either the X or Y axis, depending on the orientation of the device, to scale the Quad to match the screenshot and finally set the scale of the Quad accordingly.
The last trick is to place the Quad far enough away from the camera so that it fills the screen by updating the position you want it placed at
Vector3 pos = cam.transform.position + cam.transform.forward * 0.75f;
Adding 0.75f units forward of the camera’s position
In the example, I added an extra scene with a simply debug view to find the 0.75f magic number by moving the placed screenshot until it met my requirements. There might be a neat mathematical way to figure this out, but sometimes the simplest solution is the best :D
With these final changes in, our Screenshot code now looks like this:
using UnityEngine;

public class Screenshot : MonoBehaviour
{
    // Grab the camera's view when this variable is true.
    private bool grabScreenshot;

    [SerializeField]
    [Tooltip("Assign the camera that is taking the screenshot")]
    private CameraRenderEvent cam;

    // Start is called before the first frame update
    void Start()
    {
        if (cam == null)
        {
            // Not the most ideal search, Cameras should be tagged for search, or referenced.
            cam = GameObject.FindObjectOfType<CameraRenderEvent>();
        }
        if (cam != null)
        {
            //Subscribe to the Render event from the camera
            cam.OnPostRenderEvent += OnPostRender;
        }
    }

    public void TakeScreenshot()
    {
        grabScreenshot = true;
    }

    private void OnPostRender()
    {
        if (grabScreenshot)
        {
            //Set the screen/image width and height parameters
            int screenShotWidth = Screen.width;
            int screenShotHeight = Screen.height;

            // store in image
            var screenShot = new Texture2D(screenShotWidth, screenShotHeight, TextureFormat.RGB24, false);
            screenShot.ReadPixels(new Rect(0, 0, screenShotWidth, screenShotHeight), 0, 0);
            screenShot.Apply();

            // Spawn a Quad Primitive
            var spawnedObject = GameObject.CreatePrimitive(PrimitiveType.Quad);
            spawnedObject.transform.SetParent(cam.transform.parent);
            spawnedObject.transform.LookAt(spawnedObject.transform.position + cam.transform.rotation * Vector3.forward, cam.transform.rotation * Vector3.up);

            // Set a position Forward for the camera view
            Vector3 pos = cam.transform.position + cam.transform.forward * 0.75f;

            //Get the current scale of the Quad
            Vector3 scale = spawnedObject.transform.localScale;
            float screenAspectRatio;

            //Calculate the aspect ratio and set the scale based upon the orientation of the device
            switch (Screen.orientation)
            {
                case ScreenOrientation.Portrait:
                case ScreenOrientation.PortraitUpsideDown:
                    screenAspectRatio = screenShotWidth / (float)screenShotHeight;
                    scale.x *= screenAspectRatio;
                    break;
                default:
                    screenAspectRatio = screenShotHeight / (float)screenShotWidth;
                    scale.y *= screenAspectRatio;
                    break;
            }

            //Update the position and scale of the Quad
            spawnedObject.transform.localScale = scale;
            spawnedObject.transform.position = pos;

            // Apply the grabbed screenshot texture to the Quad's material
            var renderer = spawnedObject.GetComponent<MeshRenderer>();
            renderer.material.mainTexture = screenShot;

            //Stop grabbing a screenshot
            grabScreenshot = false;
        }
    }
}
Almost there, but not quite
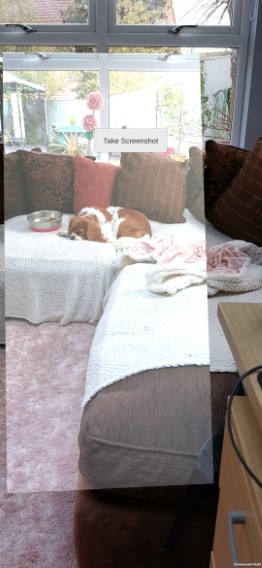
In the Screenshot above (pun intended) the device was pulled back slightly to show the proportions of the image now fill the screen, when the image was taken, it was full screen.
Last Step - Lighting
So we have our image, it is placed in our view, in the correct proportions, We are done, right?
Except
For the astute of you, you might notice the image is a little bright. If you deploy the app to a device and walk around you will notice this brightness changes when you take screenshots. You might simply put this down to the lighting conditions in the space, except it isn’t.
By default, the Quad you generate will use the Unity Standard shader, which receives lighting from all sources, including, the directional light that is included in default scenes.
As we do not want any additional lighting in our screenshots, we need to either remove lighting (which would be bad, as it would affect any 3D content we want to be placed in the scene), or more simply, use a different shader for our Quad that ignores lighting.
Lighting solution
So as described, we want to use an Unlit shader for our screenshot object, that way it will not be affected by anything else in our scene and luckily Unity provides us one out of the box, which we can access by assigning it to our Quad in the scene:
    var unlitTexture = Shader.Find("Unlit/Texture");
    renderer.material.shader = unlitTexture;
Pro Tip
NEVER assign a shader by just using Shader.Find, this simply does not work. It is not exactly clear why it does not work, except to guess that it takes a cycle or more to actually find the shader and then assign it.
  //DO NOT do this
  renderer.material.shader = Shader.Find("Unlit/Texture");

  // DO THIS
  var unlitTexture = Shader.Find("Unlit/Texture");
  renderer.material.shader = unlitTexture;

  // Even better, do this (especially if you repeatedly use the shader)
  private Shader unlitTexture;

  void Start()
  {
      unlitTexture = Shader.Find("Unlit/Texture");
  }

  void MyMethod()
  {
      renderer.material.shader = unlitTexture;
  }
For our sample, we will implement the UnLit shader by caching the Shader instance to avoid calling “Find” every time we need to place a screenshot. It isn’t very often, but you should get in the habit of caching “anything” that needs a “Find” function wherever possible.
Ths final update to the Screenshot code is as follows:
using UnityEngine;

public class Screenshot : MonoBehaviour
{
    // Grab the camera's view when this variable is true.
    private bool grabScreenshot;

    // Cache variable for our unlit shader
    private Shader unlitTexture;

    [SerializeField]
    [Tooltip("Assign the camera that is taking the screenshot")]
    private CameraRenderEvent cam;

    // Start is called before the first frame update
    void Start()
    {
        if (cam == null)
        {
            // Not the most ideal search, Cameras should be tagged for search, or referenced.
            cam = GameObject.FindObjectOfType<CameraRenderEvent>();
        }
        if (cam != null)
        {
            //Subscribe to the Render event from the camera
            cam.OnPostRenderEvent += OnPostRender;
        }

        // cache a reference to the Unlit shader
        unlitTexture = Shader.Find("Unlit/Texture");
    }

    public void TakeScreenshot()
    {
        grabScreenshot = true;
    }

    private void OnPostRender()
    {
        if (grabScreenshot)
        {
            //Set the screen/image width and height parameters
            int screenShotWidth = Screen.width;
            int screenShotHeight = Screen.height;

            // store in image
            var screenShot = new Texture2D(screenShotWidth, screenShotHeight, TextureFormat.RGB24, false);
            screenShot.ReadPixels(new Rect(0, 0, screenShotWidth, screenShotHeight), 0, 0);
            screenShot.Apply();

            // Spawn a Quad Primitive
            var spawnedObject = GameObject.CreatePrimitive(PrimitiveType.Quad);
            spawnedObject.transform.SetParent(cam.transform.parent);
            spawnedObject.transform.LookAt(spawnedObject.transform.position + cam.transform.rotation * Vector3.forward, cam.transform.rotation * Vector3.up);

            // Set a position Forward for the camera view
            Vector3 pos = cam.transform.position + cam.transform.forward * 0.75f;

            //Get the current scale of the Quad
            Vector3 scale = spawnedObject.transform.localScale;
            float screenAspectRatio;

            //Calculate the aspect ratio and set the scale based upon the orientation of the device
            switch (Screen.orientation)
            {
                case ScreenOrientation.Portrait:
                case ScreenOrientation.PortraitUpsideDown:
                    screenAspectRatio = screenShotWidth / (float)screenShotHeight;
                    scale.x *= screenAspectRatio;
                    break;
                default:
                    screenAspectRatio = screenShotHeight / (float)screenShotWidth;
                    scale.y *= screenAspectRatio;
                    break;
            }

            //Update the position and scale of the Quad
            spawnedObject.transform.localScale = scale;
            spawnedObject.transform.position = pos;

            // Apply the grabbed screenshot texture to the Quad's material
            var renderer = spawnedObject.GetComponent<MeshRenderer>();
            renderer.material.shader = unlitTexture;
            renderer.material.mainTexture = screenShot;

            //Stop grabbing a screenshot
            grabScreenshot = false;
        }
    }
}
However, if you run this code now you will hit a small snag which results in your Quad being rendered in the lovely Shader error texture of PINK!. So what went wrong?
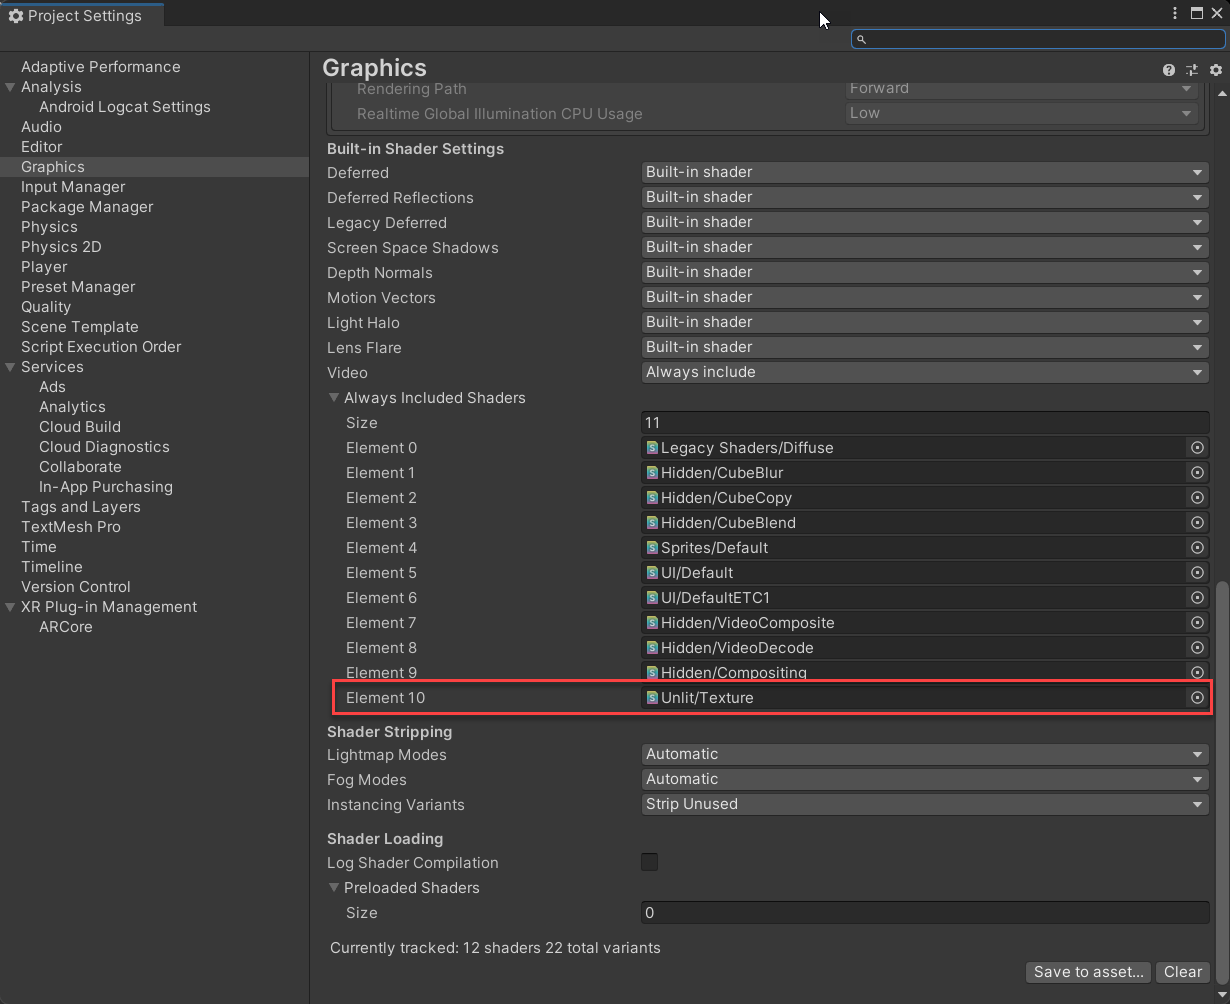
The answer is because Unity does NOT by default include the Unlit shader in Unity builds (but of course, why would Unity include shaders you have requested to use?). Fixing it is VERY simply thankfully, just tell Unity to include it in your Unity Project settings:
- Open The Project settings using “Menu -> Edit -> Project Settings”
- Select the Graphics option in the left-hand window
- Scroll down to the bottom of the right-hand window to find the Always Included Shaders section
- Increase the Size value by One
- Click on the circle icon next to the new Element (Element 10 in the screenshot below) and select the “Unlit/Texture” shader
- Done.
If you build and run the project now, you should get the same result as shown in the beginning of this article.
Fun wasn’t it.
Conclusion
This was a fun ride that took me quite a few more hours than I would have expected as I had not taken into account I was using Unity.. Things are not always as simple as they initially appear and there are almost always a few bumps in the road. Being used to Unity, I should know better but it seems I am eternally bound to repeating past mistakes when trying to do something new.
