Configuring Unity3D to use the new lightweight Visual Studio Code editor

Note, this article has now been superseded with a new version for the VSCode 0.8.0 release and the new Unity Asset plugin
http://darkgenesis.zenithmoon.com/vscode-and-unity-take-another-bold-step-forward/
On day 1 of the Microsoft Build conference, Microsoft announced an all new, streamlines and lightweight code editor called Visual Studio Code. The big thing about this announcement is that it’s available for Windows, Mac and Linux natively (deployed as a modern cross-platform web app judging by it’s innards).
This gives us some great code editing features, intellisense, code completion, snippets (short-cut code) and GIT integration to name but a few for all these platforms. For web apps, you also have some debugging features as well.
Now, the primary target for this editor at the moment is web editing, mainly ASP.NET and PHP web apps, however this is just the beginning of this tool and we can expect a great many things in the future.
**Advanced
If your an advanced user and just want the info. Go to External Tools in editor preferences, click browse to select a new editor and select code.exe in the following path:
C:\Users\<profile>\AppData\Local\Code\app-0.5.0
Then set for following External script editor args:
-r -g “$(File)”:$(Line)
Done
Can we use it with Unity?

*Edit
5 Mins after posting I got pointed to a MAC version of this tutorial. If you are a MAC user, I highly recommend checking out Raf’s version here
http://unreferencedinstance.com/how-to-integrate-visual-studio-code-with-unity3d-project/
*Edit 2
Another update from a budding OSX user with further instructions for using VSCode with Unity. Great work MassiveBacon, added after Intellisense section
In short YES, setting it up is quite simple and just requires you to replace your external tool setting in the Unity preferences, before you do though, a few things to keep in mind:
- VS Code is predominately aimed at editing single files, like Sublime and other text editors (but this doesn’t bother us since that’s the natural workflow for Unity)
- No debugging capabilities with Unity (yet!)
- Intellisense is limited and can’t read Unity stuff (however other tools weren’t great at it either) *Update , added instructions below for getting intellisense working with Unity.
- It’s faster (not really a negative)
- No shader syntax support (but then again, most other editors didn’t)
- No Line selection on launch at present
Granted this is only the story today, tomorrow may be different, or future releases. It’ll be better once they open up the editor and allow for more and community extensions.
Get it configured
As I said configuring it is easy, however since it’s a web based tool, you don’t have a specific EXE to run, if you are familiar with web based tools, they have a command tool that you pass arguments to in order to start a package or process, VS Code is the same. For example, the launch command looks like this:
“…Codeupdate.exe –processStart Code.exe”
Which runs the Update tool, with arguments to start the “code” process. Unfortunately Unity can’t handle this, it doesn’t like parameters when launching tools, however we can use / build a batch file to do it for us the compiled EXE that VSCode provides for us with a few tweaks.
Thankfully (at least on windows) we get a command line batch file to start VS Code and is configured to also pass input parameters (the file you want to edit) directly to the editor.
So, first open up the Unity preferences panel (Menu -> Edit -> Preferences) and select the “External Tools” tab, which looks as follows:
Now drop down the “ External Tools ” drop down and select “ Browse.. ” which will open up a file browser. In this navigate to the location where VS Code is installed (which on windows, is actually in your users AppData folder, not in program files), for example mine looks like this:
“C:\Users\<profile>\AppData\Local\Code”
In there, there is a sub folder called “ Bin ” and in there, there is a file called “ code.cmd “, this is the file we want. So navigate to the bin folder and select the code.cmd file and click OK.
With the update of VSCode to 0.5.0, an exe is now provided which is a lot more flexible, it also adds 2 new options:
- The ability to launch to a specific line in a file
- The ability to reuse the open window
*Note, code is now also being installed in a versioned directory, so for the moment, you’ll have to update your command for each new release.
So in the above folder there is a app-0.5.0 folder which contains the new code.exe , so select this exe in the file browser.
By default your external tools window should now look as follows:
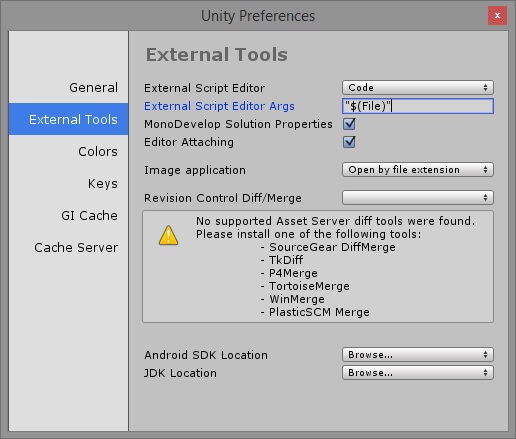
Now we just need to update the External Script Editor Args to use the new features, so replace the contents of this property with the following:
-r -g “$(File)”:$(Line)
Close the window and now when you double click on a file, you will launch the new Visual Studio Code editor (I find the first run takes a bit, but after that it is like lightning)
*Update
With the new -g command, it will also jump to the line in question from the console window if an error or warning is found. With the -r command it will also reuse the same window every time you click on a file.
Have a play and if you don’t like it you can always go back to the External Tools widow and change your selection back 😀
Getting Intellisense working
**Update With Unity 5, .csproj files are no longer generated by default. As Shahed Chowdhuri points out though, you can force this by using the “Assets -> Sync MonoDevelop” command in the editor menu
After some further investigation, I did find a way to get Intellisense working with Unity projects, however it’s not as automatic as we’d like, mainly due to limitations in Unity for passing arguments to external applications.
VS Code has the capability to detect what libraries a solution is using from the folder VS code is opened from (although it cannot actually open .SLN/Solution files), however it has to be told which folder it needs to open, not just the folder the file where the file is located. Sadly this needs to be selected manually as Unity can only pass the File and/or Line number.
*Update
For Unity 5, the .csproj and .sln project files VSCode needs for intellisense are not generated automatically anymore. To rectify this use the “Assets -> Sync MonoDevelop” command in the Editor menu.
So, when you open a script in Unity (which if you have configured the launcher above) it will open VS Code with the selected file in focus, as shown here:
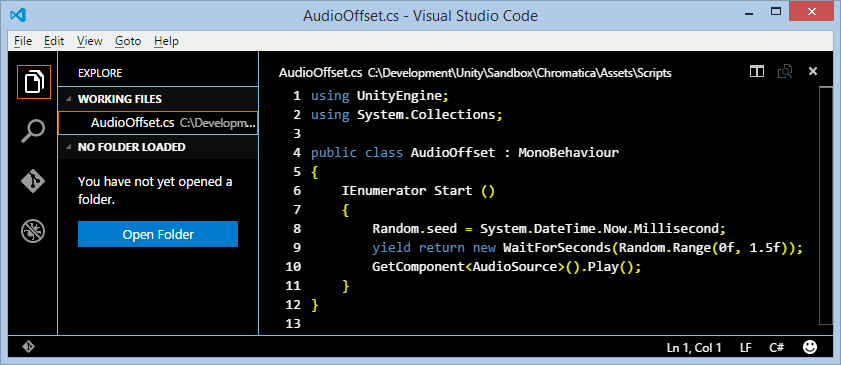
If you don’t see the Folder section, just click on the Folder icon in the top left hand corner of the window.
Using VS code like this, makes it operate like any other Text editor with syntax highlighting (with a few extra bells and whistles). To get intellisense working, we need to open the base folder where the solution that Unity creates is located.
To open the folder you can:
- Click on the “Open Folder” button (as shown above)
- Click on “File -> Open Folder” in the menu
You will then be prompted for the Folder location (which seems to default to your documents folder, not the current one :S), change this to select you base Unity folder when your project is located (The same one you open your Unity project from). Once open, your window should update and show something like this:
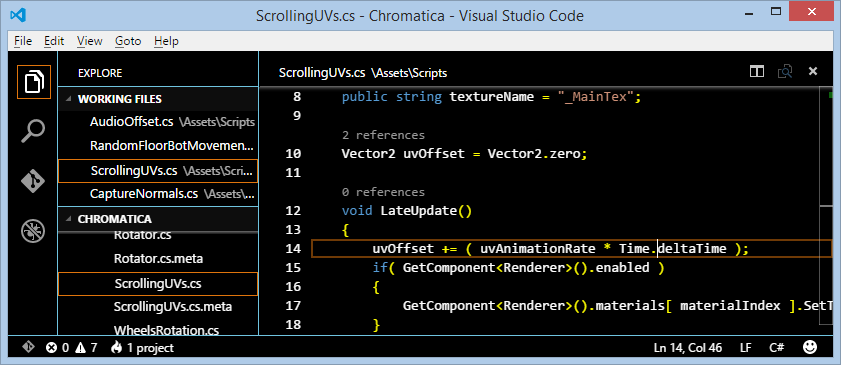
As you can see you have an expanded view of your solution as a folder now and you can navigate through it as well if need be.
When it’s first opened, it may take a minute or two for VS Code to detect the project located in the folder, what you need to look for is the “Project” and flame icon at the bottom of the window, a few points on this though:

- If the flame icon doesn’t show, it has either not found a solution / project or hasn’t started looking yet. If this persists, make sure there is a solution in the folder you have selected
- If the flame icon is flashing, VS Code has found a project (or projects) and is peeking inside it
- If the toolbar shows (as above) only 1 project, there is nothing else to select and intellisense should now be working
- If the toolbar shows more than one project or text stating “select project”, then you have to select one (usually happens if you have built the project or have editor code). TO select a project, just click on the flame icon or “project” text to open the Project selector (as shown below), for Unity makes sure you ONLY select the “ -csharp ” solution (and NOT the editor solution) as seen here (opening the base solution won’t work)

One good thing is that VS Code will stay in the same folder while your editing, so you only have to select the folder when VS Code first launches. However, it forgets when you close it, so for now you’ll have to do it when you start for the day (or just leave it running forever :D)
Hopefully this will improve as time goes on.
MWoarr OSX fun
Further instructions from a Reddit user called MassiveBacon(love the tagname)
They instruct to:
- Update to latest version of Mono
- Set Code as your default editor for Unity
- In Unity, Assets -> Sync MonoDevelop project
- In Code, click the little flame in the bottom that also may say “select project,” then select the .sln
Note: Did this all without ever directly installing OmniSharp. It comes with Code.
Have fun!
Feel free to comment below with the alternate instructions for MAC, I’m not a MAC user so can’t help there.