Debugging Android using Unity (an invasion into insanity)
Since we started supporting Android platforms fully in the XRTK, we’ve been through the mill working through all the possible combinations of testing, debugging and banging heads against tables to make Android platforms behave.
Today I’ll share some hints, tips and advice for making the insanity of working with Android in Unity a little clearer.
Article Contents
- Installing Android for Unity
- Setting up your SDK, NDK and friends
- Android ADB Drivers
- Setting up your Unity Android project
- Getting to know the Android Debugging Tool (ADB)
- Enter Logcat
- Debugging code on your Android from Visual Studio
##
- Installing Android for Unity
(Feel free to skip if you have already installed Android as a platform in Unity)
You want to target Android with Unity, are you crazy? Well if you are, or just want to build for some of the many platforms now adopting Android as their operating system (Oculus Quest, Lenovo, Magic Leap and so on), then let us first get Android inserted into your Unity installation
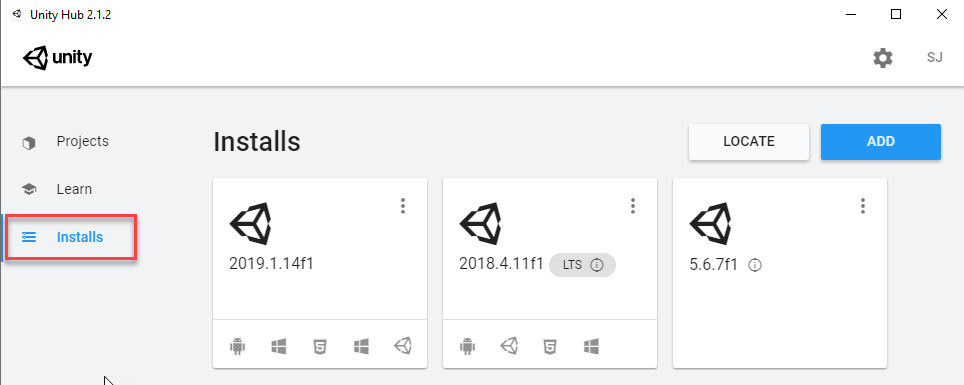
I’d recommend using the Unity Hub for managing all your Unity installations (especially if like me, you have many), you can use the old download installer if you wish, it should look fairly similar.
Open the Unity Hub and click on the Installs tab (as shown above) and you’ll see all the Unity versions that the Unity hub has detected on your machine. From here you can either modify an existing installation (by clicking the three dots … ) or click ADD to install another, this will show you the optional components for your Unity installation.
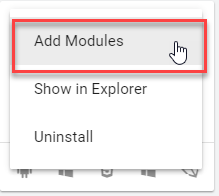
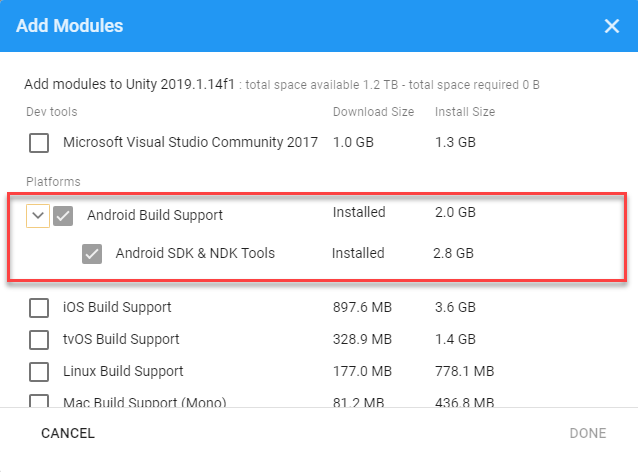
Once you have opened your Unity Installation (or started installing) you will have a list of modules that can be added to your installation. For Unity, you simply need to select the Android Build Support module to enable the Android platform. Additionally, I’d recommend expanding the Android platform (if your version of Unity support it) and also select any options for the Android SDK & NDK as this will install Unity compatible versions of these (not mandatory, but highly recommended)
Now you have Android setup against your Unity installation, so is it time to party yet? I wish that was the end of the story but let us move on.
##
- Setting up the Android SDK & NDK

Congratulations, you have installed the Android module in your Unity installation (if not, go back to 1 😀 ) but still, there is more to do.
If you open your Unity project in the editor and then open the Editor Preferences window (Menu -> Edit -> Preferences), on the “ External Tools ” tab you should see the following now:
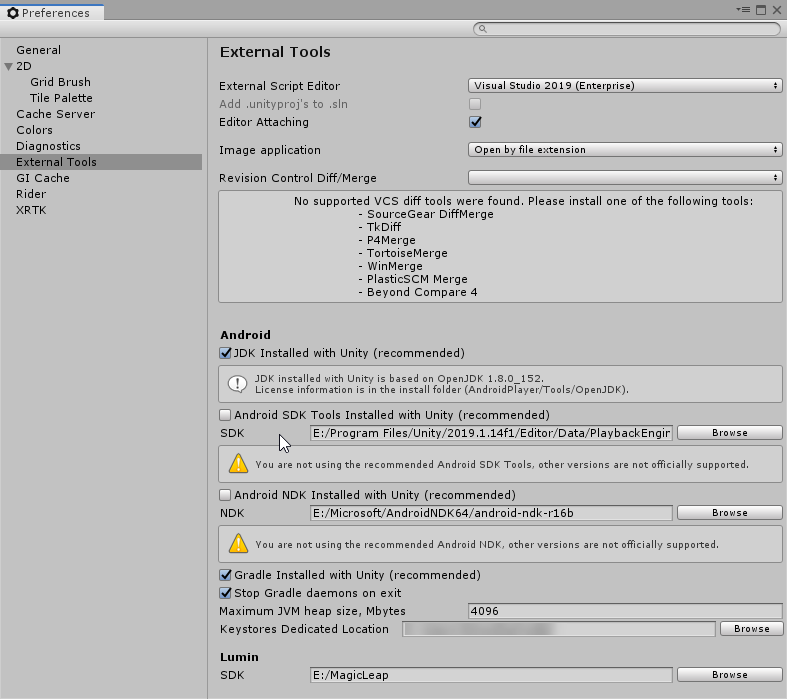
(I’ve unchecked some boxes to highlight some config here)
With Android installed, you will have an entire section dedicated to the Android module detailing the various tools needed in order to produce an Android build.
For each of these, you can either use the default install provided by Unity (as shown in Figure 3 above) or you can also install your own, as detailed here:
- JDK (2019 +)
Unity requires the Java Development Kit installed using the OpenJDK. I highly recommend the version that is included with Unity but if you want to install your own go here. If you install your own, you will need to uncheck the “JDK Installed with Unity” option and provide a path to its location. - Android SDK Tools
By far one of the biggest issues you will have with Android under Unity is the Android SDK, this gives you access to the main tools needed for creating a build.
Again, I’d recommend using the version that comes with Unity as it “mostly” works and can change from Unity version to Unity Version. If however (like me) you prefer your own install, you can either grab it directly from Googleor use the Android tools included with Visual Studio. Once installed, like the JDK option, simply uncheck the SDK box and provide your own path.
(for Visual Studio, the default path is <drive>:\Android\android-sdk )
*Note, the path is to the ROOT of the SDK folder, which should contain the necessary “Platform Tools” folder. Unity will check and complain if it is not right. - Android NDK Tools
Like the SDK, the NDK is required for building and signing your builds, but trust Google to create two toolkits to build for their platform instead of just one.
Like the SDK, you can use the version included with Unity or install the version direct from Google or the one bundled with Visual Studio
(for Visual Studio, the default NDK path is <drive>:\Microsoft\android-ndk-r16b )
So long as Unity doesn’t complain and each of the relevant tools and paths are configured correctly, you should be good to go.
If it doesn’t go right?
It is Unity after all, and if the recommended Unity defaults don’t work (I have had it happen twice on new builds) then simply switch to the Google or Microsoft versions.
If you’re using Google or Microsoft and it stops working after an upgrade, check you have the correct version of the SDK/NDK installed that Unity is complaining about, likely you’ll need to upgrade. If that fails, fall back to using the Unity default versions.
It’s a pain, but then again, It is Android.
##
- Android ADB Drivers
Before you can start building and deploying to your Android device, you will need to ensure that you have enabled “ Developer Mode ” on the device and that you have also installed the Google “ADB Drivers” for the respective device on your development PC.
In most cases, you can use the default Google USB ADB Driver, depending on your device however, (Oculus Quest has its own for example) you may need to go back to the device manufacturer and get a specific one.
Simply put, if Unity cannot find your device to build to it, it is almost always down to:
- ADB driver is not installed for your device
- Device is not enabled for Developer mode (see vendor for instructions)
- The device is locked or is not powered on (also include forgetting to plug the device in your dev pc)
- The ADB bridge is frozen on your development PC, so reboot!
##
- Setting up your Unity Android project

Now that your Unity installation is setup for Unity and your device is hooked into your machine, the last step is to get your project ready for Android, and so to enter madness.
The Android settings can be found in your Player project settings (“Edit -> Project -> Player Settings” – like most platforms) with the key area being the “ Other Settings ” tab:
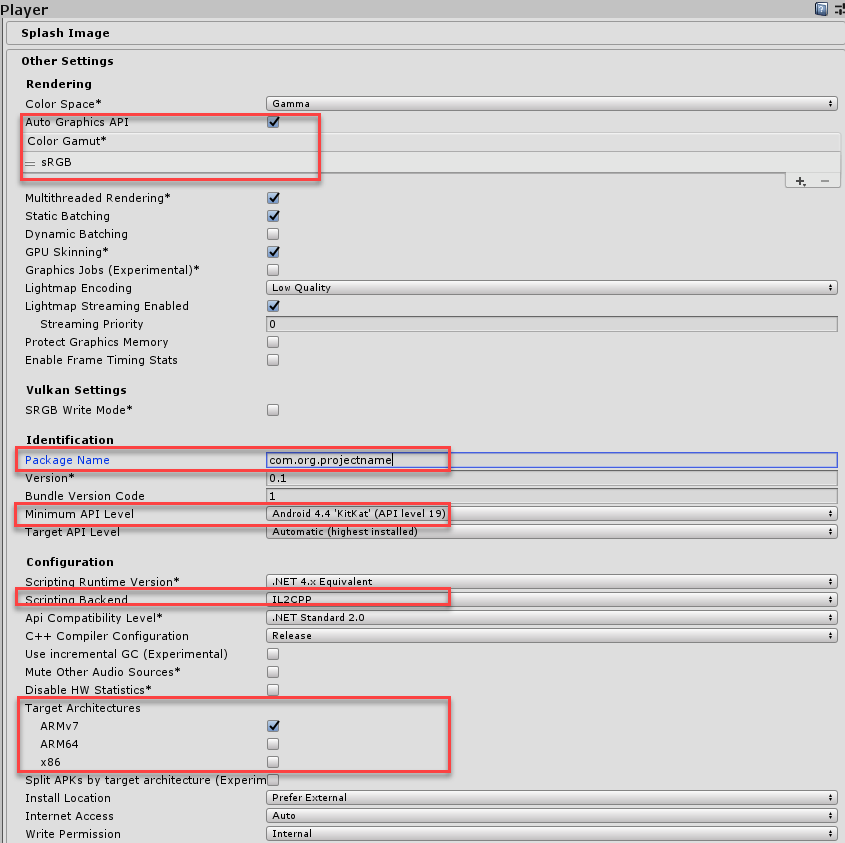
I’ve highlighted some of the most common settings you’ll need to configure for your target devices, although mileage will vary depending on what you want to support:
- Graphics API – Best to leave on automatic, just be aware some graphic api’s are not available on some devices if you configure this manually
- Package name – You must configure this or Unity will complain, just keep to the same naming standard
_ com.<organisation name>.<project name> _
Don’t worry, no one checks this except the store you are publishing to. - Minimum API level – Keep to the lowest supported by the devices you want to target. 19 should be good enough for most. Higher values will limit the devices you can deploy to.
- Scripting backend – with Unity’s move to IL2CPP, I recommend updating this if it’s set to Mono (unless you have compatibility issues with your project running on IL2CPP)
- Target Architecture – Try to limit which builds you select here, especially if you don’t want to wait for Unity to build the project multiple times. Especially in test, only select 1 (ARMv7 is a good default for most modern devices)
Tinker and play with the rest, but it should not affect development much (except permissions). You will have to review this as you go to publish, but that is tomorrows problem :D.
##
- Using the Android ADB tool

Once you can actually produce a Unity build and deploy to a device, it is time to get acquainted with the base Google tool(s) used to manage your device.
You can read/watch many tutorials, but the only tool (outside of Unity) that you will need to use is the Google ADB tool and in that, only 2 commands at most really.
– Setup a path to the ADB tool
First, you’ll need to set up a PATH on your PC to enable you to use the ADB tool anywhere using the installation path for your Android SDK, simply follow the instructions here for updating the PATH environment variable on your PC using the relevant location from the selection below:
- Unity Installation path –
“<drive>:\Program Files\Unity\<version>\Editor\Data\PlaybackEngines\AndroidPlayer\SDK\Plaform-Tools” - Microsoft Android install –
“<drive>:\Android\AndroidSDK\Platform-Tools” - Google SDK install-
“(wherever you installed google tools)\Platform-Tools”
I also recommend setting up a Command-Line (CMD) shortcut on your desktop that “Starts in” the above folder, to also give you quick access to the tool.
– using the ADB tool
Once the ADB tool is accessible, the two main commands you are going to use are:
- adb install <filename>
First, you’ll want to instal your builds (.apk files) to your device when it’s connected. The install command does this and with also auto-upgrade the installed program first. If the install fails for whatever reason, try uninstalling it (below) first and then retrying it. - adb uninstall <project namespace>
Unlike the install command which only takes a filename, Uninstall needs the namespace for the app you installed.
Simply run it and if it finds an app installed with that namespace, it’ll be gone (beware, this also applies to system apps!). If it can’t find it, then it will simply error.
You can do more with the adb tool, including getting logging information, getting device statistics and killing the services used by adb (useful when Unity crashes and you don’t want to reboot).
To learn more about the ADB tool, use the following command to see everything it does:
adb /?
But in all honesty, the only two I use are the Install and Uninstall commands.
##
- Installing Unity Logcat (preview)

Before Unity released this preview tool, the only way to get information from the device was using the “adb logcat” command. This did give you output but it was very heavy, it was raw text and almost unintelligible to the untrained eye. For a long time, this was all we had (without going down the paid tools route), thankfully Unity built (or bought?) a handy UI for the default adb logcat information.
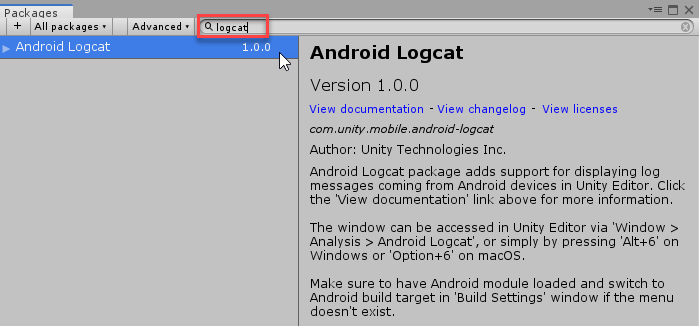
To install this tool, you will need to open the Unity Package Manager window (Window -> Package Manager) and enable the Advanced -> Show Preview Packages option as shown below:

This will enable you to see all the packages that the Package Manager has been scoped to see. To find logcat, it is best to simply type “ logcat ” into the search area in the top right and select the package to install.
And that’s it. Once installed, every time you now run an Android build from Unity, the logcat viewer will appear and connect to the device (assuming you have selected a “Development” build in the Build Settings Window looking like this:

This shows a nice graphically formatted view of the raw logcat data with Yellow text for warnings (albeit hard to read) and nice Red for errors. You can also filter the data by process, e.g. Unity, Android or your project itself.
##
- Hooking up Android to Visual Studio

Debug info and logs are all well and good, but at some point, you are going to want to step through your code (or spend endless hours pasting in debug log messages). Thankfully this is still possible, although a little tricky at times.
First off, you will need to ensure your build is set up as a development build and enable script debugging in the Build Settings window (File -> Build Settings), as shown below:
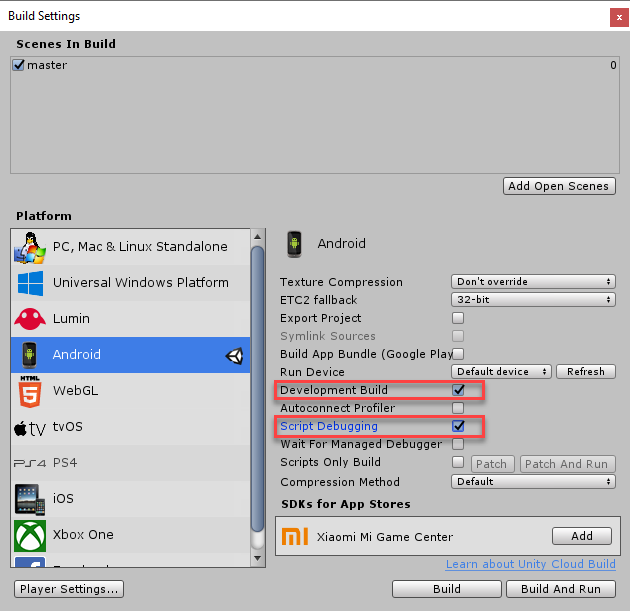
With these set, once you run the project on a device connected to the PC (although WiFi debugging is available, I still recommend doing this connected to your PC via USB) it will enable the Unity Debugger in the project ready for Visual Studio to connect to.
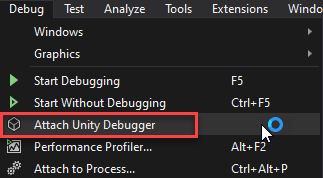
When you are ready, switch over to Visual Studio (assuming you actually have a version of Visual Studio installed) for the project (Assets -> Open C# Project) to see the latest state of your code. Once open, you will find Unity debug options under the “ Debug ” menu item in Visual Studio as seen here:
Once clicked, you will be presented with a new window listing all the Unity debugging instances available:
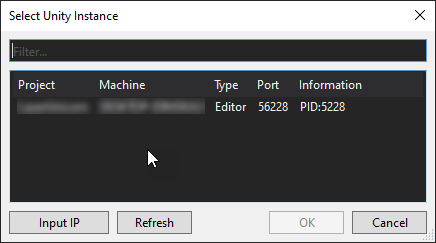
If you do not see an instance for your project yet, do not fret. Just check the device is plugged into your PC and the project has actually started, the instance won’t show up until your Unity project is at least past the Unity splashscreen.
Once it’s started, Visual Studio will be hooked up and running, allowing you to set breakpoints and walk through your code as normal.
If you need to attach Visual Studio while your project is starting up, you have two options:
- Select the “ Wait for managed debugger ” option in the Build Settings window. Although in my experience, this almost never works.
- BE QUICK , Use the “Attach Unity Debugger” menu item in Visual Studio to bring up the Unity instance selection window. When the Instance for your project shows up, open it straight away.
This will take some practice in the timing, as you can attach too soon and it will miss the hook when the Unity project starts on the device, I usually give it between 0.5 seconds and 1 second from when it appears, but this will vary depending on the speed of the device. Be patient, it will work (provided you remembered to also set a breakpoint on start, else you’ll need to try again 😀 )
In conclusion
Things are a little trickier when the Unity editor cannot connect to a platform, such as with Android, but everything is still possible.
(Subtle note, the experience is the same with ARM platforms, such as those on the Microsoft HoloLens)
A lot of the above is based on timing, being ready and building your experiences with the Android platform for Unity projects.
There are probably a ton of other tips I can pass on but this article is long enough already. The biggest being about Android manifests for multiple devices, which is an entire other article on its own.
For now, try to enjoy your Android journey, especially if it is with the Oculus Quest device and ensure you have a lot of hot drinks available, as well as a fresh supply of goodies while you wait for those many many builds to complete and push to the device to test.