Going cross-platform with MonoGame
View on GitHub
TL;DR -> Today, cross-platform projects are easy to setup (except UWP), with .NET7, it gets easier. Read the article for the How-to!
Most Game projects when built are solely for a single platform, usually the same as the development machine they are being built upon. Only later does the idea surface to maybe ship to another console, handheld or platform which then highlights issues in the games implementation that can lead to issues.
You CAN just build and ship to one platform, there is no issue with that, but if you are possibly considering more than one, plan ahead!
- Choosing your path
- Sharing the code
- Interfaces are your friend
- Code first for platforms
- Shared content
- Handling multiple content types
- Building the project with DotNet commands
Choosing your path
If you create a MonoGame project for a single platform, you get a single project with a single content project, life is simple and your concerns are light.
Once you consider adding another platform, there are a few considerations to take into account, namely:
- How to share code that is common between all platforms.
- How to structure code that is common (e.g. achievements) but have different implementations on different platforms (e.g. Steam, Xbox, etc)
- How to manage code specific to platforms.
- How to share content that is common between all platforms.
- How to structure content specific to a platform.
- Do I also need to consider multiple styles per-device (high-res, low res), but granted this is also a consideration for single-platform games.
- Will I have enough hot beverages and snacks to keep my mind at ease through all this stress.
- Cats, if not my own, the neighbour’s cat will wander in and steal all my code.
Granted the last is a bit of a fringe case but very dramatic when it happens, and for reference, this never happens with dogs as they just want to cuddle your feet or sit in your lap. “Just say’in”.
It can seem a lot to take in, but let us walk through the major points step by step and then walk through generating our project (Click here to skip ahead if you like)
Sharing the code

No one likes to write the same code twice, let alone, keep writing it or copying it multiple times across multiple projects, so when you are planning for multi-platform games, you need to identify any and all code which will be the same across all the projects (which is usually about 90% of your code) and then find a pattern that works for you to ensure you write it once, no matter the platform it is running on.
When it comes to sharing code, there are three patterns to consider, each with their pro’s and con’s:
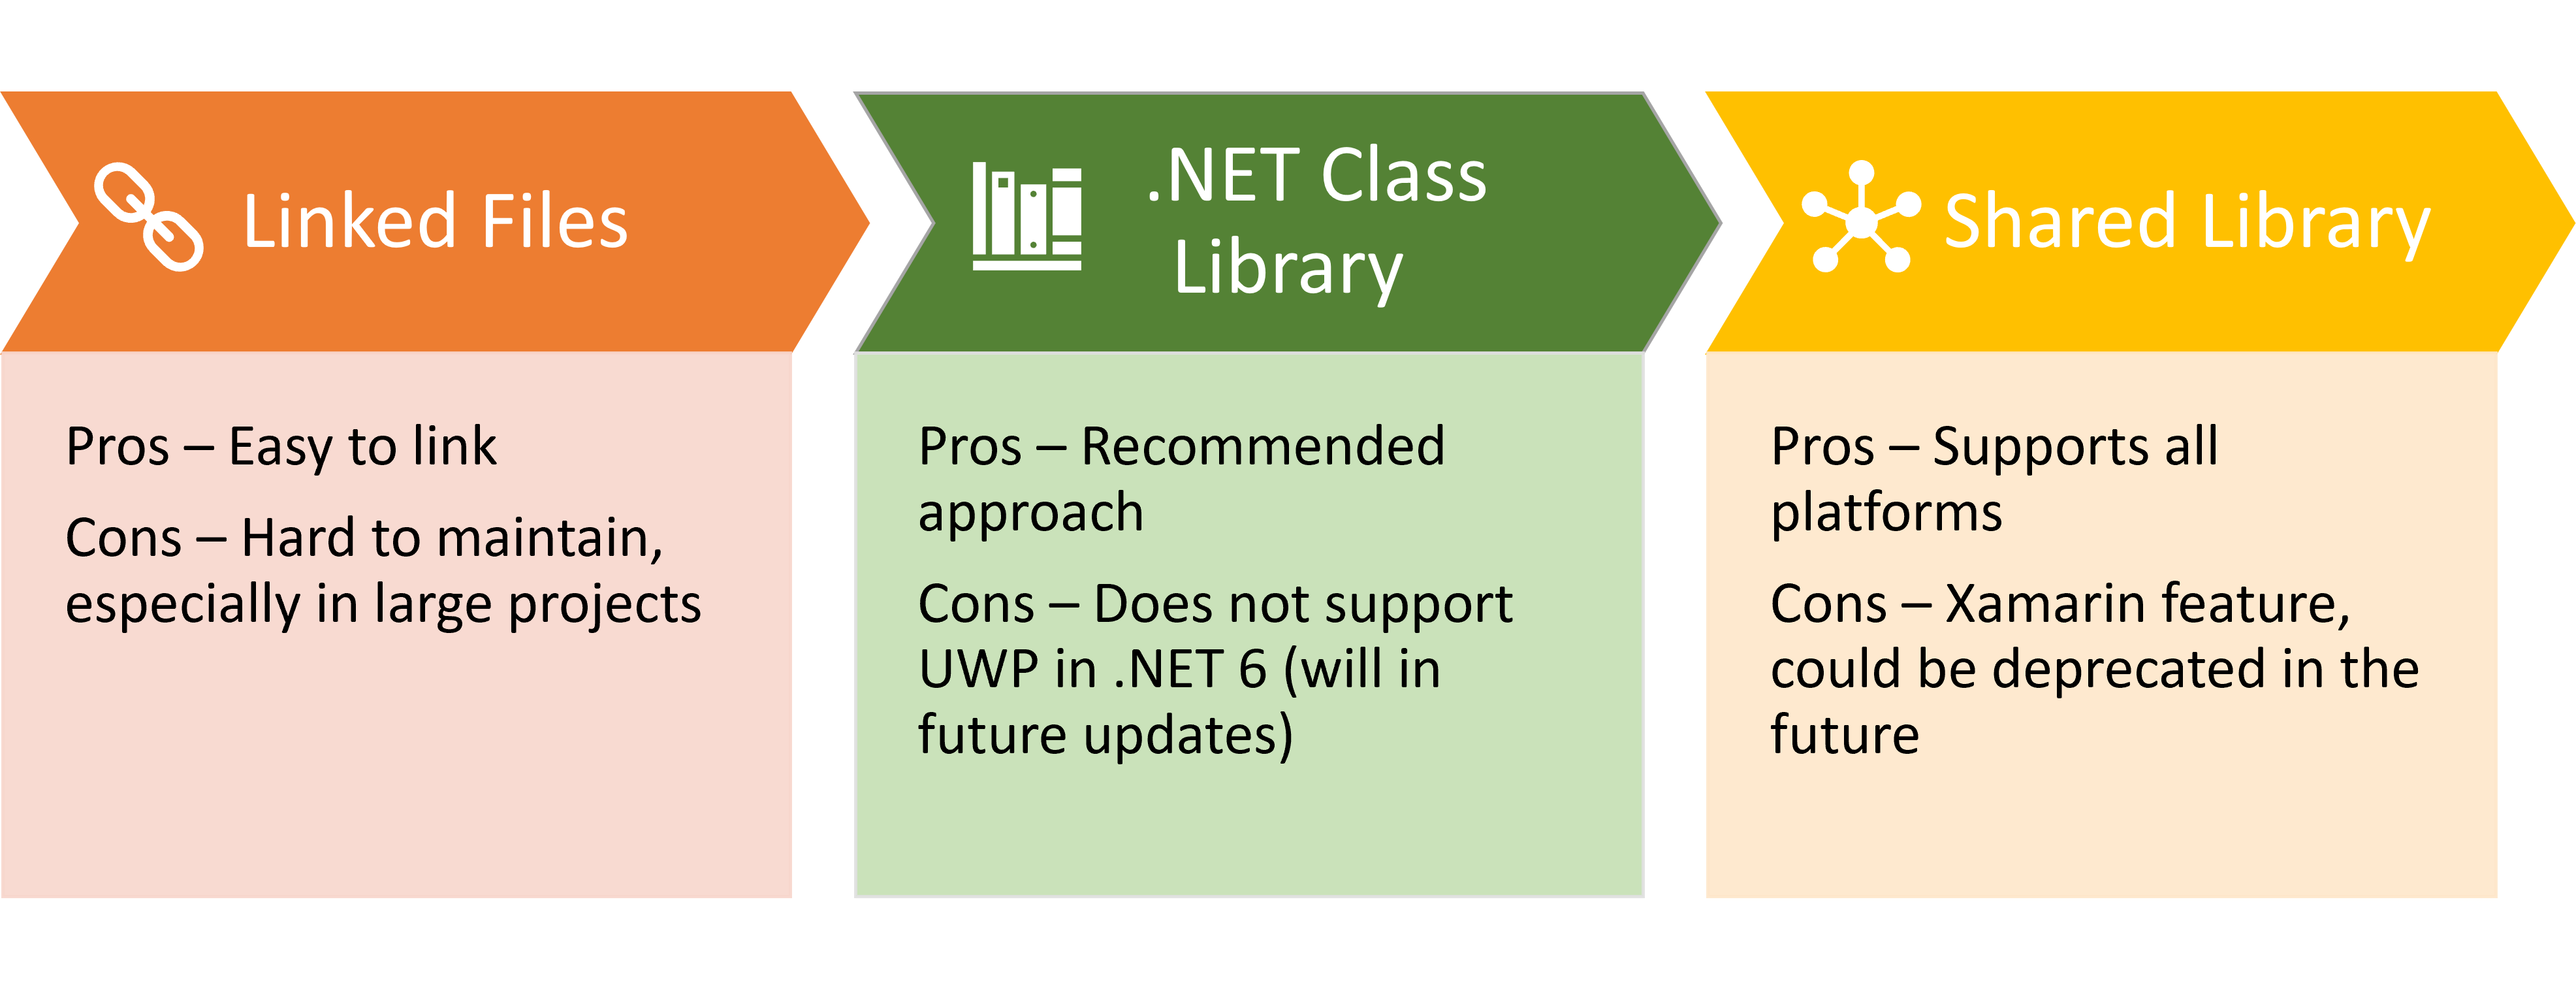
Each of the options are easy to implement and run with, although Linked Files can become harder to manage the larger your project becomes, essentially because when you add a new class file, you have to remember to manually add it to all projects (or write a script to do so).
I Recommended to use a .NET Shared library for now unless you need UWP (Windows 10/11/Xbox Xaml), then use a shared library for now until the .Net8 upgrade.
.NET Class Library (Recommended)
The recommended approach is to create a .NET class library and add a reference to that project to all your MonoGame projects, which is a quick and easy task. MonoGame even provides you with a project template specifically for MonoGame shared code.
*Note if you look at the references in the MonoGame Class Library project you will see the “DesktopGL” MonoGame reference. You can ignore this as it is just a shim, this is ignored when the project is built and the proper MonoGame DLL from your Game project is used instead. This is some magical wizardry performed by DotNEt during the build, much like the older MonoGame.Portable projects used to do.
To add a class library to an existing MonoGame project (assuming you have not created a Solution file already) is as follows:
Assuming you have a folder containing your MonoGame Project, e.g. MyGame -> MyGame.DesktopGL, while in the MyGame folder.
dotnet new sln -n MyGame
dotnet new mglib -o MyGame.SharedCode
dotnet sln MyGame.sln add MyGame.DesktopGL\MyGame.DesktopGL.csproj
dotnet sln MyGame.sln add MyGame.SharedCode\MyGame.SharedCode.csproj
dotnet add MyGame.DesktopGL\MyGame.DesktopGL.csproj reference MyGame.SharedCode\MyGame.SharedCode.csproj
Which creates a new solution file, adds your existing MonoGame project to it, generates a new MonoGame class library and adds that to both the solution and as a reference to your existing MonoGame project.
Alternatively, in Visual studio, simply:
- Add a new project to your solution.
- Select the MonoGame class library template.
- Right-click the references node in your Game Project and select a “Project Reference” for the new Class Library.
Repeat the last step for any additional MonoGame platform projects (just adding the reference) and all your projects now share the same codebase. Any code you add to the Class Library project are instantly accessible to all platforms and will be compiled with all platforms (and if any issues show up, it will instantly tell you).
P.S. Did you know you are NOT limited to just one class library, like content projects, you can have as many as you like if you prefer to also break up your code.
Adding a linked file
First make sure the folder containing the linked code is located relative to the MonoGame projects you are sharing it with (usually all at the same level, e.g. MG Project 1, MG Project 2, SHared Code). This helps maintain the consistency of the code and links for your project.
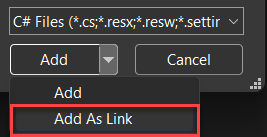
Due to the lack of support for automatically adding linked files using the DotNet CLI tool, it is recommended to use Visual Studio (any edition, including community) to create and manage the links, to do this in Visual Studio you can right-click in the Solution Explorer to add an existing file (Add existing item), then instead of just clicking the “Add” button (which will copy the file), click the drop-down on the button and select “Add as Link” as shown below:
You will need to repeat this process for every class file you add to the shared folder and make sure to add it to each project. Usually, if you choose this path, I recommend building a batch script to do it for you. You will also have to perform this task when removing files.
To link files without Visual Studio, we need a PowerShell script to edit the csproj project definition and add the required XML for the linked file, the script I use is as follows:
# usage: .\Add-LinkedFile.ps1 -SourceProjectPath MyProject.csproj -LinkedFilePath ../Shared/mysharedclass.cs -LinkedFileName Shared/mysharedclass.cs -BuildAction Compile

# output: <ItemGroup><Compile Include="../Shared/mysharedclass.cs"><Link>Shared/mysharedclass.cs</Link></Compile></ItemGroup>
param(
    [Parameter(Mandatory=$true)][string] $SourceProjectPath,
    [Parameter(Mandatory=$true)][string] $LinkedFilePath,
    [Parameter(Mandatory=$true)][string] $LinkedFileName,
    [Parameter(Mandatory=$true)][string] $BuildAction
)

$sourceProject = [xml](Get-Content $SourceProjectPath)
$linkedFileRelativePath = (Resolve-Path -Path $LinkedFilePath -Relative)

$itemGroup = $sourceProject.CreateElement('ItemGroup')
$sourceProject.Project.AppendChild($itemGroup)

$linkedFile = $sourceProject.CreateElement($BuildAction)
$linkedFile.SetAttribute('Include', $linkedFileRelativePath)
$itemGroup.AppendChild($linkedFile)

$link = $sourceProject.CreateElement('Link')
$link.InnerText = $LinkedFileName
$linkedFile.AppendChild($link)

$sourceProject.Save((Resolve-Path "$SourceProjectPath").Path)
You then simply run the script “Within the folder of the project you want to update” to update the Platforms project to reference the linked file, for example:
From the folder “MyAwesomeGame/Platforms/MyAwesomeGame.Android” (assuming you save the above script in the MyAwesomeGame folder), and your shared code is in a folder called “Shared”, also within the MyAwesomeGame folder:
../../Add-LinkedFile.ps1 -SourceProjectPath MyAwesomeGame.Android.csproj -LinkedFilePath ../../Shared/mysharedclass.cs -LinkedFileName Shared/mysharedclass.cs -BuildAction Compile
Which, if you then edit the “MyAwesomeGame.Android.csproj” file, you will see a new addition to the project, as follows:
  <ItemGroup>
    <Compile Include="../../Shared/mysharedclass.cs">
      <Link>Shared/mysharedclass.cs</Link>
    </Compile>
  </ItemGroup>
Alternatively, you can simply add the XML yourself, so long as you conform to the XML standards for the csproj specification, for example, this is also acceptable:
<ItemGroup>
    <Compile Include="../../Shared/mysharedclass.cs" Link="Shared/mysharedclass.cs" />
</ItemGroup>
In the past when I have linked files this way, I will build up the majority of the code within a single platform and then move that folder out and link the files, saves repeatedly doing this in the beginning.
Adding a Shared Library
The shared library approach is much like the Class Library approach, except it uses the MonoGame Shared Project template instead. However, you cannot add a Shared Library to your project as a reference through the DotNet command-line (as it is a Xamarin solution), it is only supported through Visual Studio.
The only advantage today of using a Shared Library instead of a class library is that it also supports UWP (windows 10/11) projects. This limitation should be removed with the upgrade to .NET 8, but at the time of writing, this support is missing from Class Libraries.
Interfaces are your friend

If you are not aware of Interfaces in the C# language, they provide an “example” of what a class “should” do for your project, and you can decide later which class that implements the interface that is used. It is a handy way of effectively swapping out which code does what, so long as each version implements the same interface (as the same public properties and methods of the interface).
In short, if I define an interface as follows:
    public interface IAchievementService
    {
        bool IsInitialized { get; }
        void Initialize();
        void UnlockAchievement(string achievementName);
    }
And then define two implementations of the interface, one for Steam and one for Xbox:
    // Steam
    public class SteamAchievementService : IAchievementService
    {
        private bool isInitialized = false;
        public bool IsInitialized => isInitialized;

        public void Initialize()
        {
            isInitialized = true;
        }

        public void UnlockAchievement(string achievementName)
        {
            // Do Steam Unlock Achievement Stuff
        }
    }

    //Xbox
    public class XboxAchievementService : IAchievementService
    {
        private bool isInitialized = false;
        public bool IsInitialized => isInitialized;

        public void Initialize()
        {
            isInitialized = true;
        }

        public void UnlockAchievement(string achievementName)
        {
            // Do Xbox Unlock Achievement Stuff
        }
    }
Finally, in your shared game project, all your code simply uses a variable for the “AchievementService”, knowing it has a property for “Initialised” and two methods to Initialise the achievement service or grant an achievement:
public IAchievementService TheAchivementService
Then in each Platform project, they simply declare which service to use, and if you want to “AT RUNTIME” you can even swap them out, the shared code is none the wiser and in fact, DOES NOT CARE which service is it using for achievements, it just uses what it is told.
Pretty neat, eh!
Summing up interfaces
Interfaces allow you to put MORE into your shared code library, letting you put either Platform specific implementations only in a single platform, or have multiple variations of an implementation available to swap out, e.g. A heavy attack or a light attack for instance. There are no limitations (other than all Concrete implementations MUST implement all the definitions in the interface).
Code first for platforms
Having shared code makes it far easier to define a specific platform’s own implementation, as it will only be contained within the platform project (as if you were building a single platform game), this includes the references and dependencies for that platform, which do not interfere with other platforms. It also means you do not need to have pre-compiler definitions scatted through your code to #IFDEF this or this. (which can become a real nightmare).
The short of the long in this case, is this:
- If the same code will run the same on all platforms, then put it in the shared library.
- If the code will ONLY EVER run on a single platform, put it in the platform project.
- If you are unsure, then use an Interface (see above) and decide later.
Shared content
It is possible to have a shared content project that is used by all projects. This is not to say it is the SAME project, but rather, at compile time, MonoGame will build the project for just that platform as a separate thing.
Originally in XNA and earlier versions of MonoGame this was possible through a separate Content Project, but with the move to DotNet and .NET6, it is a little different as we need to manually create it.
The recommendation from the MonoGame team is to use separate Content Projects for each platform, to ensure compatibility and that logos and icons specific to a platform DO NOT get mixed up. But personally, I believe there is a halfway house, where “some” content can be shared and platform specific content can still live only in the specific projects.
To create a “content project” in the new DotNet land, you can either:
- Just create a folder, move an existing “.mgcb” definition into it and effectively “link the file” as a “MonoGameContentReference” build type (which works, but you will not be able to use the mgcb editor with it as it is technically not supported).
- Create a MonoGame Class Library, add a reference to the “MonoGame Content Builder Task” dependency to it and then add the remote link (which has the advantage that the content project CAN be edited within the content project).
Handling multiple content types (High-def/low-def)
Most developers do not realise that you are NOT limited to a single content project, you can in fact have as many as you like, or alternatively, maintain separate project definitions (csproj) which are identical except they use a different content project for each.
Why would do this? Because if your project ships on multiple devices that support different resolutions, like Xbox and Mobile, the source content (albeit similar) will have different requirements, e.g. High quality 4K textures on Xbox and 1k or low-res textures on mobile (put a 4k texture on some mobiles and they will just die).
There is no hard and fast rule about which approach to take, and in fact, some developers ship BOTH types of content in a single project if it is small enough, but remember, the size of the content will affect the size of the final output, and it makes sense to keep downloads as small as possible for any platform.
The choice is yours:
- Ship all content to all platforms:
- Build out your game and swap WHICH content project gets compiled with which platform (or build, because Android)
- Have separate project definitions for each “build type” (high-def/low-def), each pointing to different content projects.
Building the project with DotNet commands

Following on from the above, what follows are the set of commands that will generate a cross-platform project with the following setup:
- A root folder for the Game Project with a Solution file.
- A folder for a class library to share common code
- A “Platforms” folder for all the individual MonoGame projects
- All references “wired up”
- Separate Content Projects for each platform (you can create a shared one later if you wish and add their references.)
Script as follows:
dotnet new sln -n MyAwesomeGame
md Shared
md Platforms

dotnet new mglib -o Shared\MyAwesomeGame.Shared
dotnet new mgandroid -o Platforms\MyAwesomeGame.Android
dotnet new mgdesktopgl -o Platforms\MyAwesomeGame.DesktopGL
dotnet new mgios -o Platforms\MyAwesomeGame.iOS
dotnet new mgwindowsdx -o Platforms\MyAwesomeGame.WindowsDX

dotnet sln MyAwesomeGame.sln add Shared\MyAwesomeGame.Shared\MyAwesomeGame.Shared.csproj
dotnet sln MyAwesomeGame.sln add Platforms\MyAwesomeGame.Android --solution-folder Platforms
dotnet sln MyAwesomeGame.sln add Platforms\MyAwesomeGame.DesktopGL --solution-folder Platforms
dotnet sln MyAwesomeGame.sln add Platforms\MyAwesomeGame.iOS --solution-folder Platforms
dotnet sln MyAwesomeGame.sln add Platforms\MyAwesomeGame.WindowsDX --solution-folder Platforms

dotnet add Platforms\MyAwesomeGame.Android\MyAwesomeGame.Android.csproj reference Shared\MyAwesomeGame.Shared
dotnet add Platforms\MyAwesomeGame.DesktopGL\MyAwesomeGame.DesktopGL.csproj reference Shared\MyAwesomeGame.Shared
dotnet add Platforms\MyAwesomeGame.iOS\MyAwesomeGame.iOS.csproj reference Shared\MyAwesomeGame.Shared
dotnet add Platforms\MyAwesomeGame.WindowsDX\MyAwesomeGame.WindowsDX.csproj reference Shared\MyAwesomeGame.Shared
Once complete, you should have a solution which looks like this:
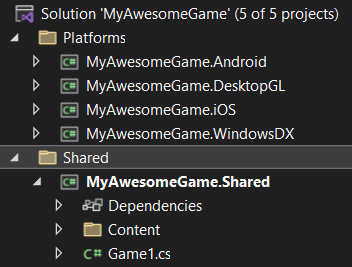
The only final changes I would make would be to either:
- Delete the Game1.cs from the class library - OR
- Remove the Game1.cs from each of the platforms and then update the respective launchers (e.g. program.cs) to start the shared Game1.cs on start.
Depends if you also want a common Game class or not to begin your game, it is up to you and there is no “wrong” answer.
Additionally, you can delete the “Content” folder from the class library as it is extremely unlikely you will use it.
Summary

Whether you build your project for a single platform, or consider the options of maximising your reach by adding more platforms to deliver to is a very important decision. It does not come without a small amount of additional risk, but the rewards mean MORE users playing your game on more platforms.
In most cases, everything will “just work”, that is the beauty of MonoGame. On occasion you will hit an issue with a dependency or service that is particular to a specific platform, which you then need to address in isolation, ideally not affecting other platforms, it is a fine balancing act.
But with shared code, your life is made that much simpler as you get to update all platforms at once with central changes, taking feedback from multiple players with different needs to wholly make your game better (or drive you to insanity with their endless demands).
Whichever path you take, I wish you well on delivering on your dreams.