MonoGame on the Web, No Really!
View on GitHub
TL;DR -> With a little effort, publishing MonoGame projects to the Web is possible, so long as you remember it is the Web and you cannot do EVERYTHING!
When it comes to GameJams, like the one mentioned in this post, pushing out the finished project as an EXE or Appx usually results in your project either getting downvoted or ignored, because who wants to infect their machine with an unknown just to test out a Jam project. This applies to most Game Engines out there that are not web-based, including MonoGame, but thankfully due to the hard work of Nikos Kastellanos (NKast) there is an option available to us.
Now you have to keep in mind, that the Web is NOT your desktop or some high-powered beast, sure, there are continual developments to make Web projects work better or support more features, but it is unlikely to match that of your modern desktops or consoles. Some things either do not work because they are too complex, others because there is insufficient support in all web browsers or devices. So long as you keep in mind the limitations (usually only found by trying to run your game in a browser), then you can truly fly.
Personally, Keep your expectations moderate. First, make your project work with the minimum, then just add more until it breaks :D. Start with the keyboard only and go from there.
- Welcome to the KNI project
- Installing the Templates
- Making a build
- What could go wrong
- Extra credit, publish to GitHub Pages
BIG thanks to NKast For the amazing work with the KNI project which offers another extended way to build MonoGame projects with some additional platforms and features!
Welcome to the KNI project
MonoGame is an awesome game development framework, made even more awesome by the growing community that surrounds it. A prime example of this is the KNI Engine made and supported by one of MonoGame’s long time supporters Nikos Kastellanos (NKast), their tireless devotion brings non-other than Web Support plus a host of other features for projects written using MonoGame.
![]()
Like MonoGame, KNI supports the Microsoft Public License for the majority of the code, with a few proprietary exceptions which are detailed in its components. KNI is free and open-source, however, maintaining and expanding the framework requires ongoing effort and resources that relies on the support of the community to continue delivering top-notch updates, features, and maintenance.
KNI Supports the same platforms that MonoGame does (because it is a fork of MonoGame) plus a few additions, which include:
- Additional Math support.
- A WPF based MonoGame Content Pipeline editor.
- Video player support.
- An improved Font Processor.
Plus a few performance tweaks for KNI based projects. Worthy of checking out!
Installing the Templates
Now, unlike base MonoGame these days, KNI does require a full Visual Studio 2022 installation, mainly to support the additional Project templates that KNI provides, these are all installed by the KNI Engine installer (much like MonoGame did before it upgraded to .NET6 in its entirety):
KNI Engine Releases - Latest (at time of writing) v3.9.9001
Like MonoGame, most of the libraries behind the templates are published on NuGet, but the Project templates (like the Web project template) still require Visual Studio to create them. (Maybe with your support this can be updated in the future!).
- Simply run and install the KniSdkSetup3.9.9001.exe to install the templates.
At the time of writing, there is a Known issue with the Visual Studio templates, which is mainly Visual Studio’s fault (honest), whereby the templates may not immediately show up and require either:
- Restarting Visual Studio a “few” times.
- Require running the command
devenv /updateConfigurationin the Visual Studio installation folder, e.g. C:\Program Files\Microsoft Visual Studio\2022\Community\Common7\IDE.If your User Profile is not in the default
C:\Usersfolder, you might also have to check/update your Visual Studio “locations” setup and move/copy the installed templates there:Just be sure to run the above
devenv /updateConfigurationcommand AFTER moving them to update Visual Studio.
Maybe with your support, this situation can be improved. All it takes is a little support. But once you are working, you can be ready to fly.
Making a build
With the templates installed and everything ready, you should have access to the new KNI templates, and for this article more importantly, the KNI Web Browser Template as shown below:
Just create your new project using this template and you are already 90% of the way there:
Running the project results in a new Web Browser being launched against your local machine, ready to test and play with:
Fantastic, so what was too hard about that?
KNI Web uses Microsoft Blazor (which uses Razor files) as the backend, which is a C# compiled Web system for building web apps. It is really useful as MonoGame is C# based and Blazor is a C# based web system, it just works. Some other Web solutions for MonoGame used a cross-compiler to turn C# into JavaScript, but Blazor is just cleaner and more efficient.
Looking into the project, you should see a few subtle differences, which we should discuss, so that you don’t change anything you should not by mistake, namely:
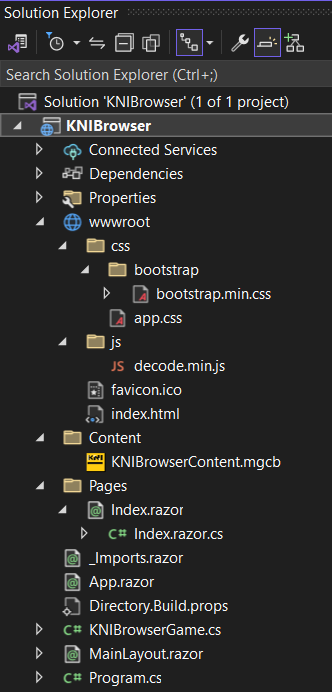
| File | Location | Description |
|---|---|---|
| Program.cs | Root | A custom version of Program.cs (like most platforms) designed for Web Builds, DO NOT TOUCH :D |
| KNIBrowserGame.cs | Root | This is basically your normal Game1.cs definition, hack away freely. But if you change the Class name, also update Index.razor.cs |
| Index.razor | Pages | This is the Razor (web) equivalent of Program.cs, it is the initialization page for the project. It defines a renderable canvas on which to draw the game. |
| Index.razor.cs | Pages (under Index.razor) | The c# code behind for the main Razor web page, this is the code initialization for the Web project |
| KNIBrowserContent.mgcb | Content | The MGCB project for the Web solution, albeit, using KNI’s own MGCB editor due to “Visual Studio” |
| wwwroot | Root | The deployable web folder for the project, unless you are a seasoned web dev, best not to touch this :D |
| !Other files | Root | Just do not touch them, mainly Razor setup files and such |
Out of the box, you should not need to change anything and the only thing you will need to keep in sync is the NAME of your Game class and the entry point in Index.razor.cs, in the same way we do for other MonoGame projects between the Game class and the Program class.
Here is a GIF of the GameState Management sample (with a few alterations) running using a KNI Web Build.

What could go wrong
Now, this is the web we are targeting and there is a lot of history and patches to make modern web browsers work, so it should come as no surprise that not EVERYTHING is going to work out of the box:
- Some features are missing, like GamePad and Touchscreen support.
- Some shaders may not work as expected, or require reduced features.
- File access can be… Tricky, pesky permissions.
To name but a few, no doubt there are more, much more. But this being an Open Source project, if you have the skills and are willing to contribute to make it better, I encourage you to do so!!.
When you do hit an issue, and more likely than not I am afraid, you will, you will see the following result when you run your project:
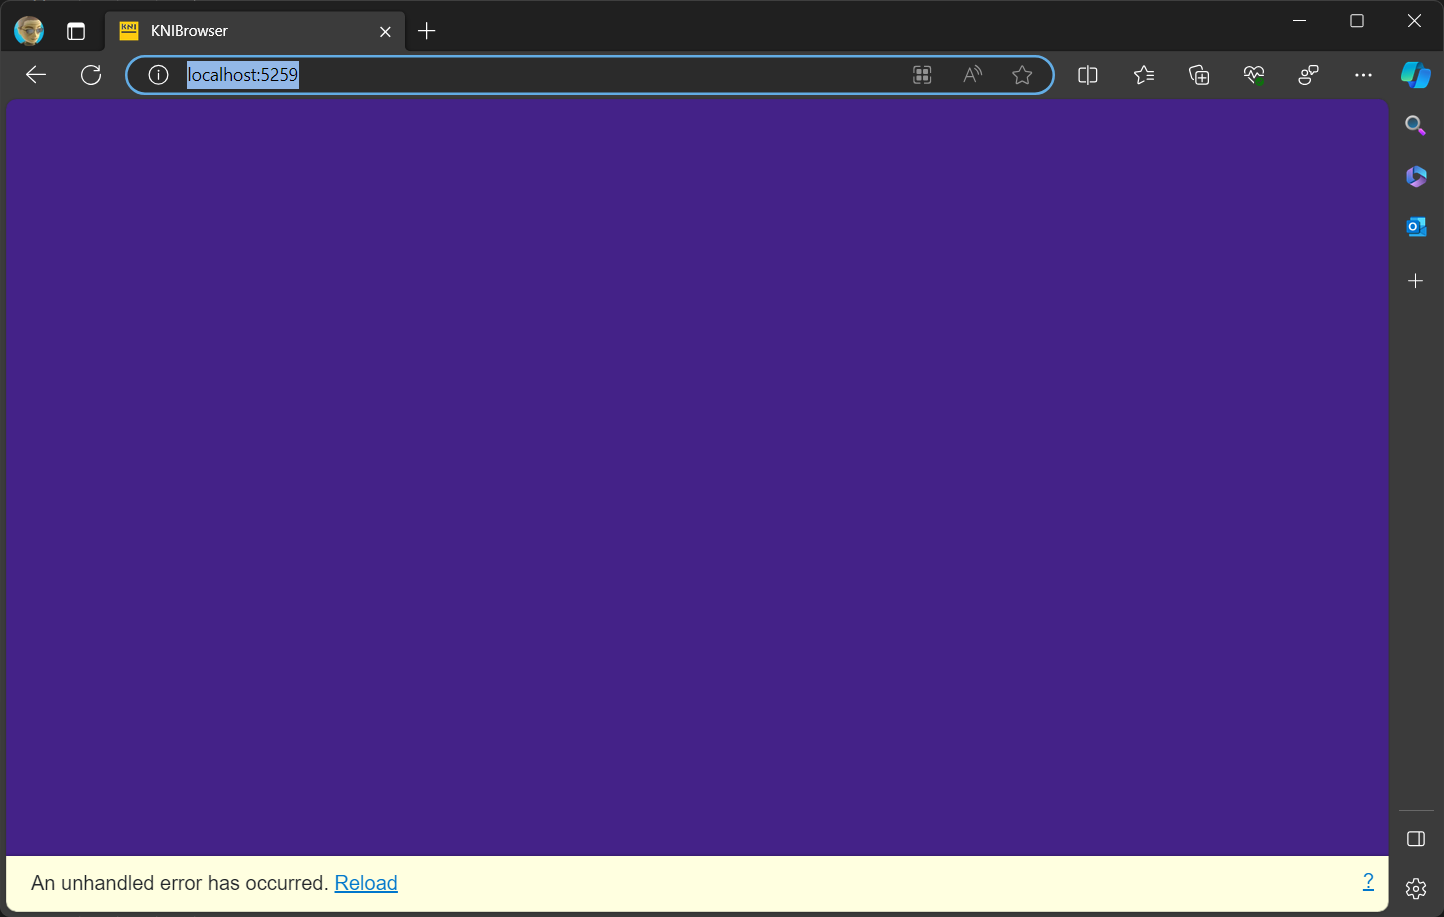
A pretty purple screen with a “Reload” option, which is not really that helpful on its own and Visual Studio is no help here really because you have left the confines of your debugger and entered “The Web Zone”!
Luckily, most browsers have an “F12” developer option, so by pressing “F12” you will get the not-so-friendly “Web Debugger” window, as shown below:
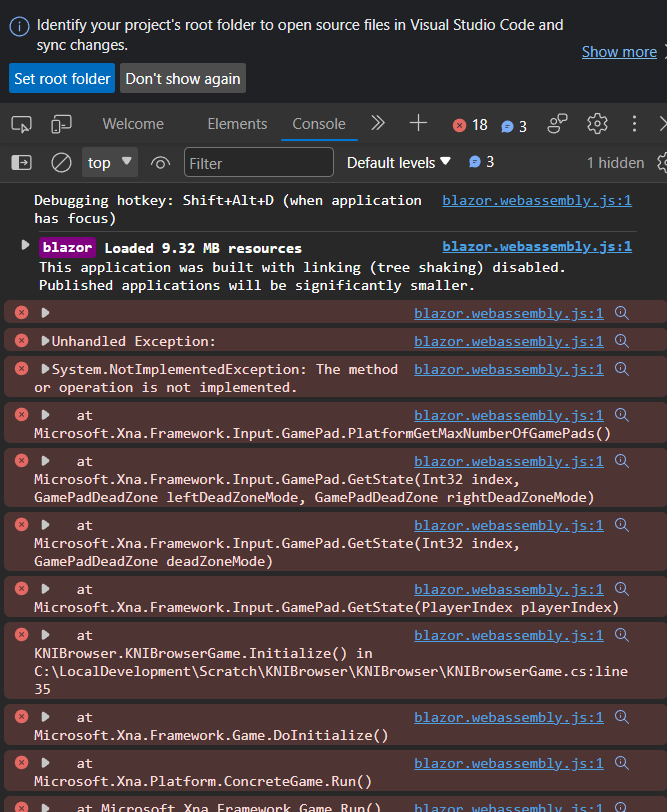
These outputs are more friendly to Web Developers (Well, I assume so?) full of lots of information to help you diagnose what is going on, in this case, the issue was simple:
The sample was using a GamePad for input and GamePads are not currently supported using the KNI Engine for the web.
If you are only doing a web project, just fix / remove the offending code, if you have a multi-platform project, then just encase the offending code with the following pre-compiler definition (#if):
#if !BLAZORGL
                CurrentGamePadStates[i] = GamePad.GetState((PlayerIndex)i);
#endif
Which will exclude the offending lines from being included in the Web Build (just make sure things still work / compile).
Feel free to experiment and play, and for those cunning individuals who are experienced in Web Development, I encourage you to help enlighten those who are not.
Extra credit, publish to GitHub Pages
Having a web build on your machine that you can view locally is all well and good, but what about everyone else? You cannot exactly ask them all to come to dinner to view your creation, what about pushing it to the web?
To get your build out there, you have a couple of options:
- Painstakingly setup a web host, build your project, connect to your host, upload your files and pray everything works. or
- Let GitHub do it for you. Hosted for free, using free time and none (well a little) of yours.
Thanks to GitHub actions (automation) and GitHub Pages (free static web hosting) we can manage the source of our project online and then create/update a build every time we push an update to source control.
To achieve this, assuming you have a GitHub repo setup and have pushed your source code to it, the tasks we need to complete are:
- Configure the permissions for automation.
- Setup GitHub pages.
- Create a GitHub Pages deployment workflow.
As easy as 1,2,3, honest.
Configure automation permissions
Because we want our automation to publish content to GitHub pages, and write back to the repository, we need to allow it to (by default, it is turned off). To do this, navigate to “Settings -> Actions -> General -> Workflow Permissions” and set the option to “Read and write permissions” as shown below:
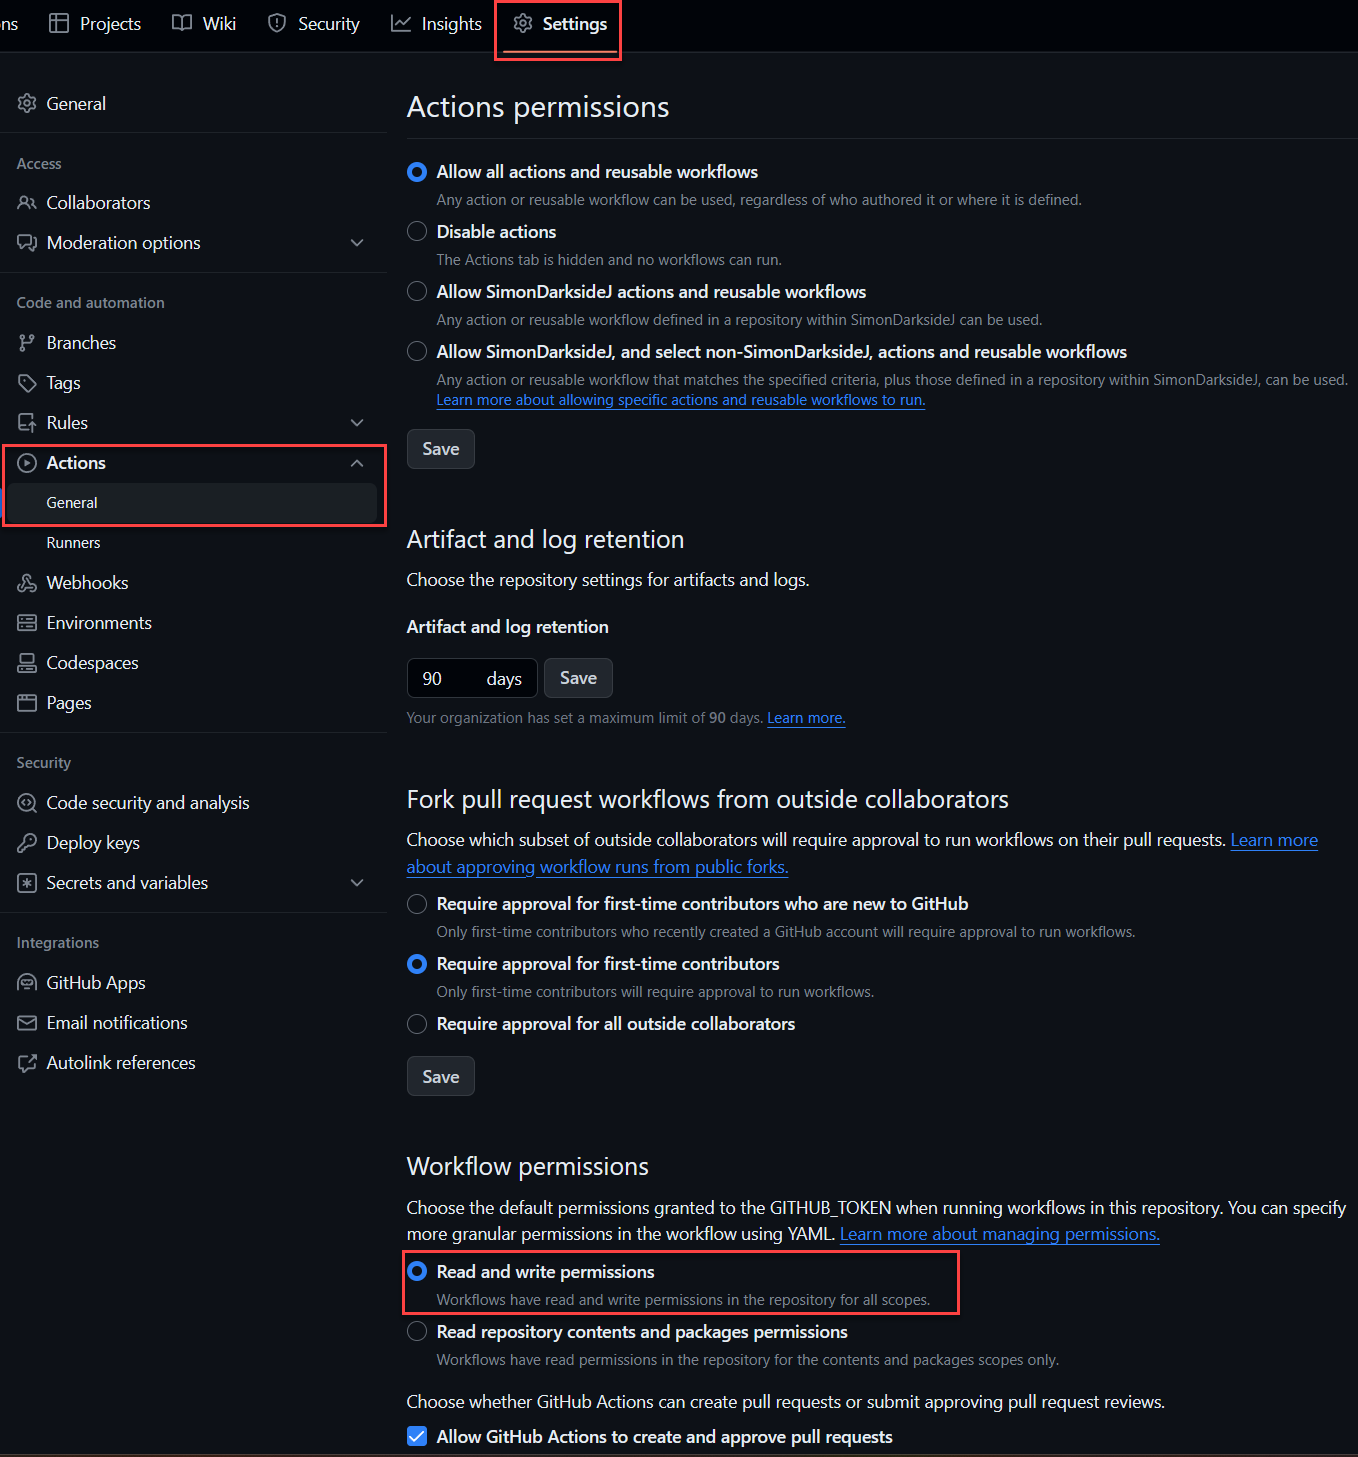
This allows the automation to publish on your behalf.
Setup GitHub Pages
Enabling GitHub pages is very simple and GitHub continually works to improve the flow to make it easier and easier.
Next, you need to:
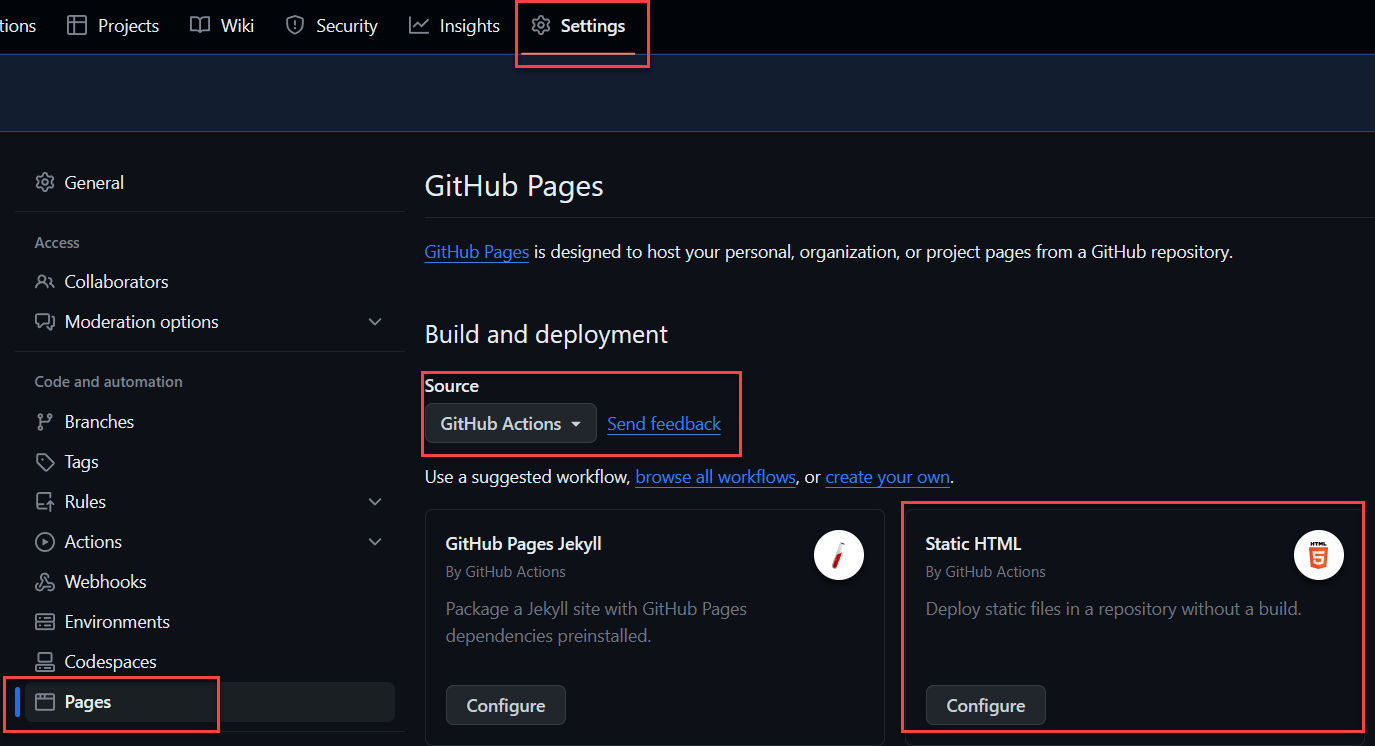
- Navigate to “Settings -> Pages”
- Change the “Source” to “GitHub Actions”
- In the selection that appears called “Static HTML”, click on the “Configure” button.
Done, there is more to do, but GitHub Pages is now setup. Now for the final and slightly trickier part, the automation workflow.
Configure your deployment workflow
Following on from the previous step, you should now see the following default workflow setup, which is close but will not build our MonoGame project.
To get the result we want, we need to add the following:
- Setup .NET 6 on the automation host.
- Build/Publish our Blazor webpage complete with our MonoGame project.
- Package the build output, not just the entire repository.
- Deploy (this is actually there, but we need to check the order)
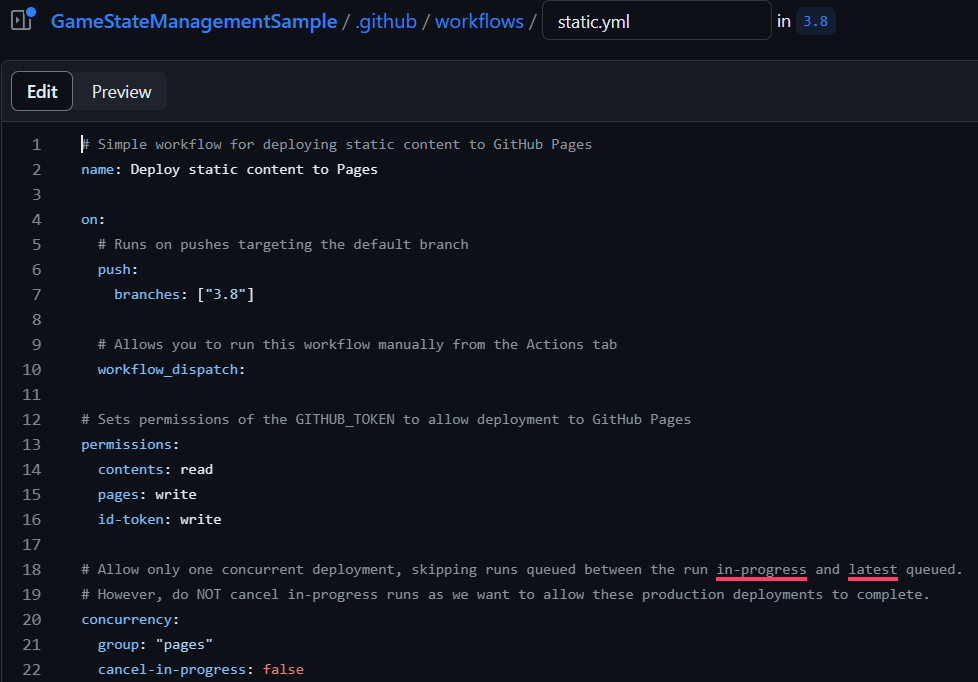
The updated YAML should be replaced with the following:
# Simple workflow for deploying static content to GitHub Pages
name: Deploy MonoGame web project to GitHub Pages

on:
  # Runs on pushes targeting the default branch
  push:
    branches: ["main"]

  # Allows you to run this workflow manually from the Actions tab
  workflow_dispatch:


# Sets permissions of the GITHUB_TOKEN to allow deployment to GitHub Pages
permissions:
  contents: read
  pages: write
  id-token: write


# Allow only one concurrent deployment, skipping runs queued between the run in-progress and latest queued.

# However, do NOT cancel in-progress runs as we want to allow these production deployments to complete.
concurrency:
  group: "pages"
  cancel-in-progress: false

jobs:
  # Single deploy job since we are just deploying
  deploy-to-github-pages:
    environment:
      name: github-pages
      url: $
    runs-on: ubuntu-latest
    steps:
      - name: Checkout
        uses: actions/checkout@v3
      - name: Setup Pages
        uses: actions/configure-pages@v3
      - name: Setup .NET Core SDK
        uses: actions/setup-dotnet@v3
        with:
          dotnet-version: 6.0.x
      - name: Publish .NET Core Project
        run: dotnet publish Platforms/Web/KNIBrowser.csproj -c Release -o release --nologo
      - name: Upload artifact
        uses: actions/upload-pages-artifact@v2
        with:
          # Upload wwwroot from publish action
          path: 'release/wwwroot'
      - name: Deploy to GitHub Pages
        id: deployment
        uses: actions/deploy-pages@v2
The critical elements to watch out for are:
- “Publish .NET Core Project” - Make sure the csproj file path is correct. In this instance it is “Platforms/Web/KNIBrowser.csproj”
- The “Upload Artifact” path, which selects the files from the build to upload. By default the “dotnet publish” command outputs to the root of the folder.
If in doubt, run the commands locally in your project folder to make sure you get the output you expect.
Click save and “Commit to main” (or create a pull request) to activate the workflow.
WARNING this will run straight away, as the workflow is activated on checking in code. But do not worry, you have 2000 minutes of FREE time on GitHub for automations.
Check the Action output
Providing everything is correct, you have put in the paths correctly and checked it DID actually build locally, then you should get the following result:

Clicking on the completed Action, you shall see the output of the Action, INCLUDING the URL that your build was actually published to:
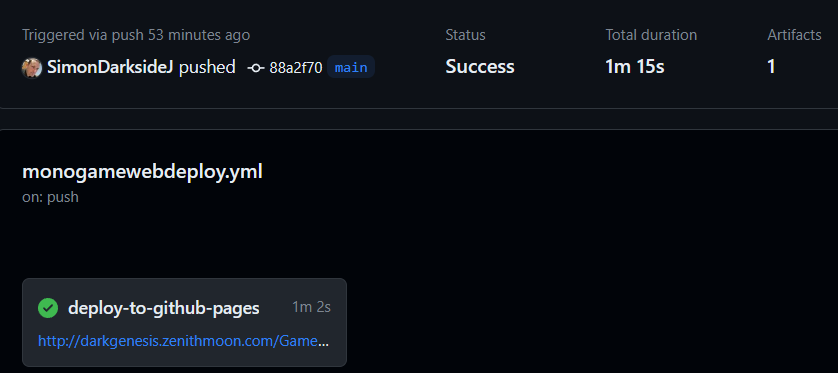
Check out my build here:
http://darkgenesis.zenithmoon.com/GameStateManagementSample-Web/
Danger Will Robinson
One issue I did hit which actually prevented my build completing, required me to edit my KNI Engine csproj file and remove a line. The line in question was:
<Import Project="$(MSBuildExtensionsPath)\MonoGame\v3.0\MonoGame.Content.Builder17.targets" />
Rather ironically, local builds will work fine and run with this in, but automated builds will not. Without it, everything is squeaky clean. (fingers crossed)
The game is afoot
We have come to the end of this little web journey, I hope others are encouraged and excited to ship your games or hack projects to the web to demonstrate your skills, especially if there is a GameJam going on :D.
Here is hoping this is a little light in the darkness to get you going!